Canvaswork, Cross Stitch, Finishing, Framing, picture framing

Back briefly

Sorry I have been AWOL for a while … all I can say is that I’ve been struggling emotionally, I guess, for a number of weeks now, and I’ve been in a bit of a ‘black fog’ for want of a better way to put it.  Anyway, I have been planning a trip back down to Melbourne for about 2 months now, but it was then put on hold indefinitely after Erin passed away until I heard about when her service would be held in NZ – as that is now likely to be the middle of January, on Monday night it was all of a sudden ‘full steam ahead’ and Katie and I started making plans once again for the trip.  It’s taken me probably until yesterday before I started feeling brighter and looking forward to the trip, but now I think it will do me the world of good … getting away from home and away from the stress and pressures of work will be great.  Of course it just may make me more homesick for Melbourne and those friends I left behind …

When I get home I think I may need to take a quick visit to the GP as well … according to my hairdresser the itchy scalp I’ve been developing over the last few weeks is likely caused by stress and upheaval, as opposed to a reaction to my conditioner … I guess my body’s trying to tell me something!  Oh well, only two weeks left and I’ll get some TLC at home when I fly over to Mum and Dad’s for Christmas – something else that I’m really looking forward to.  Recent events brings it home even more that family is really important!

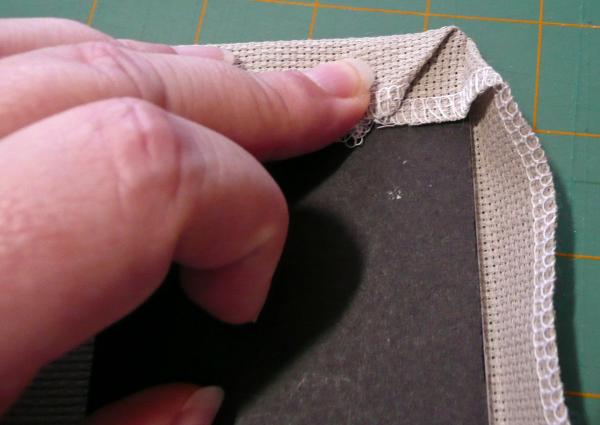
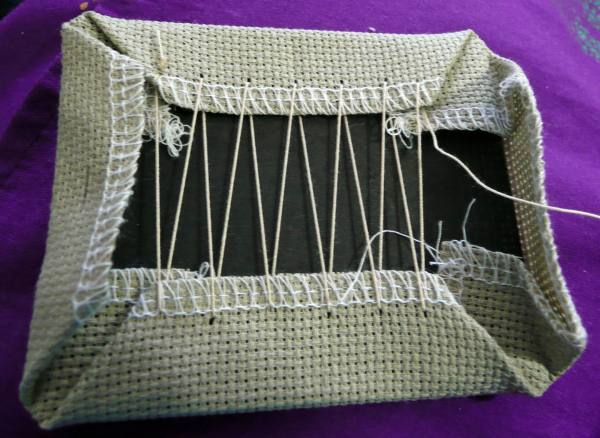
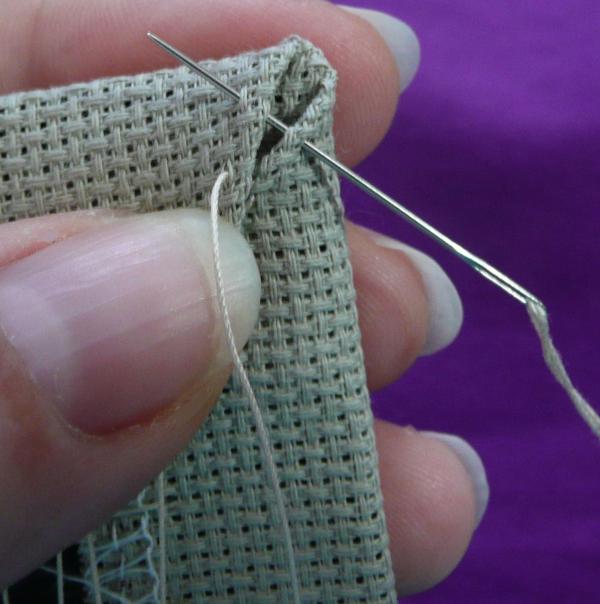
I haven’t picked up a needle for weeks now, so I guess that gives an idea of my mindset of late, as that’s super super unusual!  I did force myself to do a bit of home DIY, though, as I had a gift I needed to get ready for my trip to Melbourne.  Unfortunately other gifts still aren’t done, so I guess those’ll have to go in the post later. 

Here’s the results of my labours that I finished last night (just have to have the hooks/hangers screwed into the back):

P1020977

A framing job I did first, but in a ready-made mat and frame from Target:

P1020981

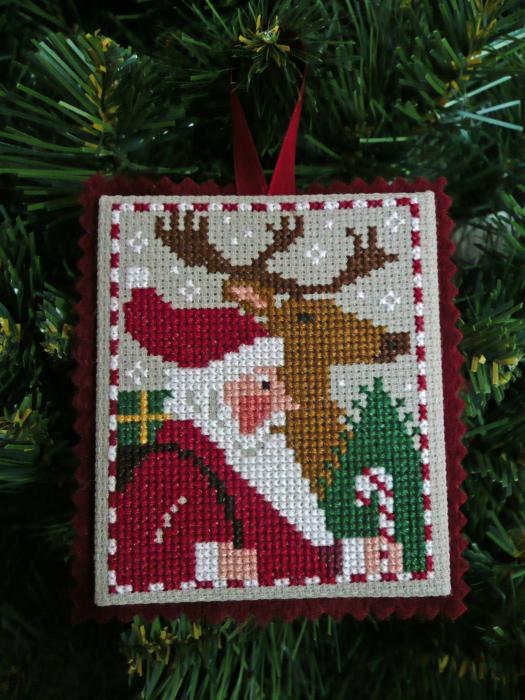
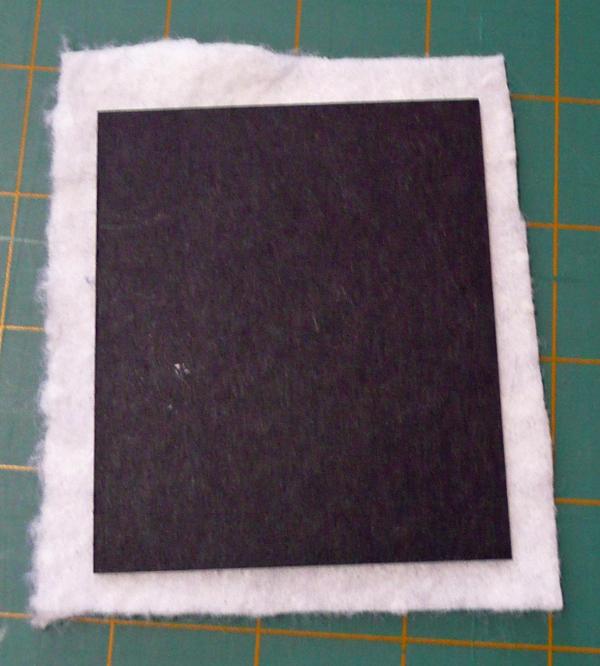
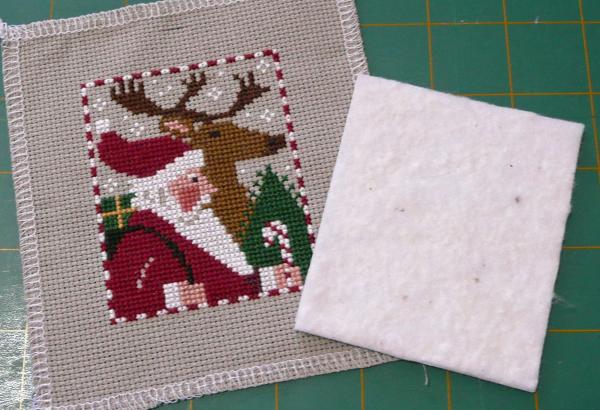
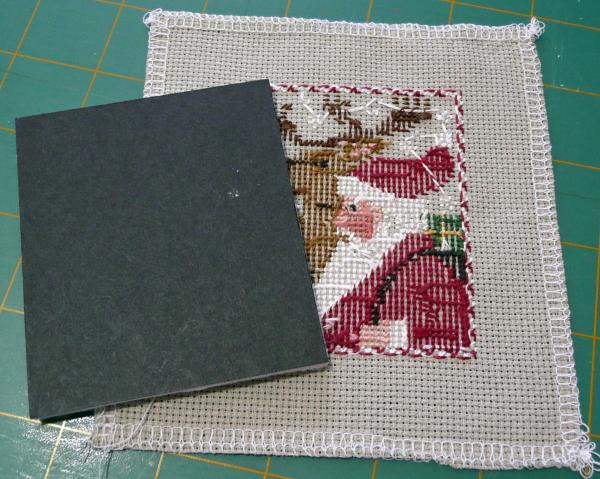
The gift I needed to get finished for this weekend (as it would be too hard to post) – this is for my ex-flatmate and friend Lisa for her birthday:

P1020982

Then this one is especially for me – LHN’s Hannah Purington, to match our lounge’s marine/blue theme):

P1020986

The piece de resistance – Graeme Ross’ Tiger … I’ve been waiting many many years to see this one framed!

P1020989

And, finally, the one frame that I cocked up a bit (this was my 2nd framing attempt) … the corner shifted slightly when I was tightening up the clamps and I didn’t notice – c’est la vie, I still love it 🙂

P1020993

These are all photos taken prior to adding the glass – I can’t believe it only cost AU$29 for 5 pieces to be cut, and the canvaswork and tiger pieces are decent sizes!  Anyway, I’m really quite proud of these for first attempts – it feels wonderful to be able to say “I did all that” … from the stitching to the mat cutting, frame making, and the actual framing itself.  I think I’ll be doing more in the future to give myself some more practice, and get some items out of the finishing pile.

Anyway, I’d better go get my packing done … it’s 8pm and I still haven’t even started yet!  Maybe there’s still a bit of reluctance hanging around under that black cloud, but I’m sure that’ll be shaken off by the morning 🙂

Boo Club, Cross Stitch, Enchanted Mermaid, Home & Family TO BE FIXED, Lizzie Kate, Mirabilia, Works in Progress

This used to be a stitching blog

This blog appears to be a photographic blog just lately, as I haven’t had the energy or the time to post an update – the only reason I have the photographic ones regularly is thanks to “post-dating”, as it means I can bulk publish for a couple of weeks, then go away and forget it! … Anyway, here’s a bit of proof that I have put the occasional stitch into fabric every now and then over the last week weeks, albeit not much!

Last weekend I had an extended weekend and had 4 days off work, and I spent the weekend housesitting on the other side of town (approx 1 & 1/2 hours drive away) for my close friends Brenda and Nigel – I had the distinct pleasure of spending the weekend with 4 furry pals … 3 cats (Comet, Ernie and Obi) and Dusty the dog (border collie).  It was really lovely having animal company again, and lovely to see B&N as we’ve been strangers for most of the year due to my ill health and being too sick to travel far.

Anyway, while I was housesitting I sat in front of the huge TV and stitched away while working my way through B&N’s DVD’s and episodes of The Mentalist and ER that I’d missed.  The main result of that was that I completed all of the stitching of Lizzie*Kate’s Boo Club – now all I need to do is attach some buttons, but that won’t be happening any time soon.  I changed loads of threads in this piece, substituting for those I didn’t have in my stash … when I publish the final finished piccie with the buttons, I’ll add all the substitution details, along with the fabric etc 🙂

I also finished off the back of a little piece of gift stitching that I’ve been meaning to finish for the last two years – I wanted to personalise the back a little bit, which I’ve now done … and now I just have to put it all together – once it’s been received I’ll show a piccie (although I still have to finish-finish it, so don’t hold your breath LOL).

Over the last week I’ve had precious little stitching time, and this week will be even worse!  This is as far as I’ve managed to get with Mirabilia’s Enchanted Mermaid … I think it’ll be an entire month stitching up one rotation slot of 10 hours stitching!  I wish I’d hurry up, ‘cos she looks distinctly creepy to me right now!

Mirabilia-Enchanted Mermaid WIP 22Nov09

This week, though, my time will be focused on the following:

60s tunic top sewing

Yes, Mum, here’s proof that I’m actually doing some sewing … clothing sewing … on the sewing machine … for real!!!  And as you can see, I’m even following my training and measuring from the side of the fabric to ensure that I’m following the grain of the fabric correctly!  Ha, I guess those gruelling hours of being lectured about how to do things ‘properly’ really did sink in!  I haven’t sewn clothes for over 20 years, so I’m incredibly nervous and reluctant about all this, but I did make a calico ‘dummy’ test to check the pattern, and I’ve been able to adjust the sides to fit semi-OK. 

This outfit is for our work Christmas party which is this coming Friday – I’ve only just decided very last minute (aka this weekend) that I’d give it a go to dress up … unfortunately being a fatty boomba it makes it really difficult to go to fancy dress shops, and op shops are just out of the question … it was even a struggle to find a dress pattern that could be adjusted to my broad rear end, and just as hard to find fabric … BUT it seems this might just work … maybe!  If nothing else, Katie is highly motivated for me to dress up along with her for the party! 😛

The theme is to dress in the decade of your birth … of course I had to be born in the decade of the mini skirt/dress, didn’t I?  As it turns out the tunic top I’d decided to make to wear over trousers doesn’t seem to look too bad as a dress, so I’ve added an extra 3″ to the bottom, and it sits marginally below the knee now – I had to let it out slightly at the hips (thank goodness for the overlocker which will hopefully still work when I try it out tomorrow night), and I had to take it in a little bit under the arms – I haven’t tried it back on again yet since making the adjustments, but fingers crossed it’ll work out OK.  Then I’m off to buy some big black false eyelashes, and a flick-up-bob kinda wig … and I’ll make a chunky purple necklace and earrings, I think – the only problem I have is with shoes – I think knee-high boots were all the rage back then, but I don’t have any … oh well, what am I stressing for, there’s still one night of shopping left, right???!!! 😛

Anyway, time to hit the hay for the night – we’ve been sweltering in a 42C heatwave all day today and I have to say I’m a bit exhausted from the whole melting day.  It’s been a real effort just standing up in our little flat today, never mind anything else, and everything you touched around the flat was hot to the touch … even the stems of my poor ‘fresh’ lilies in their vase.  I think both Katie and I will be sleeping with the electric fans on tonight, and praying for a reprieve from the sweltering heat tomorrow, we have too much to do!

Charity, Charity Stitching

Scissor fobs for a good cause

As I mentioned yesterday, I am now selling some of my scissor fobs via an ArtFire store – I have only managed to load up about half of my stock so far (that took me all the rest of the day yesterday), so not all colours and styles are available yet.

The first ten sales will have the proceeds donated to Coral and her family, in aid of baby Timothy.

Timothy ribbon

Timothy was born on April 16th this year and diagnosed with a rare form of Juvenile Leukemia on the 1st of July. The money will be going towards Timothy’s escalating medical costs.

Please do come and support a good cause, and help me sell those first ten fobs! Just click on the ArtFire link above, or the thumbnail below, and it should take you directly to my storefront 🙂

Alternatively, if you want to make a straight-out donation, I’m happy to take any and all donations and add them to the “bucket” to send to Coral. I can accept funds via PayPal (my email is shakatak @ iinet . net . au – just remember to take the extra spaces out).

Also, if you’re able to advertise on your own blog for this good cause, I’d be really grateful – if there’s enough business generated, I may be able to offer the proceeds of more than ten fobs 🙂

Fob Thumbnail

Canvaswork, Christmas Ornaments, Cross Stitch, Finishing, The Drawn Thread

Small ornie finishing session

This week I’ve been a bit anti-social at home, rather being glued to the Ghost Trappers chat room and radio in my bedroom, so yesterday I made an effort to catch up with Katie while watching a bit of recorded TV, and decided to finish off a couple of old stitched ornies while sitting around.  The following are the results of my wee finishing session – some were stitched by Mum (those on Aida), while the others were stitched by me.

The skiing Santa was one of the first XS pieces I ever stitched many years ago – Mum accidentally took it out of its hoop frame holder, so I made it into an ornie instead 🙂

Xmas ornies 1

Xmas ornies 3

Xmas ornies 2

I still have a HUGE pile of finishing yet to be done, but I figure if I just pull a few out every now and then it will eventually get whittled down.  I’ve really lost my confidence with finishing over the last couple of years, so I think I need to just not think about it, and just do it – seems to be working so far! 😀

I also finished a pinkeep last night too, but I’m not happy with it this morning when seeing it in daylight, so I’m going to replace the ribbon used on it today, and hopefully will like the finished result a bit better.

Enchanted Mermaid, Home & Family TO BE FIXED, Mirabilia, picture framing, Works in Progress

Mixed bag of allsorts

It’s been an interesting weekend and start to the week so far … this week I’ve been totally addicted to Ghost Trappers on Facebook – I’ve been having a blast!  I actually found the game’s Wiki and have been learning more about playing, and it’s all making a heckuva lot more sense!  And I’ve been glued to the chat room and internet radio for giveaway prizes, and been exceptionally lucky to win 3 or 4 prizes … now all I need to do is transfer that luck to the Lotto draws, and I’ll be happy LOL 😉

Ghost Trappers 1

Ghost Trappers 2

I haven’t been stitching much at all – on Sunday (or Saturday night, I can’t remember now!) I managed to get the following paltry start into Mirabilia’s Enchanted Mermaid … quite pitiful, really!

Mirabilia-Enchanting Mermaid 31Oct09

What I did do, though, is to go online and order my first picture frames to give it a shot with framing myself.  This is how I’ve chosen to frame five of my stitches pieces – the biggest piece size-wise is probably Graeme Ross’ Tiger, and I’ve chosen a total of three mats for that one.  Fingers crossed the frames/mats all look OK when they arrive, and that I manage to actually put them all together!

Frame order 1 Frame order 2

Frame order 4 Frame order 5

Frame order 3

And on that note, I’d better hit the hay – I’ve been up until 1am every night this week playing and hunting ghosties on Ghost Trappers and think it’s time I hit the sheets before the haunting hour!!

I also just remembered that I need to draw the names of the scissor fob winners, so I’ll rope my friend and flatmate Katie into giving me an impartial hand in drawing names out of the proverbial hat over the next couple of days 🙂

Christmas Ornaments, Cross Stitch, Finishing, Tutorials

New tutorial for a Christmas Ornie

Unfortunately I don’t think the Just Cross Stitch ornie magazine is very clear with their finishing instructions for ‘newbies’ so I thought I’d make one up myself to help people out that haven’t done this type of fnishing before – and show just how simple it is 🙂

j0439073

CHRISTMAS ORNAMENT TUTORIAL

(the way Prairie Schooler finishes them)


Materials needed:

  • Stitched ornament
  • Felt in coordinating colour
  • Cardboard (I use matboard)
  • Batting (I prefer cotton)
  • Ribbon for hanger
  • Glue
  • Thread for lacing (I use crochet cotton or pearl cotton)

1.  Firstly measure your stitched ornie for the size that you want the cardboard to be.

2.  Next, cut out your cardboard/mattboard to the desired size. Add glue to one side of the cardboard, and place glue-side down on your batting. Even though I don’t show it in the photos, I actually smooth down the glue with a little offcut of mattboard so that the glue covers the cardboard evenly – that way you don’t feel ugly bumps on the front when it dries.

3.  Once the glue has dried, cut around the cardboard shape and cut off the excess batting (my mattboard is black on one side, it just happened to be the piece that our local framers gave me).

4.  Now it’s time to attach the stitched piece to the padded mattboard.

Turn the stitching over so the good side is facing down – place the padded mattboard padded-side down on top of the stitching.

5.  My instructions for the next part are in relation to lacing the ornie together – I’ve found that this gives a much cleaner finish on the front of the ornie, and in particular in the corners. If you don’t want to lace, you can just use glue to stick the sides down in the same way – you’ll just have to be careful that the glue doesn’t dry before you have the stitched piece nicely centred on the front.

7.  Next I start lacing – I usually start with a couple of little anchor stitches at the start, but here I used a waste-away knot first (this will be cut off later) – then you just work from one side of the ornie to the other, as you can see from the series of photos below.

8.  At this point turn the stitched piece over and check that the stitching is sitting nicely centred over the mattboard. If it’s not centred perfectly, just give it a little jiggle around until it is nicely centred.

9.  Turn the ornie back over again, and continue to lace the remaining two sides. Now I usually stitch up the mitred corners, as this really tidies up the corners and gives nice clean points.

10.  The finished version should look something like this if you’ve laced it according to my version.

11.  You now have the choice of adding your ribbon hanger now, or at the end. I always used to add my hanger at the end, but decided to try it this way for the tutorial, and have added the ribbon prior to adding the felt backing.

Cut a piece of ribbon to your preferred length – I ‘twist’ my ribbon to give it a nice loop, if you just fold it in half the ribbon doesn’t sit quite as nicely. Hopefully that makes sense, and you can see what I mean from the photos! Attach the ribbon with a couple of little stitches to attach it to the fabric – I prefer to stitch it rather than just gluing to ensure the ribbon hanger doesn’t fall off in a hurry.

12.  Next, turn your ornie over and add glue to the back – I usually use Tacky Glue and once again I use a little offcut of mattboard to spread the glue out all over the backing, but this isn’t essential. I figure this will help to keep the glue stuck down for longer than just having a little bit on the edges 🙂

13.  Now place your glued ornie down on the felt backing and ensure the felt is pressed down nice and evenly onto the glue. Then, using pinking shears, cut around the ornie shape – don’t forget to hold your ribbon hanger out of the way so it’s not accidentally lopped off!

14.  If you prefer to add your ribbon hanger at the end, this is an example of one of my older finished ornies that I completed this way 🙂

15.  And you now have a beautifully finished ornie – all you have to do is to hang it up on your (or a loved one’s) tree! 😀

I hope that’s easy enough to follow – if you have any questions, don’t hesitate to scream out and I’ll try to answer them.

Blue Monday, Cross Stitch, Just Nan, Works in Progress

Blue Monday & Just Nan Progress

First up is Sunday night’s progress on Just Nan’s Winter in the Square – this should be finished in another couple of nights, as the cross stitch is almost completed, then it just leaves the specialty stitches and backstitching to be done.  As more and more stitches get added, I’m remembering just why I fell in love with this piece in the first place 🙂

Just Nan-Winter in the Square 25Oct09

j0439073

Here is my choice for this week’s Blue Monday – this is a rustic-looking urn I found while walking around Timbertown, near Port Macquarie, NSW. Once again, I’m not sure whether I’ll continue doing this meme, but I’ll give it a go for a couple of weeks 🙂

Blue Monday

2008 06 04_0579

Cross Stitch, Scenic Sunday, Works in Progress

Scenic Sunday & WIP progress

I managed a tiny bit of stitching tonight while catching up on a bit of recorded TV – after a couple of episodes of Ghost Whisperer, Criminal Minds and City Homicide (no girlie shows for me! LOL), here is the current progress on Just Nan’s Winter in the Square – at 1am, a crappy photo as usual … and oh boy, am I looking forward to the end of all that white stitching, pretty though it is!

Just Nan-Winter in the Square

j0439073

Here is my choice for this week’s “Scenic Sunday” – Ashcombe Lavender Gardens in Melbourne, Australia … with a little touch of spring in the air.  I’m not sure how often I’ll continue with this photo meme, but I thought I’d give it a go and make a start anyway … and seeing as it’s technically Sunday, I’m posting early! 😀

DSC_0347

Scenic Sunday

Beading, Boo Club, Cross Stitch, Lizzie Kate, Works in Progress

Another round of Boo Club

My little needles have been turbo-charged over the last couple of days – and today is the first day that I’ve woken up and actually thought through all the housework that needs to be done etc … signs of this blasted bug finally getting out of my system.  While I’m still quite wheezy and trundling through the tissues, I feel much brighter within myself, and ready to start getting out of my stitching chair for more than 5 minutes at a time – yippee 😀

In the meantime I’ll leave you with a latest photo of my progress on Lizzie*Kate’s Boo Club – here are parts 1-4, which leaves me with just 9-12 to go (although in honesty I’ve almost finished part 9, with the exception of the broom handle).

LizzieKate-Boo Club 1-4

Time to put my rotation to one side briefly, though, as the final round of our Friendship Quaker RR has arrived on my doorstep so I really need to get cracking and get that one finished soon!  Mind you, I also have two little gifts that are well overdue being stitched, so those will have to be slotted in as well – oh so many things to stitch, so little time 😛

I’ll finish up with photos of a beaded fish that I made once at a class in Melbourne. I’ve never been able to take a good photo of it, but now my Panasonic Lumix has a fantastic macro setting, I thought I’d give it another shot while it was just sitting there! You probably can’t tell, but it’s hollow all the way through to the tail – I just adore this little fella …

Beaded Fish 1

Beaded Fish 2

Beaded Fish 3

I really need to get the instructions out again and brush up my beading skills so I can get these little guys out of the ‘filleted’ stage and into the finished stage, which will knock off another two UFOs! (UnFinished Objects for those of you who are searching for actual UFOs in this post) In this photo you can clearly see how the little fishies are constructed … I only hope I can work out how to do the beaded stitch once again, as it’s been quite some time since I took the class! 😀

Beaded Fish WIPs

Cross Stitch, Works in Progress

A lot of illness and not much stitching…

Unfortunately when I was finishing off my Acorn Needlebook on Saturday, I was also fighting off a viral infection/flu-bug that had been kicking me for a couple of days last week.  On Sunday it hit me full force on the side of the head, and I spent 3 full days in bed either in my bedroom or on the sofabed in the lounge – a high fever and blinding headaches as well as a beautifully phlegmy chest and nasal congestion have put paid to any major stitching on my days off work … I hate being so sick you can’t even stitch! 😦

Today, though, I finally managed to stay upright all day, albeit in my stitching chair and not wandering around.  Still feel pretty grotty, but certainly not as bad as I have over the last few days.  I did, however, manage to get a little bit of stitching in today.  I forgot to take an ‘in progress’ photo of this piece that I started weeks ago, so you can’t see the minimal stitching I’ve actually managed, but I’ve now stitched as far as I can until a skein of Crescent Colours Cocoa Bean turns up … sorry, but the photography is really bad as I had my stitching light directly over it and it’s washed the colours out really badly.

LHN-Home of a Needleworker

Then I started on my next rotation slot (WIPs/UFOs), and picked up an old UFO and added a few beads, as well as doing a spot of unstitching of the satin stitch band ‘cos I’d miscounted the last time I touched it – 1 3/4 years ago sitting on the floor of my empty flat here while I was waiting for the removalists from hell to deliver my furniture days later than planned.  This is the “before” picture, but I won’t bother taking the “after” picture yet as there’s really not much to show aside from a few beads – with luck it won’t be long before you see the finished product – the way I’m feeling, I think I won’t be doing a great deal over the weekend, just taking it easy and continuing to recuperate and recharge the batteries again …  Hopefully then I can get a better photo!

Sweetheart Tree-Wildflowers Needleroll UFO