I got halfway through this post when my PC screen fizzed and died completely … so I may be offline for a wee while until I can afford to buy a new screen. Unfortunately my laptop is totally temperamental and keeps shutting itself down (I think the hard drive is on its last legs), so I don’t know how stable it will be over the coming hours, never mind the coming weeks. Alas I’m down to the last $20 in my wallet after spending more than expected recently, so not sure how quickly I’ll get the money together (my recent stash splurges cleaned me out hmmm).
Anyway, I’d better quickly get this post finished before my laptop dies again … here is my latest finish, hot off the Qsnaps today – once again I’ve opted for a scan instead of a photo, as it’s quite dark in here. If I remember, I’ll take some ‘real’ photos later 🙂
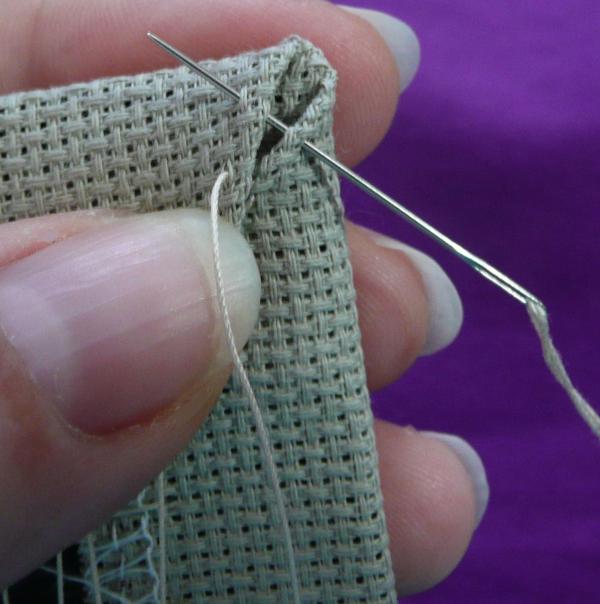
“Beyond XS #3-1 – Whipped Spider Web Rose” by The Victoria Sampler stitched on 25ct white Lugana with kit threads and charm
I’m not sure what I’ll pick up to work on next – I think I’ll try to continue having a small project or two on the go for when I’m stitching in my room, and perhaps leave my Mirabilia’s and Chatelaine’s for stitching in the lounge.
Now it’s time to jump on a website or two to price up screens so I know what I’m looking at pricewise (while my laptop is still working) – then I’ll be stash diving for a new project 🙂
Updated: Well, it appears that this morning my screen is working fine – I unplugged all the wires and put them all back in again, and it’s started up straightaway. Different to my laptop, which died in the middle of “publishing” my blog entry last night, so I couldn’t have priced up screens if I’d tried!! Fingers crossed this will keep working for a while yet – but in the meantime I’m going to print off my contacts list etc in case it does go out of action again!
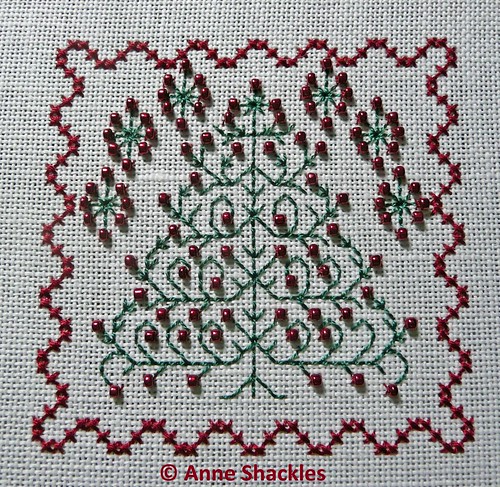
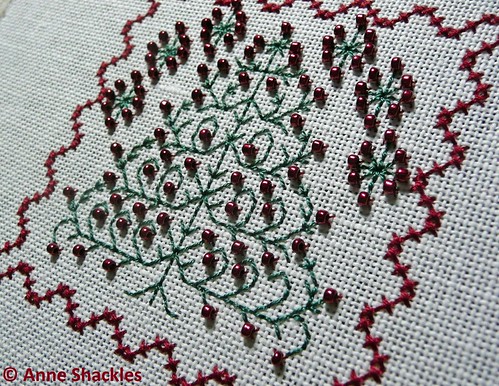
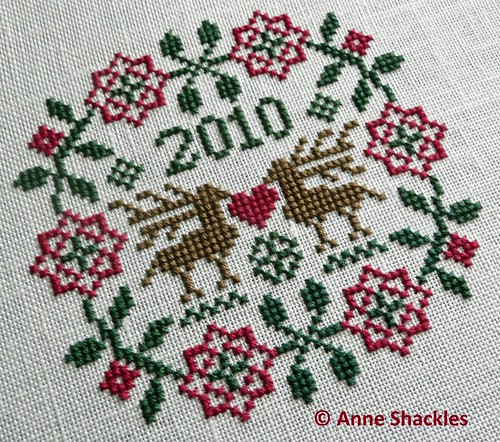
I think I may be at the end of my record-breaking run of wee finishes now … I stayed up late tonight to put the final beads onto my little ornie, making 4 finishes in as many days – woohoo! 😀
“Red Berries” by Rosewood Manor from Issue 11, December 2006, Gift of Stitching magazine
with DMC 221 and Hand Dyed Fibers premium silk “Jewel Weed”
stitched on 28ct white Cashel linen
I really should learn to take photos in daylight, instead of 11.30pm under bright light globes! It really doesn’t do this piece justice, as the beads are a beautiful metallic red. I have to admit, though, if I were to do this piece again, I would probably forget about the ‘star/snowflake’ things in the corners, as it seems a bit overcrowded and overpowering to me … but all in all I’m relatively happy with it 🙂
Now I have the quandary of what to work on next … I’m pretty keen to work on a number of projects, and the main ones that are calling me are probably the following:
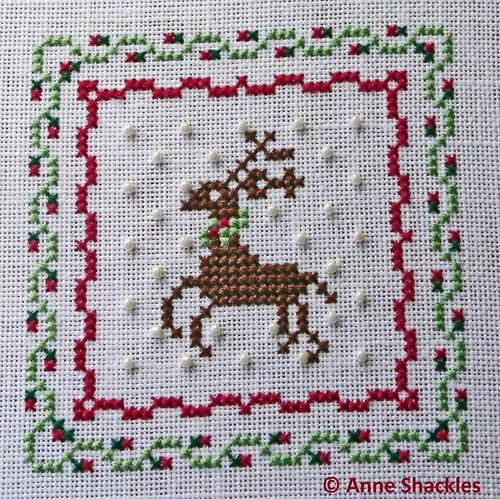
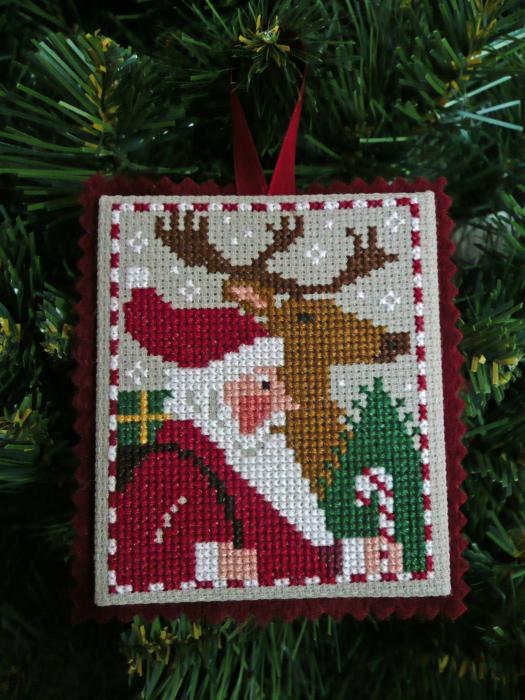
Here’s my latest wee finish – I was able to complete the stitching last night after picking up the elusive DMC 368, then I put the beads on this morning. It was supposed to be stitched 1 over 1, but I wimped out and stitched it over-two on 28ct, then just increased the bead size from 40123 to 00123 instead.
“Prancer” by JBW Designs from 2004 JCS Christmas Ornie issue
stitched on 28ct white Cashel linen
with recommended DMC and Mill Hill beads
Now I’m off to find the ever-elusive bag of beads that I’ve already lost once, then I found them last weekend and put them somewhere safe … I should have known I was in trouble at that point, as “somewhere safe” usually means the equivalent of the Bermuda Triangle … only I can lose something twice in as many weeks!!! … ho-hum
In fact, I might just hold off the search party and go and have some brunch across the road first, then I may even put together my bookcase … and then I’ll decide whether to start the search party again for my bead bag, or whether to sit in the lounge and finish off Boo! 🙂
Updated: Hmmmm, I’ve just decided to check out my camera settings to work out why all my photos seem to be washed out just lately … sure enough at some stage I’ve managed to change my exposure settings permanently … now I’ve put it back to “0” adjustment, the photos are coming out more more crisply, so I’ve re-uploaded the Prancer photos – slightly darker fabric, but definitely a lot clearer on the beading detail!
Katie and I have been hitting the lounge chairs almost as soon as we’ve walked in home at the end of each day, as we’re both a bit under the weather and really tired this week – it means we’re also now keeping on top of our TV viewing as well, and watching all our favourite shows within 24 hours of taping them … I’ve got Katie into my mindset of taping everything then watching it the next day and forwarding through the adverts … ah, bliss!
Of course all this sitting on my bottom early has meant a bit more stitching time this week … which would be great if I was stitching to my normal levels, but I’ve been stitching like an old snail this week, and it’s taken me 4 nights to complete one little ornie! Oh well, it’s better than nothing, and I have to admit it feels good to see one more kitted up finish off the pile.
“Reindeer Garden” by Threads Through Time from 2000 JCS Christmas Ornament issue
stitched on 36ct cream Edinburgh linen with DMC
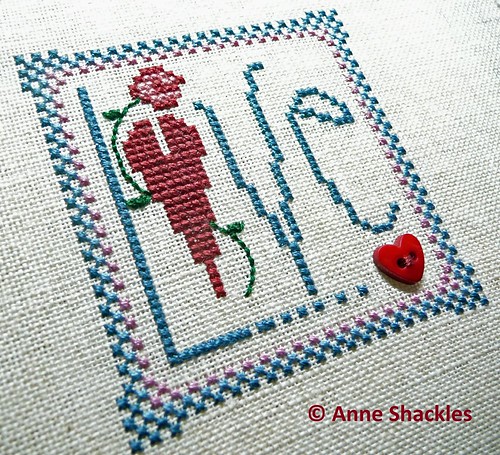
Once I’d finished Reindeer Garden, I also dragged out my Mosey n Me freebie “Love February” – I’ve never been happy with it ever since I stitched it back at the beginning of February … so I unpicked all the cream stitches and re-stitched in the pink colour, plus I was really unhappy with the green used for the rose’s stem, so out that went tonight as well, and I re-stitched the stem with a darker green. While the photo is really really washed out and bad, I’m a LOT happier with this version than the previous one, and really glad I opted to do some frog-stitching tonight! Now this one can officially join the “finished” list as well 😀
Before ……………………………………………. After
“Love February” by Mosey ‘n Me stitched on 32ct Lambswool linen in DMC
with addition of small red heart button
As it was quite late by this stage, and I need to kit up some more charts/fabrics with their actual threads, I started stitching a simple JBW Designs Christmas ornie that was already kitted up tonight … I have a busy weekend planned, though, so no guarantees it’ll get finished until early next week … unless we have another DVD marathon tomorrow night 😉
With any luck my missing thread won’t be too far away now so I can get back to stitching my canvaswork Sapphire Star … I’ve also completed all the stitching of my Periwinkle Promises January Sampler Accent, but I’ve mislaid the teeny tiny bag of blue beads, and don’t seem to have the colour in my stash (Murphy’s Law!) … once I get a replacement packet, I just need to do the backstitching around the back piece of linen, make the corner tassels, and put it all together (I’ve obviously decided to use the linen backing instead of using the fabric for something else).
And on that note I’d better get my A into G and get some of those threads kitted up so I can jump into bed and get some shut-eye, so I’m a bit fresher for more stitching tomorrow night … and of course it’s a big day at work for a change, so I guess being fresh for work won’t go amiss either 😛
It was a busy weekend – started by Friday night’s shenanigans being dressed up as a nun for the Sound of Music Sing-a-long. I only managed to get one paltry photo taken without the flash, while in the office, so it’s incredibly unflattering (like most photos of me) … anyway, it gives you an idea of how I wandered around Sydney train stations and streets for the evening. We had a blast, and really enjoyed our meal at Retro Cafe next door to the theatre before the show.
Saturday I went with Katie to my hairdressers for a MUCH needed haircut!! I had to cancel a couple of weeks ago due to my vertigo/virus. I am now thrilled to be sporting a fringe once again, along with a couple of inches off the length … woohoo!!! 😀
While we were there we also decided to go the whole hog and had a beauty session while the other person was having a haircut. I got my eyebrows shaped and had my … shock, horror … first EVER pedicure!!! Oh boy, was it lovely – I enjoyed every minute of the pampering. I’ve been a tad stressed at work fairly recently, so it was really good to chill out and do nothing for the morning. Unfortunately, though, I was so exhausted afterwards (thanks to an early morning start) I ended up having a nana nap in the early evening … which didn’t help with the evening sleeping ritual … I ended up getting back up at 10pm and continued stitching my pin pillow exchange piece!
Sunday saw me getting up relatively late, but the entire day was spent in front of the gogglebox clearing up the hard-drive and watching Medium, Ghost Whisperer, Fringe and Good News Week episodes … but I DID manage to get the final stitches into my pin pillow exchange, and made it up in the little pillow … now it’s sitting in its padded envelope waiting for a visit to the Post Office during the week 😀
After finishing my exchange piece, I started a new Christmas ornament from an old JCS issue that I’d already got kitted up from a couple of years ago – I made an OK start into that one while watching TV last night … and I’ll put a few more stitches into it tonight.
Tomorrow I’m heading off to my GP to check a few things checked out – my lightheadedness continues, unfortunately, so I’m going to ask to get my blood pressure checked out. I’ve also had really bad acid reflux over the last few months, so that’s also on the list … better to be safe than sorry, I guess! And on that note, it’s time to go get some soup for dinner and settle in front of the TV for an hour or two 🙂
At least I managed to stitch up 7 ornie sides before my sewing machine packed up … here are 6 I managed to fully complete last night – the last remaining one is for my tutorial, and I prefer to wait until the weekend when I’ll have better daylight for the photos … now I’m off to sit in front of the goggle box for an hour or two to chill out – TGIF tomorrow! 😀
PS: I should add that this isn’t all my handiwork – only the top left and top right ornaments were stitched by my own fair hand … the other four beauties were stitched by my Mum 😀
This week I’ve been a bit anti-social at home, rather being glued to the Ghost Trappers chat room and radio in my bedroom, so yesterday I made an effort to catch up with Katie while watching a bit of recorded TV, and decided to finish off a couple of old stitched ornies while sitting around. The following are the results of my wee finishing session – some were stitched by Mum (those on Aida), while the others were stitched by me.
The skiing Santa was one of the first XS pieces I ever stitched many years ago – Mum accidentally took it out of its hoop frame holder, so I made it into an ornie instead 🙂
I still have a HUGE pile of finishing yet to be done, but I figure if I just pull a few out every now and then it will eventually get whittled down. I’ve really lost my confidence with finishing over the last couple of years, so I think I need to just not think about it, and just do it – seems to be working so far! 😀
I also finished a pinkeep last night too, but I’m not happy with it this morning when seeing it in daylight, so I’m going to replace the ribbon used on it today, and hopefully will like the finished result a bit better.
Unfortunately I don’t think the Just Cross Stitch ornie magazine is very clear with their finishing instructions for ‘newbies’ so I thought I’d make one up myself to help people out that haven’t done this type of fnishing before – and show just how simple it is 🙂
CHRISTMAS ORNAMENT TUTORIAL
(the way Prairie Schooler finishes them)
Materials needed:
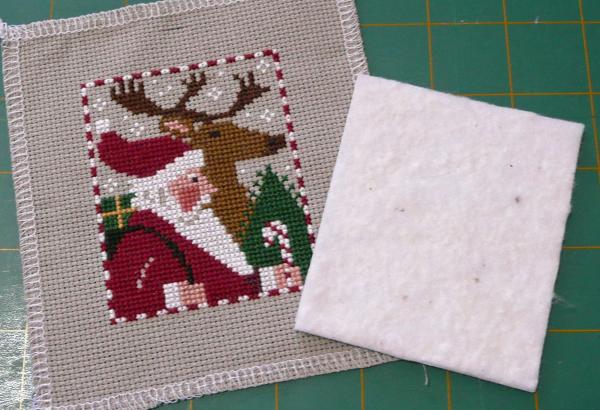
Stitched ornament
Felt in coordinating colour
Cardboard (I use matboard)
Batting (I prefer cotton)
Ribbon for hanger
Glue
Thread for lacing (I use crochet cotton or pearl cotton)
1. Firstly measure your stitched ornie for the size that you want the cardboard to be.
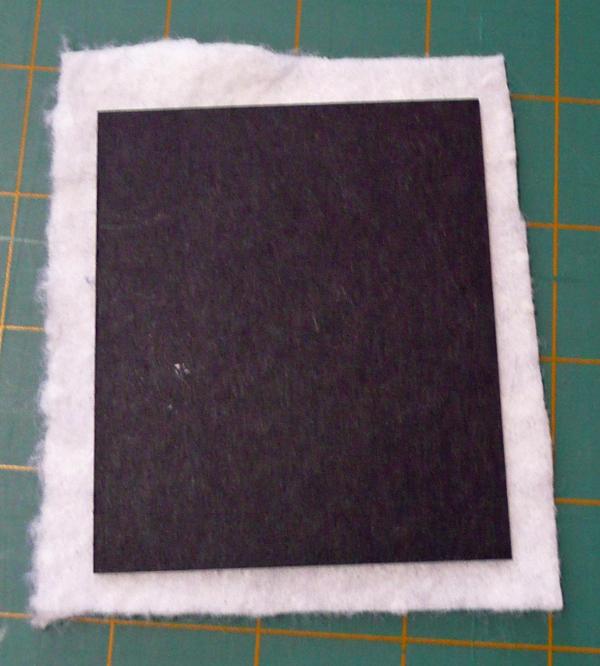
2. Next, cut out your cardboard/mattboard to the desired size. Add glue to one side of the cardboard, and place glue-side down on your batting. Even though I don’t show it in the photos, I actually smooth down the glue with a little offcut of mattboard so that the glue covers the cardboard evenly – that way you don’t feel ugly bumps on the front when it dries.
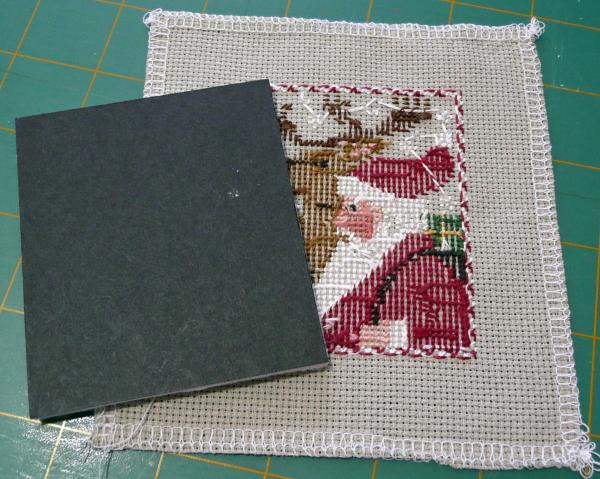
3. Once the glue has dried, cut around the cardboard shape and cut off the excess batting (my mattboard is black on one side, it just happened to be the piece that our local framers gave me).
4. Now it’s time to attach the stitched piece to the padded mattboard.
Turn the stitching over so the good side is facing down – place the padded mattboard padded-side down on top of the stitching.
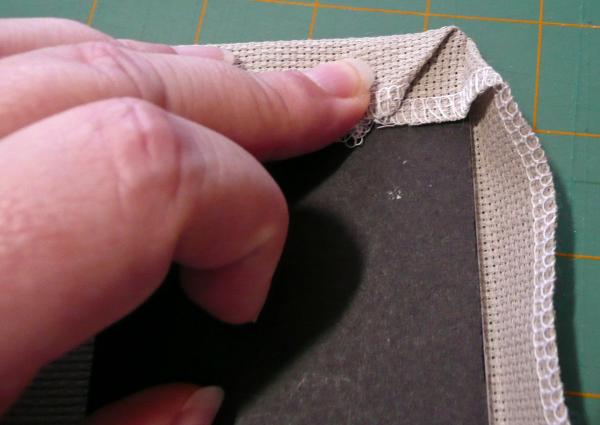
5. My instructions for the next part are in relation to lacing the ornie together – I’ve found that this gives a much cleaner finish on the front of the ornie, and in particular in the corners. If you don’t want to lace, you can just use glue to stick the sides down in the same way – you’ll just have to be careful that the glue doesn’t dry before you have the stitched piece nicely centred on the front.
7. Next I start lacing – I usually start with a couple of little anchor stitches at the start, but here I used a waste-away knot first (this will be cut off later) – then you just work from one side of the ornie to the other, as you can see from the series of photos below.
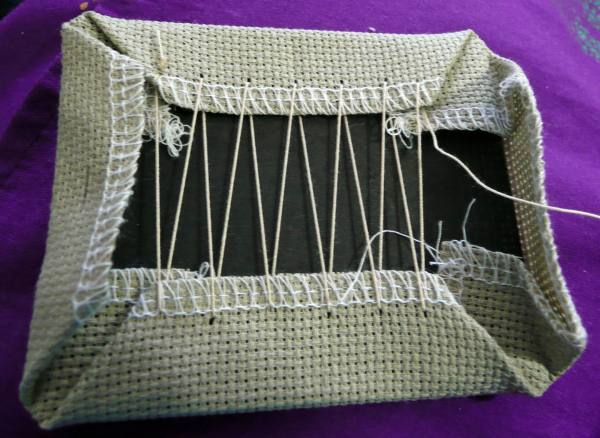
8. At this point turn the stitched piece over and check that the stitching is sitting nicely centred over the mattboard. If it’s not centred perfectly, just give it a little jiggle around until it is nicely centred.
9. Turn the ornie back over again, and continue to lace the remaining two sides. Now I usually stitch up the mitred corners, as this really tidies up the corners and gives nice clean points.
10. The finished version should look something like this if you’ve laced it according to my version.
11. You now have the choice of adding your ribbon hanger now, or at the end. I always used to add my hanger at the end, but decided to try it this way for the tutorial, and have added the ribbon prior to adding the felt backing.
Cut a piece of ribbon to your preferred length – I ‘twist’ my ribbon to give it a nice loop, if you just fold it in half the ribbon doesn’t sit quite as nicely. Hopefully that makes sense, and you can see what I mean from the photos! Attach the ribbon with a couple of little stitches to attach it to the fabric – I prefer to stitch it rather than just gluing to ensure the ribbon hanger doesn’t fall off in a hurry.
12. Next, turn your ornie over and add glue to the back – I usually use Tacky Glue and once again I use a little offcut of mattboard to spread the glue out all over the backing, but this isn’t essential. I figure this will help to keep the glue stuck down for longer than just having a little bit on the edges 🙂
13. Now place your glued ornie down on the felt backing and ensure the felt is pressed down nice and evenly onto the glue. Then, using pinking shears, cut around the ornie shape – don’t forget to hold your ribbon hanger out of the way so it’s not accidentally lopped off!
14. If you prefer to add your ribbon hanger at the end, this is an example of one of my older finished ornies that I completed this way 🙂
15. And you now have a beautifully finished ornie – all you have to do is to hang it up on your (or a loved one’s) tree! 😀
I hope that’s easy enough to follow – if you have any questions, don’t hesitate to scream out and I’ll try to answer them.
I’ve been offline most of the week thanks to feeling really crappy again during the week – this week, though, I’m making an appointment for a CT Scan for my sinuses and having some allergy tests done, so fingers crossed we can finally work out why this stupid sinus infection is hanging around for so many months and making me feel like death warmed up!
Last weekend, though, was a lovely treat for the month – I went to the Hunter Valley in NSW with Alison, Amanda and Sue for a stitching weekend away. Amanda kindly came and picked me up on Friday afternoon and chauffeured me – it was a lovely change for me, as I’m always the one driving. We arrived at about 7pm and walked into ‘our’ house to be greeted with a roaring log fire and dinner being prepped by Alison and Sue – the weekend was starting out on a blissful note already! The rest of the weekend didn’t disappoint either, it was a fantastic weekend away where we managed to combine some stitching (yes, we actually did do some), chatting, shopping, wining and dining, and I even made my very first scissor fob sale … to a lady vintner at one of my favourite vineyards up there (her white port is to die for in my opinion!). All-in-all it was a really awesome weekend, and hopefully we can make this an annual event, ‘cos I’m signing up for next year already!! Here’s a photo of our accommodation and home for the weekend, along with my fantastic company for the weekend 😀
The week before the retreat I managed to finish a little ornie stiching, and got the following ornie finished – it was supposed to be for the Yahoo group CYOO challenge, but I got a bit cranky during the month and couldn’t be bothered posting a photo on the board (and for once didn’t even bother doing the JCS monthly challenge one). I still hope to stitch an ornie a month, I just probably won’t be posting it on the board.
“Joy, Love, Peace” by JBW Designs stitched on 32ct natural Belfast linen
with WDW Garnet and GAST Dried Thyme
During the weekend retreat I managed to put a reasonable amount of stitching into Prairie Schooler’s 2005 Limited Edition Santa, and during this weekend I’ve been able to put the final stitches into it after having a marathon stitching session on Saturday. The only thing I changed is to leave out the “2005” which is stitched in Black Coffee Crescent Colours below each side of the green letter blocks, and added a couple of random snowflakes instead.
“Here Comes Santa Claus 2005” by The Prairie Schooler stitched on 28ct natural Cashel linen
with kit Crescent Colours threads
I love how the snowflakes lift off of the fabric – hard to see in the photo
Now I’m off to try to create my soon-to-be Etsy store, as I’ve also got a whole heap of scissor fobs to load up into the store. I had another beading session yesterday while Katie and I watched Supernatural Season 4 on DVD (that was after we had a few hours out at Miranda shopping centre where we saw the latest Harry Potter movie). I’ll do a separate post of the latest ones that I created yesterday, plus a couple of close-ups of my latest favourites …