… the ornie, that is, not my canvaswork that has been languishing way too long as a UFO!!! I managed to get a bit of stitching done yesterday, and hoped to actually get this one finished as it’s a relatively quick stitch … but alas, in fine form I find that yet again I’m missing one of the main components of the stitching – no bugle beads! I’m starting to think that *I* am missing one of the key components of my brain, as I’m doing this way too often just lately!!! Or perhaps there’s some hidden side of me that just loves to have a million unfinished pieces sitting around the bedroom while waiting for that ‘one little item’ … !!
Anyway, this is how it currently stands until I can pick up some white bugle beads … and now I’m just going to have to grab another ornie out of my ‘to-do pile’ and kit it up so I can meet my self-imposed deadline of two ornies each month (with luck). I have a whole heap of photocopied working copies from when my stitching stash was in storage, along with the fabrics cut up ready, and I just have to add threads and beads, so it shouldn’t be too much of a hardship 🙂
Today saw me undertaking a number of housekeeping tasks, including packing away all the Christmas decorations, cleaning half of the bathroom, vacuuming and even a little bit of dusting (shock, horror, I hear Mum utter) – after the vacuuming I decided I’d had enough of the rivers of sweat pouring down my back and opted to sit for the rest of the afternoon in front of the electric fan and watching Criminal Minds on DVD – which also meant plenty of stitching time today for Day 10 of the Crazy January Challenge, and some brown blobs that will eventually look like little teddy bears once a bucket-load of backstitching is added.
I’m absolutely loving doing this challenge, and like a few other people I’ve seen, I could continue all month doing these new starts, it’s very invigorating. I will, however, need to think of a potential substitute for Prairie Moon’s Christmas chart if my fabric doesn’t arrive over the next couple of days – oh such hardship, having to find another project to start!! I’m thinking perhaps Jardin Prive’s Eiffel Quaker … or JBW Designs’ Christmas Pudding … or … or … or … well, a number of other projects waiting in the wings to be started really … 😉
After completing two bears, I decided enough was enough of the revolting Lugana I was stitching on, and I picked up my previously started Christmas ornie and finished it. I stitched this one a few years ago when I didn’t have the recommended Blue Moon by Crescent Colours, and this time I used the correct blue seeing as I now have that thread in my stash (I did, however, still continue to substitute WDW Kudzu with NN Olive Grove). This completes one ornie for my monthly goal – but I’d still really like to finish one more, which I have kitted up ready to go (along with two more kitted up ready for next month). I love, love, love this ornie, and the colours are just stunning … this is possibly one of my favourite ornies EVER! But that’s a no-brainer really, ‘cos it’s BLUE! 😀
“Winter’s Eve” by Country Cottage Needleworks from 2006 JCS Christmas ornie magazine stitched on 32ct natural Belfast linen with mix of DMC, Needle Necessities and Crescent Colours threads
And on that note I’d better hit the hay, ‘cos it’s now 1am and I need to be up and at ’em early tomorrow to make the most of my final day off 🙂
Before I show piccies of the decorations, I want to say a heartfelt “thanks” to one of my closest stitching pals Katrina who has been spoiling me for a number of years now with a handmade ornie – each one I treasure dearly, and this latest one is absolutely no exception! (Excuse the silver lametta sitting on the top!)
Don’t you think this is just so “ME”? 😀 Unfortunately I forgot to bring the other part of the gift home with me, and it’s still sitting on my computer at work … it’s the cutest little yellow rubber ducky with little santa hat and scarf on … too, too cute! He was keeping a smile on my face all day at work on Friday. Thanks again Katrina, you have once again spoilt me rotten, and I totally adore it! I feel very blessed that the internet has enabled such a lovely friendship to blossom 🙂
Unfortunately I haven’t been in the brightest of stitching moods throughout the year, to be honest, and my own ornie plans pretty much went out the window – instead I’ve been focused on stitching whatever I’ve felt like just to keep my momentum up as much as possible and keeping the feeling of being ‘overwhelmed’ at bay. I think I’m finally coming out of that blue phase, so fingers crossed in the new year I’ll get a few more ornies stitched up and sent to some of my best online pals, as well as fulfilling some outstanding stitching commitments!
Anyway, back to the decorations, it was receiving Katrina’s ornie on Friday that made me start thinking of bringing up my ‘little’ Christmas tree from the garage instead of the huge 6ft one and having only my stitched ornies on display. Even Katie gave it the thumbs-up when I’d finished and said she really likes it, so I guess it gets the official seal of approval 🙂
Rightio, enough of the waffling, here are this year’s lounge decorations in all their glory (I personally think the tree’s a bit crowded, but I didn’t want to leave any ornies out! – I think maybe next year I need to buy a tree that’s just a little bit taller and fuller, and it’ll be a perfect size):
And this little tree (which stays up all year as a backdrop to my ornie finishes) is look a wee bit bare as it’s waiting for Mum’s 12 Days of Christmas set to be finished and added … not entirely sure that’ll be completed before Christmas, but it definitely will happen before I have to put them all away again! 🙂
The next year I also want to make a table runner for the lounge and/or the table under the tree – I bought this fabric a few months ago in readiness for when the urge of quilting creativity struck (which will hopefully be some times prior to December 2011!) – this is from the 12 Days of Christmas fabric range by Moda:
And on that note, I’m off to sip on my iced Paull’s Egg Nog (that’s the brand on sale in supermarkets over here) and perhaps do a bit of stitching … perhaps … unfortunately Bittersweet Season will continue looking like this for a while longer, as the threads I need are still lost in transit, but I do now have the threads to finish “Valentine Bird”, so perhaps that will suffice for now and may even get some of that stitching mojo back … ?
I still don’t feel like stitching, and have no urge to pick up a needle yet … I do, however, have the urge to do some organising of my stitching ‘stash’ in the computer!
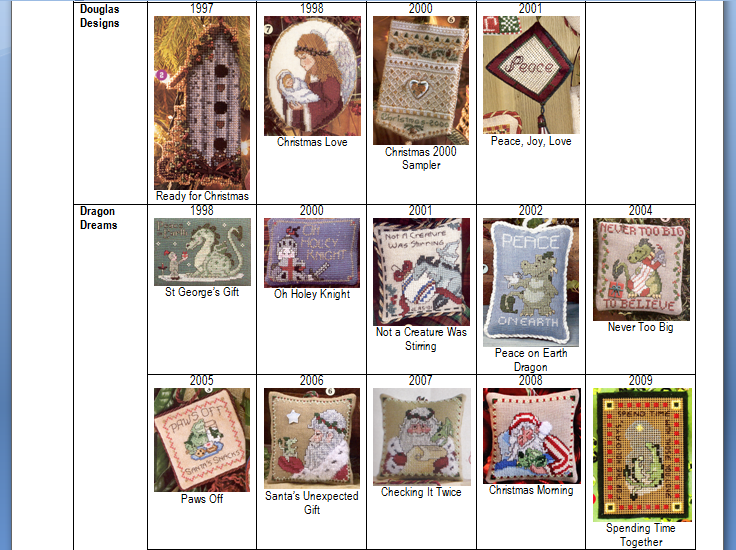
Years ago I started scanning the JCS Christmas ornie magazines, and started creating a library of sorts within Microsoft Word. It basically has a thumbnail of each year’s ornaments listed by designer, and the details of the ornie along with magazine issue (year), scanned thumbnail and ornie title. I originally started doing this when I was going to do a personal challenge, ie stitching one ornament by every single designer that has been published – now this was a number of years ago, and there weren’t as many designers as there are today, but I still never did get very far with that challenge. I thought it would make me stitch some designs I’d never really looked at before, as often ornies are much better in real life than in the magazine … it was a good idea at the time 😛
Anyway, seeing as I wasn’t feeling up to stitching and I felt like getting a numb butt in front of the PC for a while, I scanned the 2010 magazine and updated the various pages with the latest ornies.
It’s really nice to flick through the pages for visual inspiration, and it helps to find an ornie quickly when you get that sudden urge to stitch a specific one. It might be a lot of work once a year, but it sure is worth it! 😀
Here’s a little sample of what a page looks like – alas, I’ve never been able to track down the 1999 issue, so that one is missing … but otherwise I have every year from 1997 to 2010 😀
As you can obviously tell, I’ve been busy this morning, going by all the separate posts. I finally finished off two pin pillow tutorials that have been languishing since last weekend, and I’ve been listening to my flatmate clean up the flat in readiness for her mother arriving this afternoon. It seems she’s worked out how to use both the mop and vacuum cleaner, all that is needed now is to work out how to take the recycling down to the rubbish bins, and it’ll be a perfect day from my perspective! 😛
This afternoon I’ll be hibernating in my room all afternoon catching up on some of my own housework while I finish off the last DVD of Criminal Minds Season 1 – then I can take it back to its owner and trade it in for Season 2. There may not be any more stitching done this weekend, but yesterday I did manage to finish up a little cutie – as per normal I’ve managed to misplace my bags of charms that I know I had in my hot little hands last weekend, so hence the tidy-up in my room that is well and truly needed.
“Christmas Treat Bag” by Shepherd’s Bush stitched on 32ct hand-dyed Belfast linen by Countrystitch
~ in colour “Little Boy Blue” (Kiwi Illusions) with recommended DMC and Mill Hill beads
Then yesterday I started another Christmas ornie that was already kitted up and ready to go … but I looked at the fabric already cut out and thought ‘what a waste’ – after a quick measuring up with a ruler, I decided if I was frugal enough I could just get two ornies out of it, so lo and behold my stitching session is now seeing two ornies grow side by side instead of the one! It’s a bit slow going on the stitching front, but at least it’s a start! And as I’ve already stitched this one before for myself, these are eventually going to reside with family or friends some time next year.
I seem to have forgotten all about Christmas ornies this year, so doubt there’ll be any to be sent out this year. Last year I didn’t even manage to post out Christmas cards, so at least I’m ahead of the game this time, and have a pile ready to be posted out over the next week or two.
And on that note, I’d better haul it and get my A into G! 😀
Following is a tutorial that I’ve just completed for the Focus on Finishing blog … I started this before my sewing machine went bust the last time, but finally completed the finishing a few weekends ago, and now the actual tutorial is done and dusted! 😀
* * * * * * * * * * * * * * * * * * * *
The following is a very basic pillow Christmas Ornament tutorial designed, in particular, for beginners.
Supplies needed:
Stitched project (if you want to you can also iron on some light interfacing to the back of the stitching to add some strength and stability as well as giving a smoother finish
Backing fabric
Approx 6″ (15-16cm) of ribbon to coordinate with your stitching for the hanger (I normally use 7mm double-sided satin ribbon)
Stuffing
Sewing machine with coordinating thread to match your fabrics
Complimentary sewing thread and needle
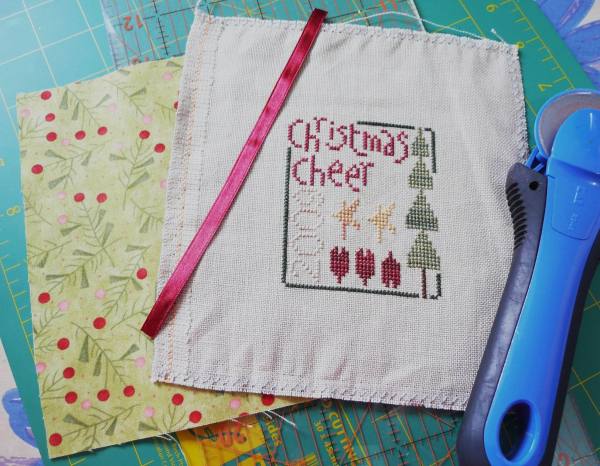
1. Start off by laying your stitching piece on top of your backing fabric, with wrong sides facing, as shown below:
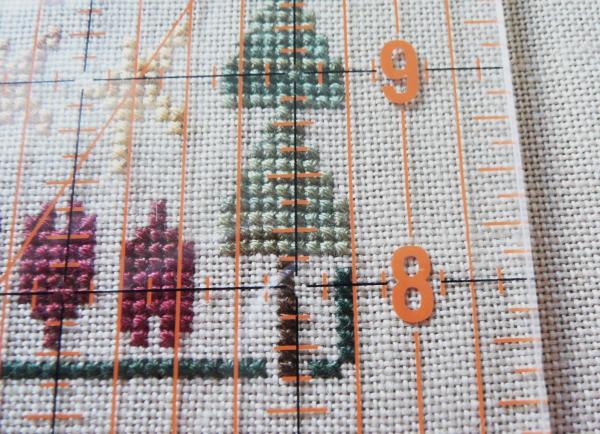
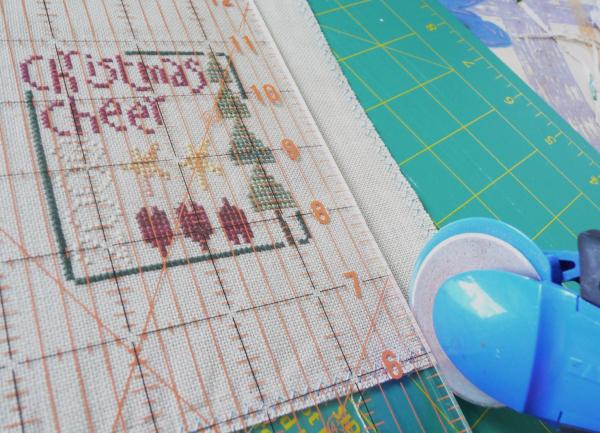
2. Now we need to cut the fabric so that all sides are equal. The amount of margin that you leave is up to you, here you can see that I’ve allowed 3/4″ margin on each side. I line up my ruler along the edge of my stitching, and cut the fabric with my rotary cutter (both my stitched piece and backing fabric at the same time).
3. You continue this same way until all four sides are cut away. Remember that your backing fabric is underneath, so you need to be careful when you are moving your stitching around on the cutting mat that the fabric doesn’t move out of place or your pieces won’t match at the end. Once you have finished cutting all four sides, remove the backing fabric from your stitching fabric.
4. Next I attach the piece of ribbon to my stitching – the ribbon must be attached to the right side of your stitching. Adjust the size of the loop to match your own preferences, then pin in place. I like to have a slight angle to the top of the ribbon where it is pinned in place, so that it hangs nicer when it’s finished.
5. Next place your backing fabric on top of your stitching/ribbon, with right sides facing, as shown below. Pin the pieces together around the edges.
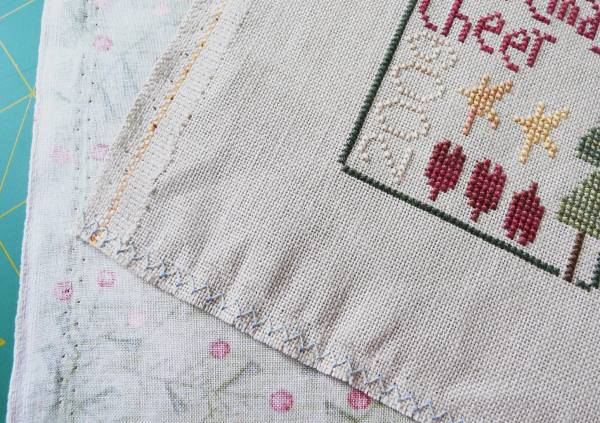
6. Now we need the sewing machine – once again, it is up to you to choose how much fabric margin you’d like to leave around the stitched piece
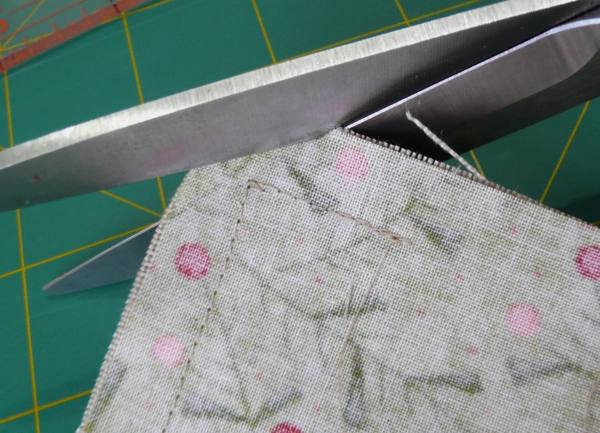
It’s quite hard to see the stitching threads because they match the fabric so well, so I’ve doctored the photo and drawn a line to show you the stitching line of where I started and finished – hopefully you can see clearly now that I have left an opening of about 1 1/2″. I like to leave a long tail of the sewing thread at one end, which I don’t trim off, so that I can use it for stitching up the final seam opening.
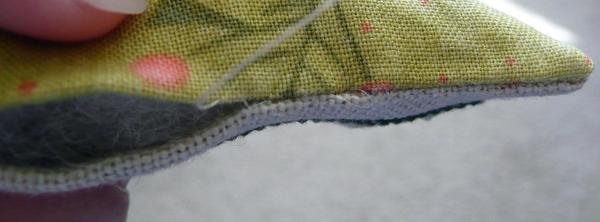
7. The next step is to trim the fabric at the seams, so they aren’t as bulky when you turn the ornament inside-out. The first photo below is my bottom seam – some fabrics tend to fray a lot when you are trying to pull the fabric through the opening, so I’ve learnt to leave the bottom seam a tiny bit wider than the other three seams. The second photo is the usual amount that I trim back the main seams.
8. Then you should trim off each of the corners – once again, this allows you to get a crisper point on the ornament corners once you’ve turned it inside-out and improves the look of the ornament. Just be careful not to snip the stitching!
Your ornament should now look something like this:
9. The next bit can be a little bit nervewracking if you haven’t done it before! You need to reach in and pinch a little bit of the backing fabric between your thumb and forefinger, and then slowly and gently pull the stitching and the backing fabric through the opening so it’s facing the right-side out. Take your time when doing this, and just pull your fabric through little by little – it seems like it will never come through, but then all of sudden a miracle seems to happen and you have it all turned inside-out. I often enlist the aid of a chopstick to help me get the corners nice and pointy once I’ve finished turning my ornament inside out.
Your ornament should now look a little something like this. Of course it was at this point that I realised I’d forgotten to attach my little gold charm to this particular ornament so I had to add that quickly before finishing the next stages … doh! I usually give the ornament a quick run over with an iron at this point to remove most of the creases caused by turning inside out.
10. The final stage is to stuff your ornament with stuffing of your choice. I tend to just use polyester fibrefill from my local craft store. Once you’ve stuffed it to your satisfaction (my preference is to fill it to a medium level – if I fill it too much it doesn’t sit quite as well on my little tree), you need to thread your sewing needle with sewing thread (if you didn’t leave a long tail from the seam stitching). You should use a sharp needle here, not a tapestry needle, so that you can pierce the backing fabric easily.
I use a ladder stitch to sew up the opening. As you can see from the photo below, I start off by slipping my needle into the seam of the backing fabric, then coming back out about 1/4″ along the seam (about 3mm) and bring my needle out.
I then take my needle directly opposite where I just came out of the backing fabric and slip my needle into the linen and follow the seam along for about 1/4″ (3mm) and bring the needle back out again.
I’ve left the stitches nice and loose in the photo below to help illustrate how the stitches follow along opposite each other, like rungs of a ladder.
When you pull the thread tighter, the stitches almost disappear into the fabric, giving a really nice clean finish – this is definitely my favourite stitch for closing up openings for that reason!
Once you reach the end of the seam opening, you need to finish off your thread with a couple of teeny stitches – I then bury the needle into the seam and come out somewhere about an inch way and bring the needle back out again – then clip the thread close to the fabric so that my thread tail does’t appear easily.
And here’s the final seam all finished off – see now nice and tidy that ladder stitch is in the opening? 😀
Your ornament is now finished, and ready to hang on the tree 😀
I hope you’ve enjoyed this tutorial, and found it useful. I would love to see any photos of ornaments you’ve completed using this tutorial so please do drop me a line or leave a comment with a link to your pictures 🙂
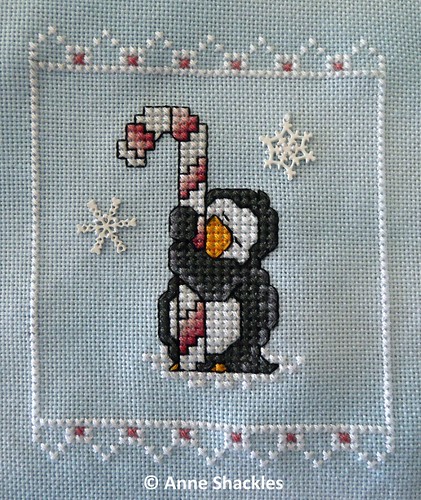
Here’s my latest stitching finish that I’ve been working on during this week – I put the final stitches into it last night while Katie and I watched the last episodes of Dark Angel (great series, shame it got axed at that point after the 2nd season). This design is supposed to have all the white stitches overlaid with a half-cross of blending filament … I managed to do the snow beneath the penguin’s feet, then got totally fed up with it (I truly detest BF), so I didn’t bother doing the BF in the border – I think it still looks alright to me that way 🙂 (The fabric looks kinda grey in this photo, but it is a lovely light blue in real life.)
“Penguin Hugs” by Paw Printings from 2004 Just Cross Stitch Christmas Ornament issue
stitched on 32ct hand-dyed Lugana
with recommended DMC
In my overflowing mailbox this week I received an exquisite exchange from Elaine in NZ (this was an exchange hosted by the StitchNZ Yahoo Group). I’m absolutely thrilled with this exchange – I really adore hardanger, although I still haven’t kicked myself in the pants enough to get back into it myself again … and this one is just gorgeous! Elaine made it into a stitching pocket so I can hold my needlework tools and supplies – and sent along a matching wee pincushion (so gorgeous!) and packet of needles. I’ve taken loads of photos so you can share in the beautiful stitching detail of this piece – while photos never do stitching real justice, I’m sure you can imagine that the finished piece is even more exquisite! Thanks Elaine for a wonderful exchange! 😀
My exchange piece unfortunately left a little bit late (actually a whole week late, ahem!) … thanks to not being able to get to the Post Office. As I’m pretty positive the recipient doesn’t read my blog, but perhaps I’d better play it safe and not post details about it yet … I’ll tempt you with a photo of the ‘backside’ in the meantime, and will post more when it’s received 🙂
What’s next??? Oh yes, yesterday I sat in the lounge with Katie watching Dark Angel DVDs, and doing a teeny bit of finishing – I managed to get the Christmas Ornament tutorial photos completed (very basic ornie) which also means one more ornament off the finishing pile, my Just Nan Ladybug Santa is now in its little Whimzi frame, and I completed the Periwinkle Promises January Sampler Accent into its little pillow, complete with little corner tassels (I ran out of silk for the backing fabric/joining, but luckily had a skein or two in my stash that I was grab to finish this one off).
As for my WIPs themselves, I’ve done very very little stitching over the last week or so – I managed to put a handful of beads into Chatelaine’s Egyptian Garden Mandala (3 nights of beading and I’m still not even halfway finished the one band of beads – the row on the edge of the lotus flowers) – it doesn’t help that the beads don’t sit nicely with that poxy fabric that I’m using, so I’m having to squeeze the beads in and offset them every 6 or 7 beads:
Then yesterday I managed to complete some more of the border of the Quaker Huswif, and am now working on the bottom quaker band. Once this section is finished, I’ll be flipping the design upside down and unrolling the scrollbars to work on the final two sections at the other end – I think at this point in time I’m pretty much sitting on the halfway mark of this piece 🙂
And that’s pretty much it for now … not sure what I’ll be stitching on this week, if anything … I’ve got some big deadlines at work over the next fortnight, so I may be putting in some longer hours, which means less mental/physical energy for stitching …
Unfortunately my back was killing me while I was out shopping yesterday, so I drove Katie over to Epping for the 50th birthday, but I left after 1 1/2 hours so I could come home and put my back to bed early. After chewing Nurofen last night/this morning the edge has been taken off the discomfort and I’ve been sat up in bed this morning with my needle in hand clearing TV shows off the TiVo. Here is the end result of a few hours not moving:
“Reindeer” by JBW Designs (Christmas Keepsakes II)
stitched on 32ct natural Belfast linen
with a mix of GAST, WDW and DMC threads
That means I’ve now stitched all three designs from the Christmas Keepsakes II chart – I’ve really enjoyed stitching these ones up.
As for what’s next, I’m considering picking up Sapphire Star again this afternoon and looking at thread choices to substitute for the horrible one that made me put this one on hold. I’m thinking of just using a DMC pearl cotton, but I’m not entirely sure whether it will look OK …
Otherwise I’m tossing up between two new starts for my bedroom – “Sky Blue” Sampler Accent by Periwinkle Promises or “A Simple Sampler” by The Sweetheart Tree, both of which are ready and waiting and all kitted up for starting. Plus of course I still have my little birth sampler to stitch for my work colleague, and I’ve finally made my decision for my next PIF victim 😀




 PhotoHunt