Yesterday I felt as though a weight had been lifted from my shoulders – my feral and miserable mood finally disappeared, plus I had reconnected with my one and only “regret” in life overnight.
I had lost contact with a dear friend (who was, in all honesty, the one true love in my life from those early days – and most definitely the one that got away, or at least that I pushed away – he was the only guys I’ve ever thought I could have married … oh how I wish I had the strength of character and wise mind back then that I do now!) – anyhoo, I got a Facebook request from an old school chum from when I was about 11/12 years old, along with links to some old school class photos, and it brought all those childhood memories flooding back, and that old regret came bubbling back up to the surface … as well as the romantic regret, more so the regret that I had lost a rare and special friendship all those years ago.
Well, I did a quick Google search and found Glen surprisingly easily. He has his own animal dermatology business in Florida, where he lives with his wife and two kids. I received an email back from him on Saturday morning touching base and telling me a little about his life since leaving home. So perhaps that has been the biggest contributor to the weight being lifted from my shoulders, or perhaps it was just coincidence … but I do know it was lovely to share a couple of childhood stories and touch base once again. Mum always thought of him as the son she never had – I’m really glad to hear he’s OK and happy, and knowing that he’s happy may just let me move on too 🙂
Anyway, for the first time in ages my mood gave me a jolt of mental energy – I had an urge to stitch something ‘new’, and put my hand into the kitted up drawers to find something … that “something” ended up being a stumpwork correspondence course from the Embroiderers’ Guild of America. I’d forgotten just how long it takes to stitch one little item in stumpwork (at least it does for me!!) – even with chunky Brazilian embroidery threads being used, it took me the entire afternoon just to stitch 1 1/2 leaves! But I have to say I really enjoyed it, and am about to go and finish off that 2nd leaf.
Here you can see the entire design – called “Gracie”, it’s a big chunky goldfish when it’s finished. The colours are eye-popping vibrant oranges/reds. The leaves are outlined with stem stitch (there is LOTS of stem stitch in this project), padded with chain stitch, then covered with sloping satin stitches. It was quite hard to stitch last night in the poor lighting, so hopefully it will be easier this morning with the natural daylight coming in as well … fingers crossed I’ll get that 2nd leaf finished by lunchtime, to give me time to do some baking (see, I told you I had energy all of a sudden! haha).
In continuing to try and find a stitching element to my photo memes when I can, I ended up having a mini photography session this morning after taking the first photo … but hopefully it ties in well with the theme!
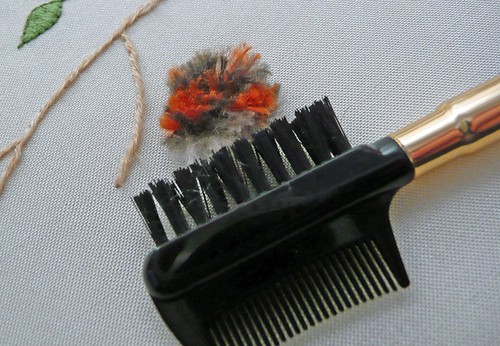
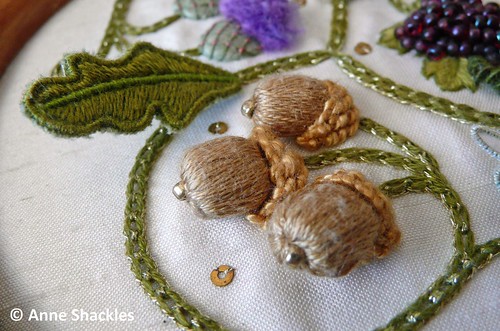
Here is my choice for this week’s Theme Thursday, where the theme is ”Brush” – I use an eyebrow brush to fluff up my turkey knot stitches in stumpwork to make fluffy little insect bodies. This one is my old UFO not completed yet, but pretty much ready for a trim back into the body shape 🙂
When it grows up, and it’s trimmed back, it’ll look something like this little bee:
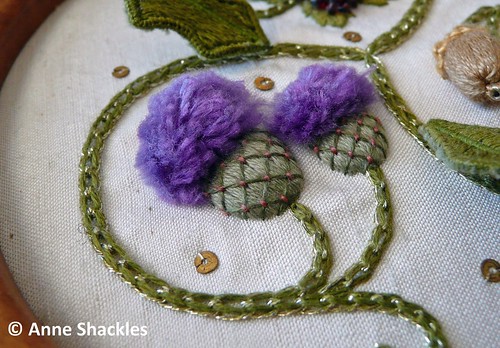
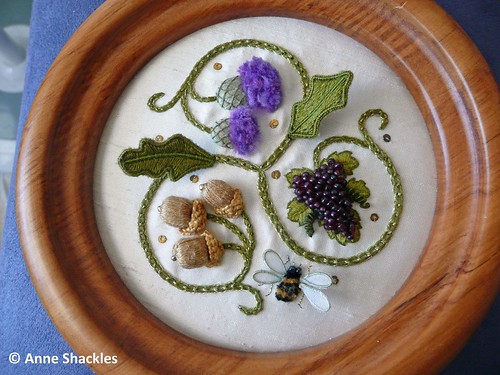
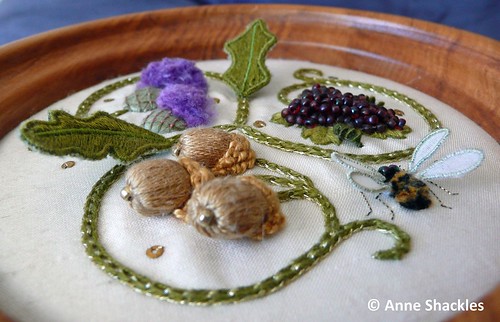
Here is another piece that is brushed up and fluffy – gorgeous thistles!
And while I’m showing you the brushed-up parts, I thought I’d share details of the rest of this piece … this is Elizabethan Roundel by Jane Nicholas:
I just love how all the piece stand-up 3-dimensionally on the fabric with the padding and wires.
On a different note, thanks to everyone who has left comments with your preferred ONS. Unfortunately the ONS I’m currently having issues with (accessory packs ordered in January, charts ordered in March) is one of the ‘good’ ones you listed … so I think I just lucked out. Never mind, I’m going through a mini financial crisis with some major bills coming up that I can’t afford, so I won’t have to worry about stitching orders until at least the beginning of next year!
It also may mean I’ll finally have to clear out my stash and put a lot of it up on Ebay, along with my scissor fobs … I have about $1,500 to find in 10 days for my car registration, which is hilarious (both the actual cost itself, which is twice as much as living in Melbourne, but I also have to buy local licence plates which bumps the cost up, along with the hilarity of finding $1,500 in itself in such a short time). So my guess is that my car will be taken off the road until I have the funds available – oh my, I’m sooooo not looking forward to being a bus passenger again 😦 I really need to get my car up and running again by the beginning of October, though, as Mum’s coming over to visit and we’ll need it for running around in. Oh well, I’ve lived on tinned tomatoes once before, I guess I can do it again for a while!
Anyway, enough of these woes and troubles … time to shake it off and jump in the shower for another day of torture in the office … I was feeling so stressed yesterday I almost burst into tears at the end of the day when yet another hurdle cropped up, which almost immediately burst into anger with the next email … this PMT is a right royal b*tch, I haven’t missed it whatsoever over the last few years – and now it’s back, it’s back with a vengeance!! Maybe I should start booking in annual leave every month? LOL.
I really do struggle with some of the ONS (that’s Online Needlework Stores for your benefit, Mum). I’ve had the border accessories for Summer and Winter Snapperlands on order since approx 13 January – at the same time I requested ordering some hard-to-find charts of designers that are also showing available on their site … believe it or not, I JUST received an email to advise that my Summer Snapperland border pack has arrived … nothing else, just that one … Now I’m normally very patient, but that does seem excessively long (and I’m not telling you about the numerous email sent chasing this issue)!
I have also had some other Kreinik threads on back-order from yet another ONS for my Halloween Fairy – while it was on backorder CCN brought out the Summer at the Shores chart … I quickly emailed to ask if they could ask that to the order (note, it had only just been released), along with the pre-Christmas JCS magazine. Two days ago I receive an email to advise the order is on its way (back-ordered from the first week of June), but no mention of the magazine or chart. On questioning it, they have sent the magazine but not the chart that I was so lusting after … but no mention of it being on backorder yet again, just that they had run out of the chart by the time they filled my order. I’ve just written back to cancel the chart order, and I’ll now just find it locally because I can’t justify the overseas postage just for one chart.
The last time I had a deadline to meet I ordered some graziano checked linen and advised that I had a deadline to meet – the linen had to be backordered, which took 2 months, only to find that they’d ordered the wrong linen colour (they only worked that out because I sent them a chaser email after 2 months to ask where the “pale” blue linen was at in the order process) – which meant the ordering process had to begin all over again. Of course I missed the deadline well and truly, and yet another ‘bad experience’ was added to the list.
Not to mention a local store that I placed orders with on a couple of separate occasions and they’d run out of the item – but the order was never ever filled, with no refund of the value. Because the owner had been good to me previously (and she’s just lovely as a person), I didn’t make a big fuss about it, I just don’t go back there anymore.
I used to complain about a certain ONS that always seems to have sales happening, and refused to deal with them anymore … but considering all the experiences I’ve had since with other ONS, it looks like I’m going to return to the fold once again for my once or twice-a-year orders … ‘cos the competition isn’t much better to what I can see 😦
My dream is that one day I will place an order and it will arrive in the same calendar month, all in one piece, with no hassles and chasing required – communication will be prompt and thorough and not because I have demanded a response after not hearing a solitary thing for 2 months or longer … I know, I have big lofty dreams, but I do still fantasise that it will happen one day …
And now it’s time to go write back to the original ONS to ask what is happening to Winter Snapperland border pack and the remaining charts on order … because alas dreams aren’t reality just yet … But it WILL be awesome to finally get this little beauty into a finished state before 12 months of languishing around in my WIP basket are up! I’m not starting Winter Snapperland until those border pieces arrive in my hot little hands!
Let’s just say that ‘cranky’ is currently my middle name … alas, I still have one more week of testing left to go for my project launch, and testing isn’t quite going as well as planned, which is super stressful (not to mention the fact that I lost almost an entire week of testing time last week having to write test plans for the site testers … I cracked a wobbly and refused to work over the weekend, and thumbed my nose at the whole thing). Add to that a certain time of the month arriving and PMT being today’s companions, I haven’t had much tolerance for anything today …
Anyway, this is what I decided was highly needed when we walked in the door from work … I made Katie and I super-alcoholic Frozen Mango Margaritas … took our heads off, but raised our spirits 10-fold!!!
And surprisingly enough I still managed to complete a few stitches while we sat and watched Criminal Minds and City Homicide … and even more surprisingly I didn’t have to frog everything at the end … which means Quaker Huswif is now almost 80% completed 😀
And on that note, I think it best that I call it a night, ‘cos I might get up and go walking in the morning (I did that this morning, and it felt great to get some fresh air before work).
Here are my choices for this week’s Theme Thursday, where the theme is “Palm”. First up is Four Mile Beach, Port Douglas, Queensland.
In order to keep with the ‘normal’ theme of this blog, I’ll attempt to do some photo memes with a link to stitching where I can …
Therefore this week my next choice is my first designing attempt in cross stitch – this is the song of farewell in Fijian (Isa Lei). I remember it always used to amaze the Fijian locals at the resorts that I could sing the whole song along with them in their native tongue … it was always my favourite song when I was visiting, even though it was always sad to actually say goodbye to our Fijian friends each time.
I took the top section out of a XS magazine, then designed my own borders that are Fijian in origin (the side ones are stitched over-one yikes) – I charted out the words myself (all in Fijian), then stitched the little shell on the bottom right using a commercial chart but stitched over-one, then designed my very own little kava bowl and coconut shell cups on the bottom left (also stitched over one). I was incredibly proud of this little attempt, and it was given as a gift to the resort owners of the resort we used to go to in Fiji … shame about the quality, but I’m unable to go back and take another photo as it is now missing in action (and this photo was taken way back when digital cameras weren’t ‘the norm’) 😦
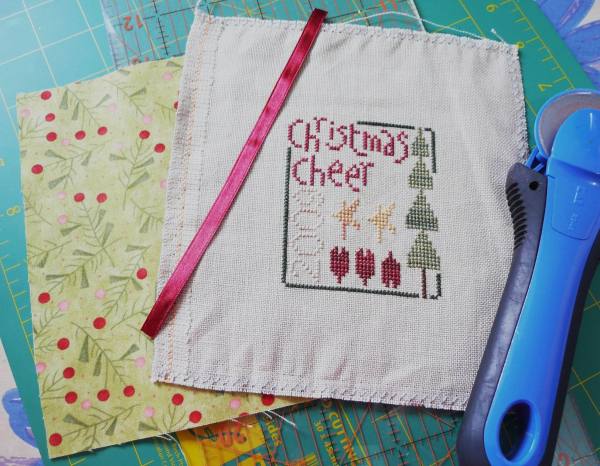
Following is a tutorial that I’ve just completed for the Focus on Finishing blog … I started this before my sewing machine went bust the last time, but finally completed the finishing a few weekends ago, and now the actual tutorial is done and dusted! 😀
* * * * * * * * * * * * * * * * * * * *
The following is a very basic pillow Christmas Ornament tutorial designed, in particular, for beginners.
Supplies needed:
Stitched project (if you want to you can also iron on some light interfacing to the back of the stitching to add some strength and stability as well as giving a smoother finish
Backing fabric
Approx 6″ (15-16cm) of ribbon to coordinate with your stitching for the hanger (I normally use 7mm double-sided satin ribbon)
Stuffing
Sewing machine with coordinating thread to match your fabrics
Complimentary sewing thread and needle
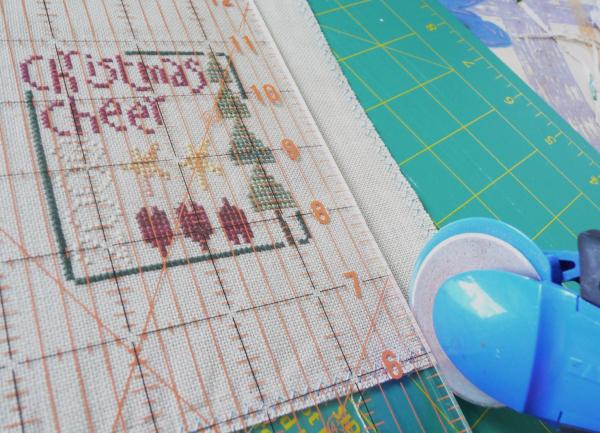
1. Start off by laying your stitching piece on top of your backing fabric, with wrong sides facing, as shown below:
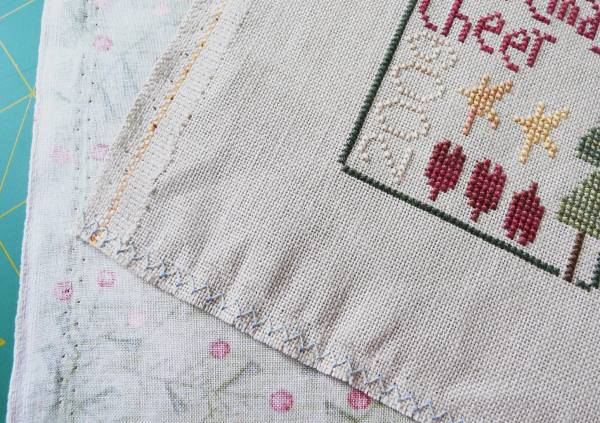
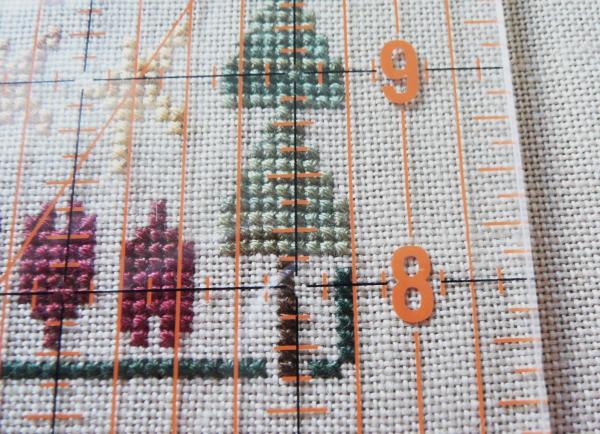
2. Now we need to cut the fabric so that all sides are equal. The amount of margin that you leave is up to you, here you can see that I’ve allowed 3/4″ margin on each side. I line up my ruler along the edge of my stitching, and cut the fabric with my rotary cutter (both my stitched piece and backing fabric at the same time).
3. You continue this same way until all four sides are cut away. Remember that your backing fabric is underneath, so you need to be careful when you are moving your stitching around on the cutting mat that the fabric doesn’t move out of place or your pieces won’t match at the end. Once you have finished cutting all four sides, remove the backing fabric from your stitching fabric.
4. Next I attach the piece of ribbon to my stitching – the ribbon must be attached to the right side of your stitching. Adjust the size of the loop to match your own preferences, then pin in place. I like to have a slight angle to the top of the ribbon where it is pinned in place, so that it hangs nicer when it’s finished.
5. Next place your backing fabric on top of your stitching/ribbon, with right sides facing, as shown below. Pin the pieces together around the edges.
6. Now we need the sewing machine – once again, it is up to you to choose how much fabric margin you’d like to leave around the stitched piece
It’s quite hard to see the stitching threads because they match the fabric so well, so I’ve doctored the photo and drawn a line to show you the stitching line of where I started and finished – hopefully you can see clearly now that I have left an opening of about 1 1/2″. I like to leave a long tail of the sewing thread at one end, which I don’t trim off, so that I can use it for stitching up the final seam opening.
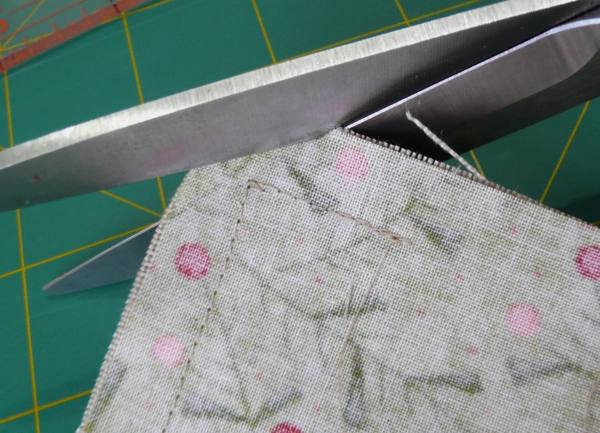
7. The next step is to trim the fabric at the seams, so they aren’t as bulky when you turn the ornament inside-out. The first photo below is my bottom seam – some fabrics tend to fray a lot when you are trying to pull the fabric through the opening, so I’ve learnt to leave the bottom seam a tiny bit wider than the other three seams. The second photo is the usual amount that I trim back the main seams.
8. Then you should trim off each of the corners – once again, this allows you to get a crisper point on the ornament corners once you’ve turned it inside-out and improves the look of the ornament. Just be careful not to snip the stitching!
Your ornament should now look something like this:
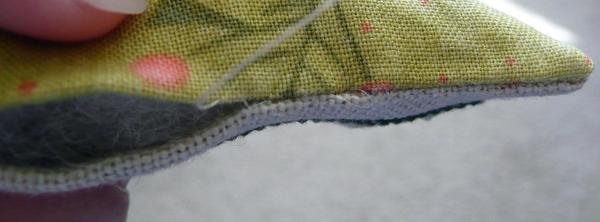
9. The next bit can be a little bit nervewracking if you haven’t done it before! You need to reach in and pinch a little bit of the backing fabric between your thumb and forefinger, and then slowly and gently pull the stitching and the backing fabric through the opening so it’s facing the right-side out. Take your time when doing this, and just pull your fabric through little by little – it seems like it will never come through, but then all of sudden a miracle seems to happen and you have it all turned inside-out. I often enlist the aid of a chopstick to help me get the corners nice and pointy once I’ve finished turning my ornament inside out.
Your ornament should now look a little something like this. Of course it was at this point that I realised I’d forgotten to attach my little gold charm to this particular ornament so I had to add that quickly before finishing the next stages … doh! I usually give the ornament a quick run over with an iron at this point to remove most of the creases caused by turning inside out.
10. The final stage is to stuff your ornament with stuffing of your choice. I tend to just use polyester fibrefill from my local craft store. Once you’ve stuffed it to your satisfaction (my preference is to fill it to a medium level – if I fill it too much it doesn’t sit quite as well on my little tree), you need to thread your sewing needle with sewing thread (if you didn’t leave a long tail from the seam stitching). You should use a sharp needle here, not a tapestry needle, so that you can pierce the backing fabric easily.
I use a ladder stitch to sew up the opening. As you can see from the photo below, I start off by slipping my needle into the seam of the backing fabric, then coming back out about 1/4″ along the seam (about 3mm) and bring my needle out.
I then take my needle directly opposite where I just came out of the backing fabric and slip my needle into the linen and follow the seam along for about 1/4″ (3mm) and bring the needle back out again.
I’ve left the stitches nice and loose in the photo below to help illustrate how the stitches follow along opposite each other, like rungs of a ladder.
When you pull the thread tighter, the stitches almost disappear into the fabric, giving a really nice clean finish – this is definitely my favourite stitch for closing up openings for that reason!
Once you reach the end of the seam opening, you need to finish off your thread with a couple of teeny stitches – I then bury the needle into the seam and come out somewhere about an inch way and bring the needle back out again – then clip the thread close to the fabric so that my thread tail does’t appear easily.
And here’s the final seam all finished off – see now nice and tidy that ladder stitch is in the opening? 😀
Your ornament is now finished, and ready to hang on the tree 😀
I hope you’ve enjoyed this tutorial, and found it useful. I would love to see any photos of ornaments you’ve completed using this tutorial so please do drop me a line or leave a comment with a link to your pictures 🙂
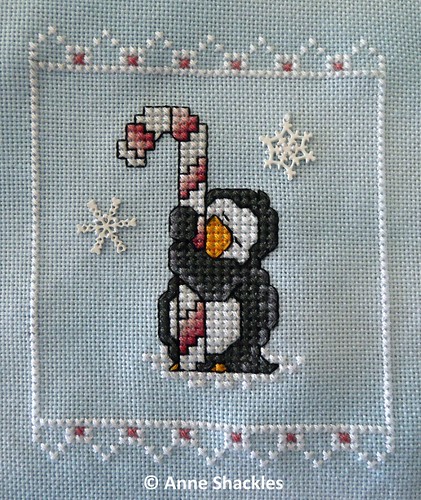
Here’s my latest stitching finish that I’ve been working on during this week – I put the final stitches into it last night while Katie and I watched the last episodes of Dark Angel (great series, shame it got axed at that point after the 2nd season). This design is supposed to have all the white stitches overlaid with a half-cross of blending filament … I managed to do the snow beneath the penguin’s feet, then got totally fed up with it (I truly detest BF), so I didn’t bother doing the BF in the border – I think it still looks alright to me that way 🙂 (The fabric looks kinda grey in this photo, but it is a lovely light blue in real life.)
“Penguin Hugs” by Paw Printings from 2004 Just Cross Stitch Christmas Ornament issue
stitched on 32ct hand-dyed Lugana
with recommended DMC
Sorry about my rant yesterday, but oh boy did it feel good afterwards!!! Yesterday morning we had a meeting to discuss next week’s plans with my colleagues and bosses, and I tried to put forward my feedback in a constructive manner. The one thing they know about me is that I will openly address issues I’ve got once it starts to affect me, but then once it’s been voiced I move on and it’s generally put behind me.
The male boss (“M”) I was referring to wasn’t too thrilled with it regardless, because I guess the feedback was directed at his handling of the situation – plus he feels that the rest of us put too much effort into testing and that he feels it’s not required in such detail – he feels that the test cases provided by our developers are sufficient to test from. My new (female) boss (“W”) stood up for me in some of my feedback in particular in regard to testing, but I know that she struggles with M and they often clash in meetings with differing opinions I’ve been told … W (the lady) is much too polite to discuss those things openly herself and doesn’t play politics, which I really admire about her. Anyway, I said I would review the developers’ test plans and see if I could flesh them out to suit our needs to save me some work … and had great pleasure in providing M feedback at the end of the day, that “BTW, M, there are no test plans whatsoever provided for X and Y parts of my project” – his response, “well, how have they been able to sign off for functional testing?” … well, that’s the million dollar question isn’t it? And yet again it has been proven that we can’t rely on those test cases (which has been my argument for over 12 months now) – but M likes to take the easy way out, and take shortcuts and not put the hard work in himself … and unfortunately the guys in the sites hate him for it. He’s got the worst reputation in the sites – he’s a lovely enough man outside work (still arrogant, but that’s easier to cope with outside work), but his work manner is arrogant and overbearing and I’ve learnt the hard way this year that he does take the credit for everything, and likes to dominate any meetings and/or decisions regardless of whether he is provided with data to prove that his solution is inaccurate or just plain wrong. Unfortunately many of his projects go out in a less-than-perfect state and the sites get angry.
The new guy who just joined the team last week has already made a comment to me that M really likes to take over meetings and is overly assertive. Personally I just think he’s stubborn and bloody-minded, egotistical and arrogant. I had to laugh inwardly the other week when he offered to be my work mentor … while I politely thanked him for his offer and changed the subject …
Funnily enough, we had a team training meeting yesterday afternoon (without the bosses) and my other colleagues all started talking about M and how arrogant and overbearing he is, and that they can’t stand him … especially how he sits in meetings leaning back in his chair with his hands behind his head, with a non-verbal display of arrogant dominance and aggression. I have to admit I was a bit surprised by the vehemence of their attitude towards him, though. I’ve heard other people call him incompetent and useless, but didn’t quite realise how far-reaching this antagonism towards him went … I can normally tune out my frustrations with him (until I lost the plot on here in my last post!), but now I’m realising his impact on others a lot more …
Unfortunately it’s all this sort of rubbish that is making me lose my enthusiasm for the job … I find I am ‘numbing myself’ every day to try not to be affected by all the environmental crap that goes on, but that is tiring in itself …
Anyway, enough of my gripes about work …
I’m about to do a Photo Hunt post with a piccie of my latest stitching finish … then it’s time to start putting my fingers to the keyboard in Excel and start writing up these test plans, I guess …
I’ve been trying to catch up on a few blogs over the weekend, but keep getting error responses when trying to add comments – it appears from the help forum that this is a known issue, and multiple of reports of it happening. Not sure when the issue will be resolved, and I’ll be able to comment again – I’ll keep trying, as every now and then a comment does get through, it’s just frustrating typing everything then losing it all to the ether 😦