2014 WIPocalypse, Beading, Canvaswork, Finishing, Flatfold, Framing, Halloween, Judi Utter, Laura J Perin, M Designs, Monsterbubbles, Ruth Schmuff, Stash, Valerie Pfeiffer, Wool embroidery

April & May WIPocalypse

11402901674_5cd19d2dc5_o

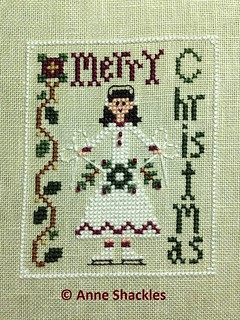
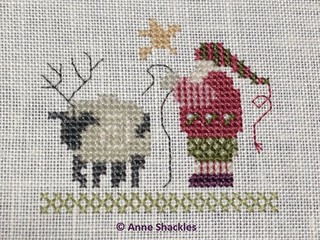
Hmmm, it seems I’m more than a ‘bit’ forgetful these days … it seems even though I was posting to my blog during April I totally forgot all about the official WIPocalypse update post … doh!! April saw a wee bit of stitching, including the completion of Nora Corbett’s Miss Valentine fairy and Blue Bayou by Northern Pine Designs … it also saw a couple of small ornie finishes … so all-in-all probably a reasonable month of stitching.  The ill-fated Flossy has found a happy home with my Mum (the Dragon) … we were going to offer it to a very close family friend, but Mum made me laugh when she said she has it propped up on her computer chair in her bedroom so she can see her all the time and she says goodnight to her every night as she goes to sleep … bless her.  When I mentioned giving it to our dear friend, her response was “she can have it when I’m gone”!  She’s even got plans for how to get her framed, so I’m pleased she loves her so much that at least she will be treasured.  I do have to admit she does look very pretty, even though she is dressed head to toe in candyfloss pink! 😀

Mirabilia (Nora Corbett)-Valentine Fairy

LHN-The Merry Skater

Shepherd's Bush-Joyful Night

Northern Pine Designs-Blue Bayou

When it came to the end of April and then into May, my mojo kind of disappeared a wee bit when I came to the end of my canvaswork rotation and started my “finishing” rotation … for some reason I have to really be in the mood to sit down and do finishing work.  I think part of the problem these days is that I don’t have a dedicated area that I can start items and then leave them to pick up and finish later … with my current flatmate I don’t feel comfortable doing my needlework or finishing in front of him (aside from the fact he comes and puts the TV on as soon as he walks in the room, irrespective of whether I was enjoying the peace and quiet or not in there myself), and I just don’t have the space in my bedroom with all the other junk that is piled up in there …

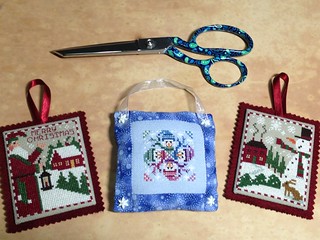
Last weekend, though, I decided “bugger the flatmate” and pulled a small fold-up table into the lounge, did a bit of finishing, then pulled the little table out of the way at the end of the weekend – it was also still there for this last weekend when I did a wee bit more finishing yesterday while he was out (mind you I only did that because I’d figured out he was going to be away for the rest of the weekend and out of my hair!!).  So perhaps I have found a solution for when I come to my finishing rotation again – and in fact I could possibly pull it into my bedroom too on a temporary basis as long as I pull it back out again before sleeping … hmmmm, I like that plan! So, what did I manage to do with my finishing rotation over the last few weeks?  I managed to finish off the following – which really didn’t need that much done to them for them to be 100% finished … First up 3 ornies – these just needed the felt backings and hangers for the Prairie Schooler ones, and the hanger and little snowflake buttons for the Just Nan one

Christmas ornaments

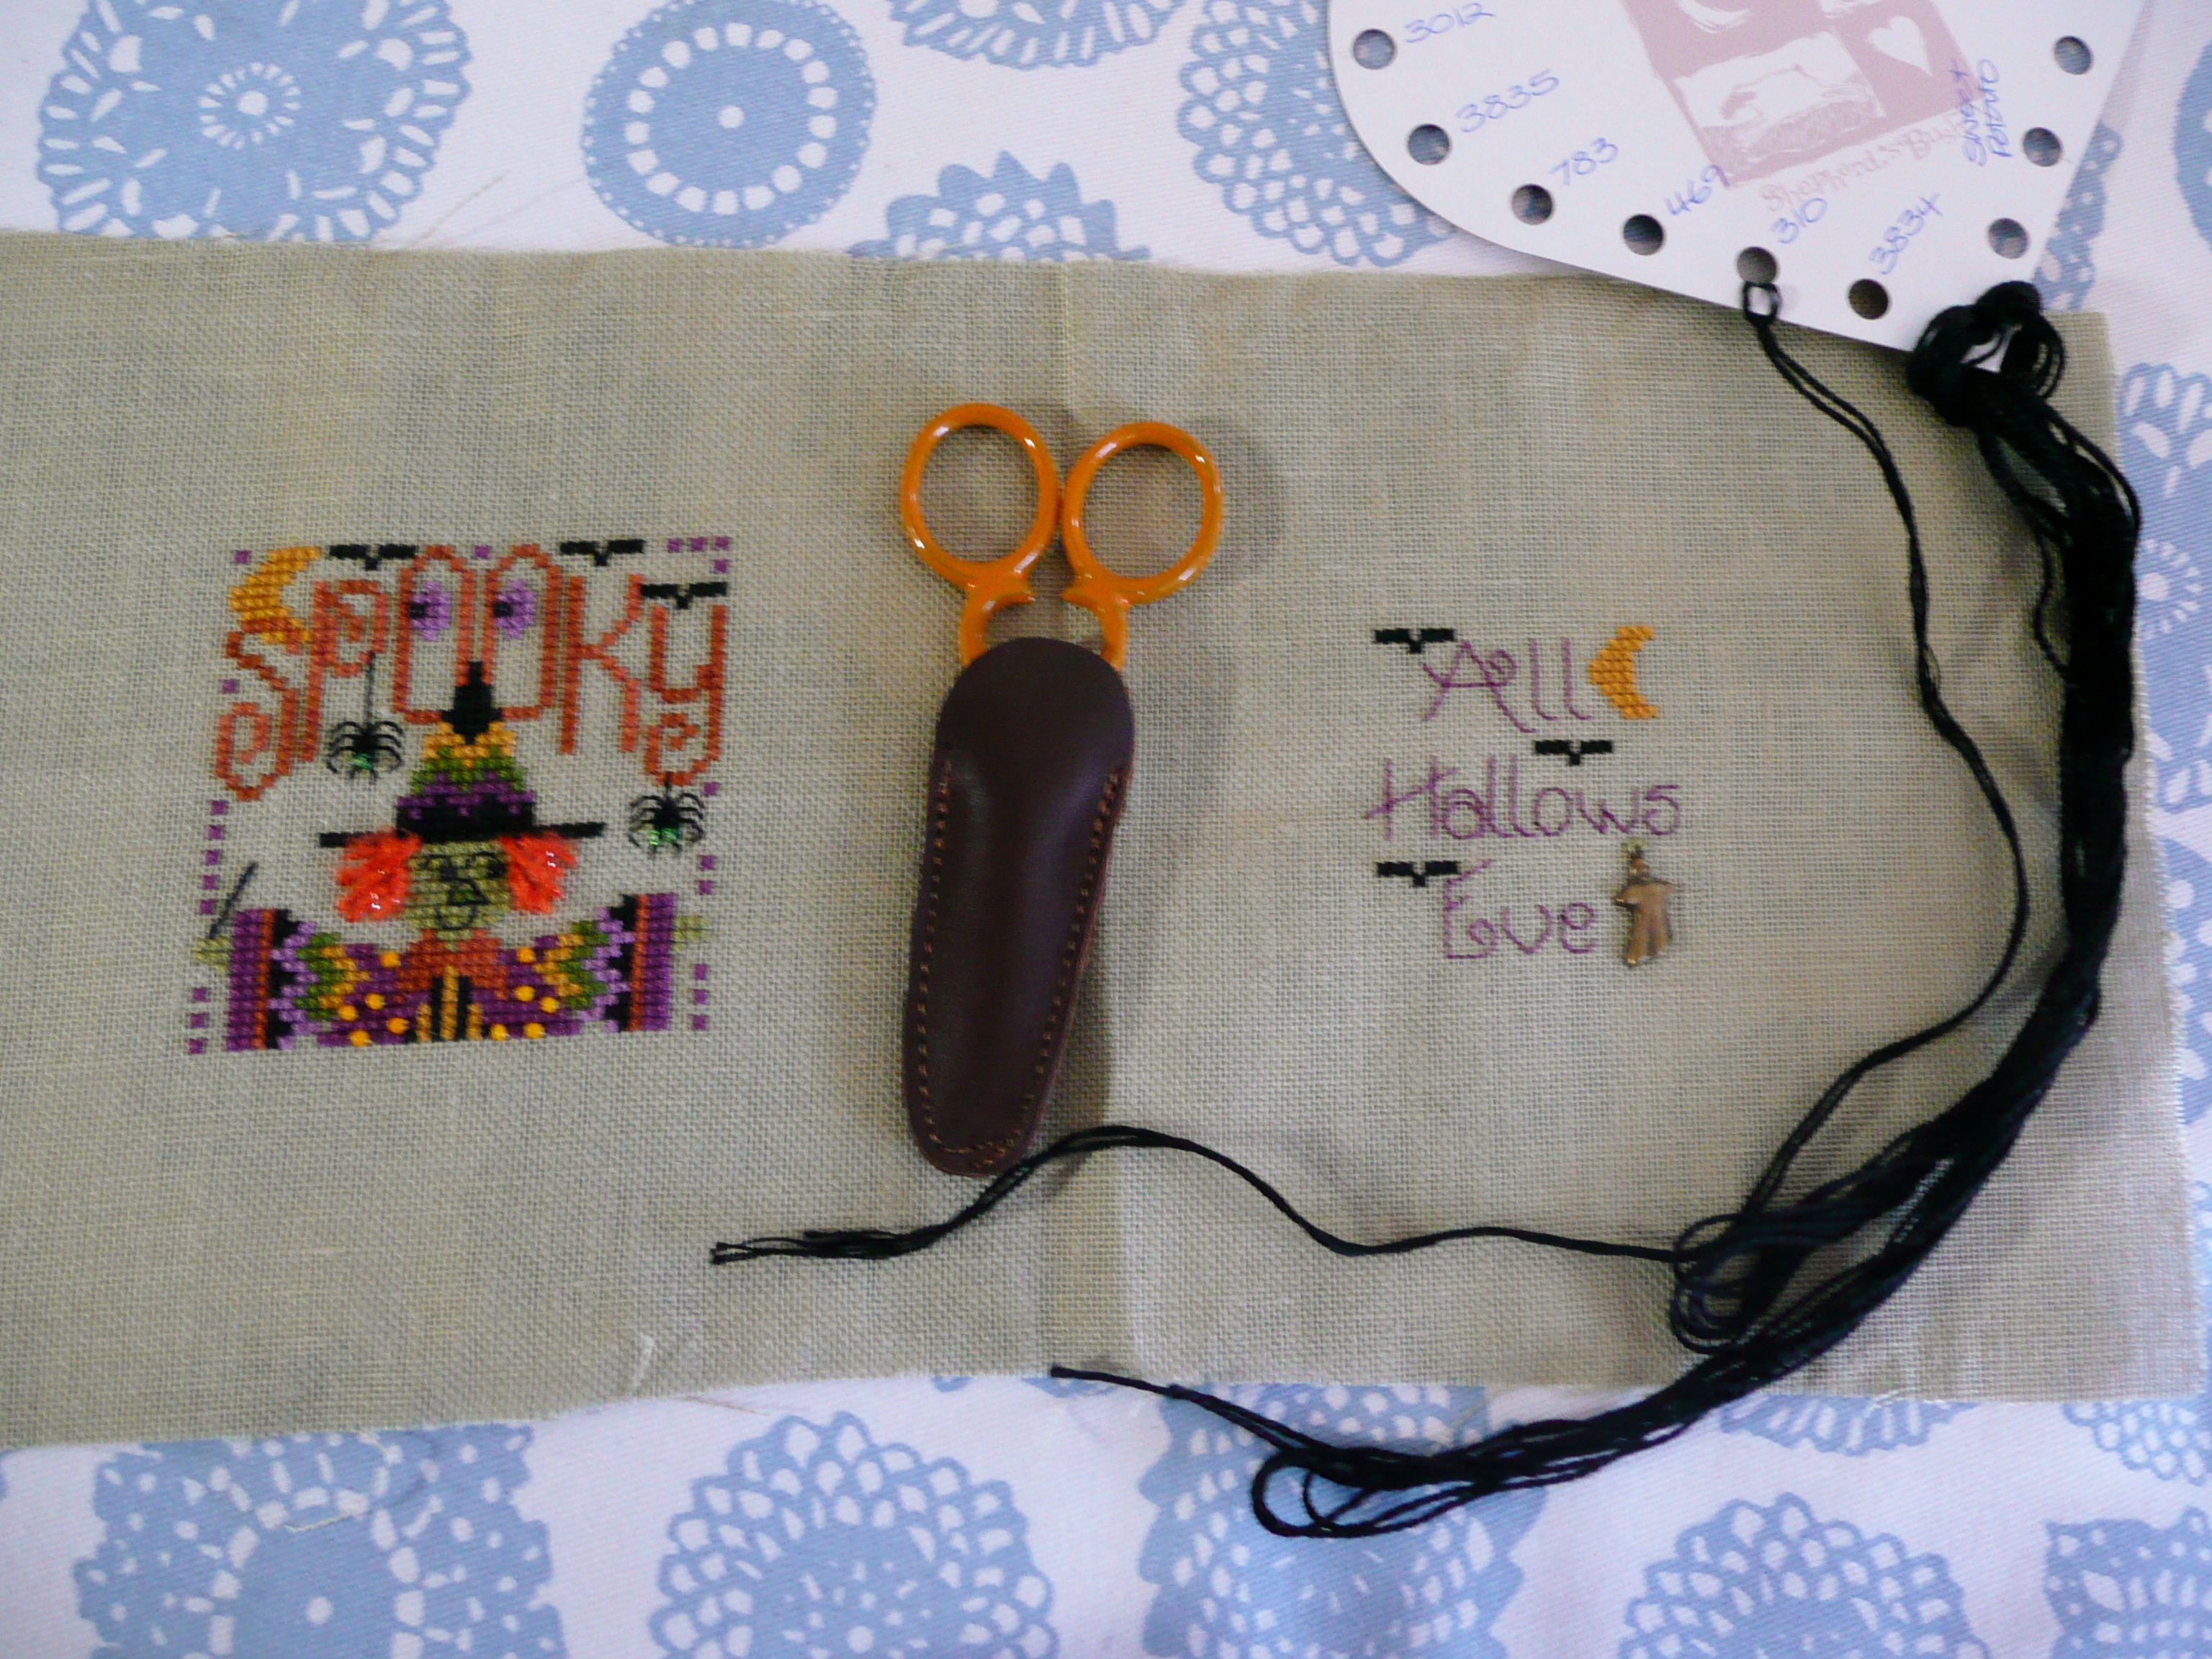
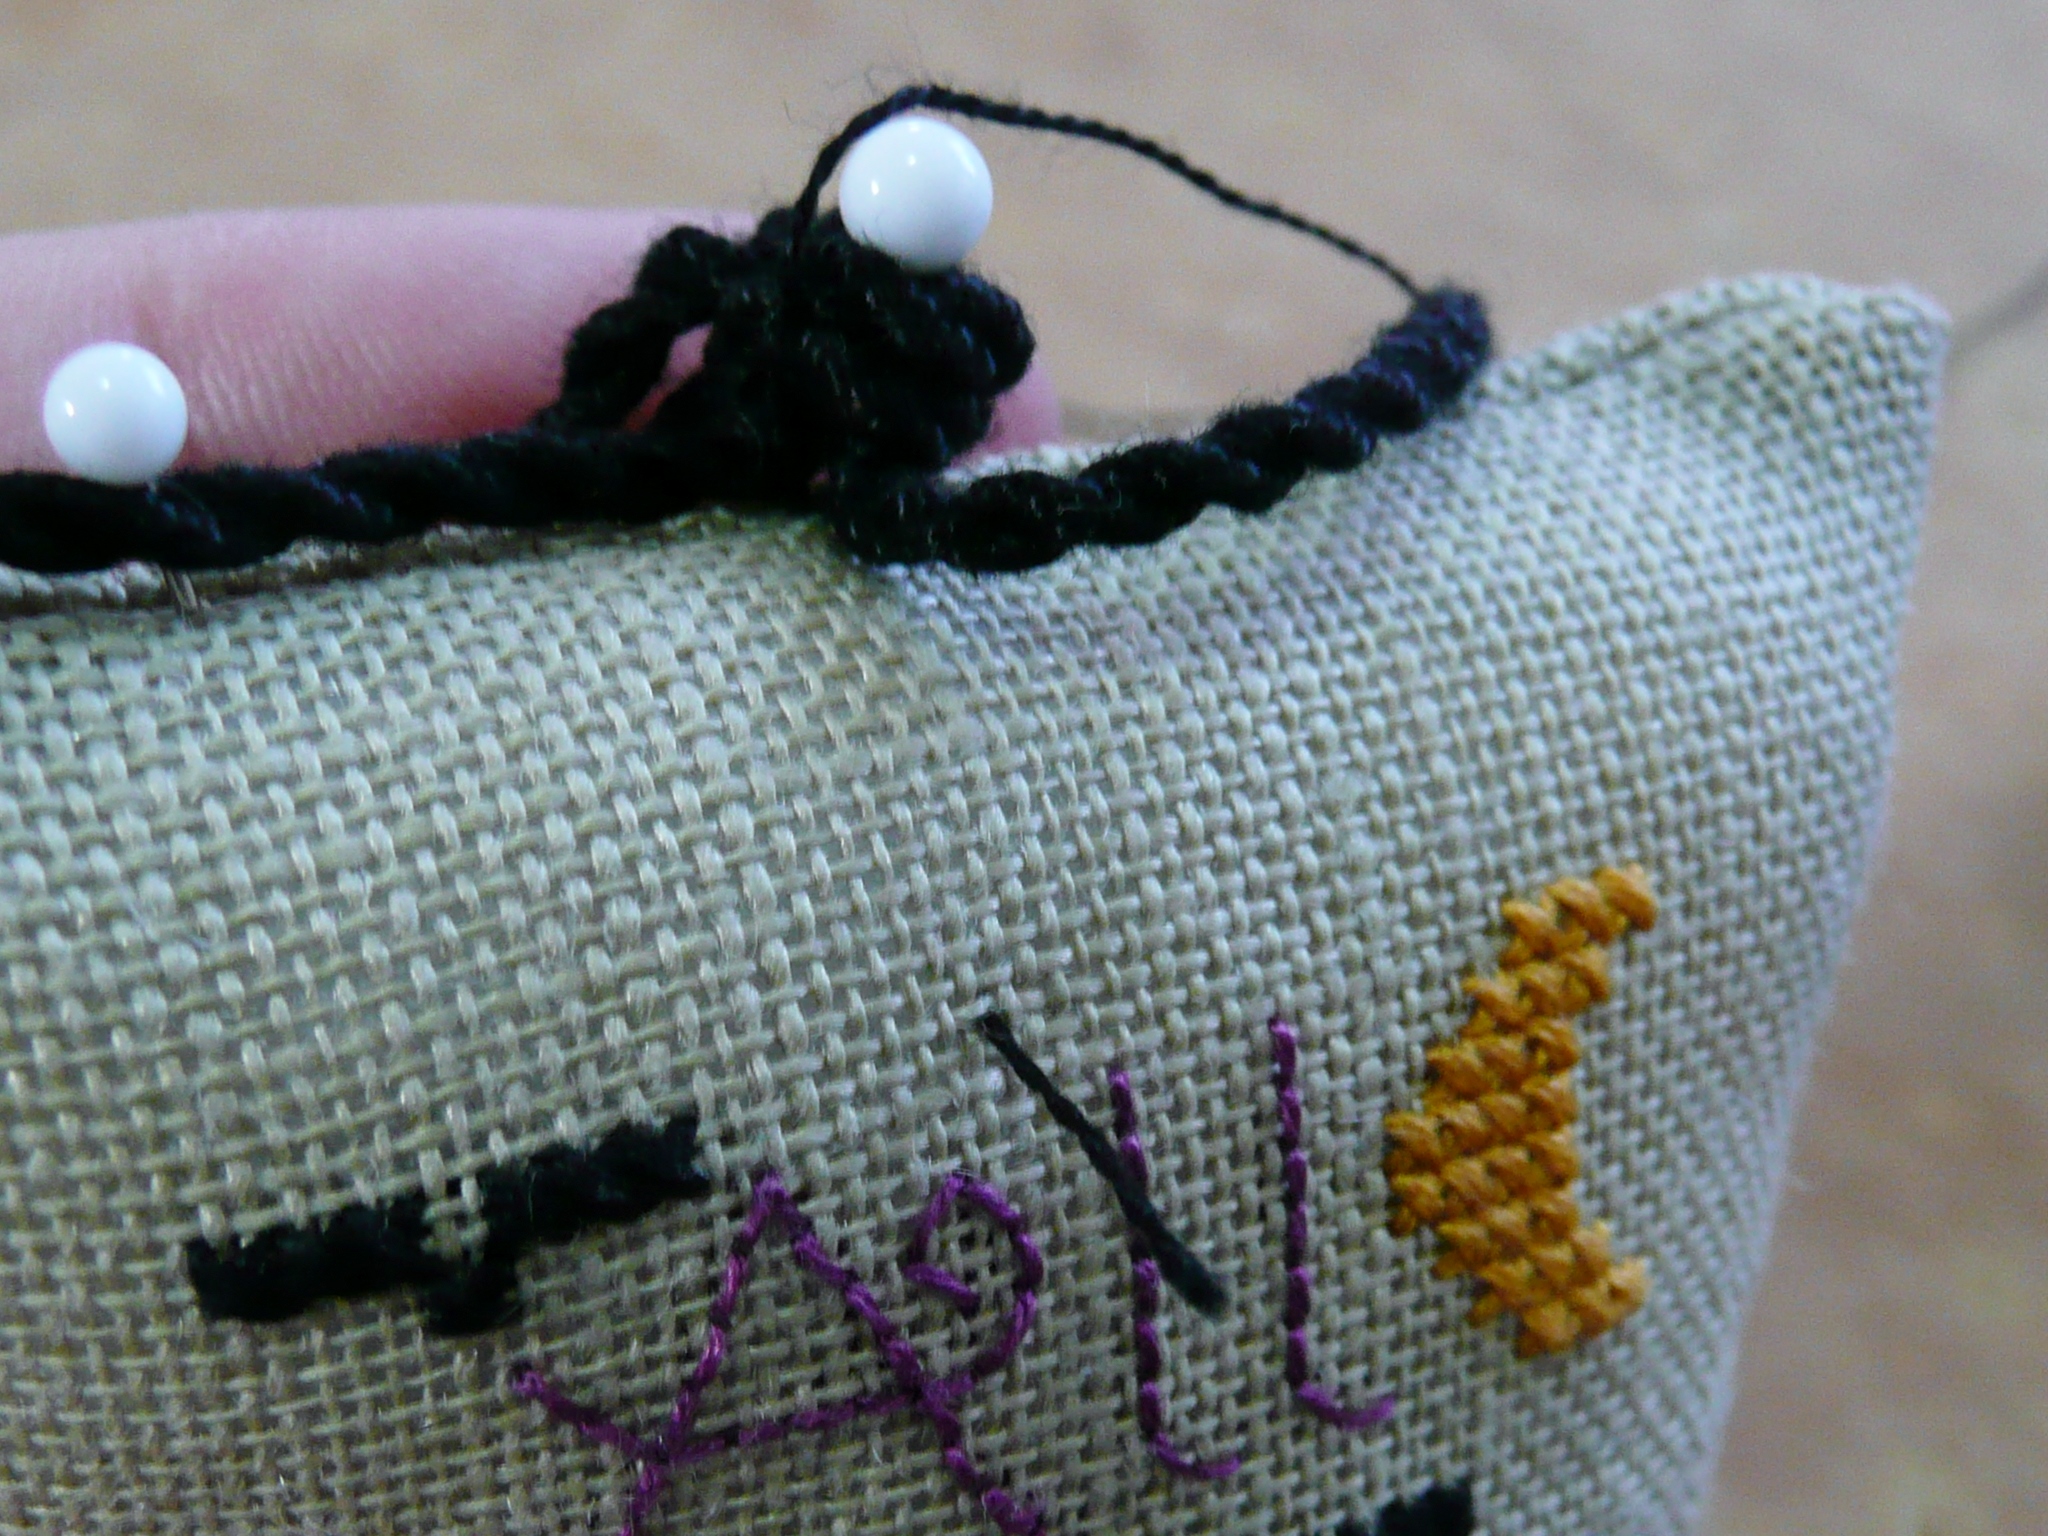
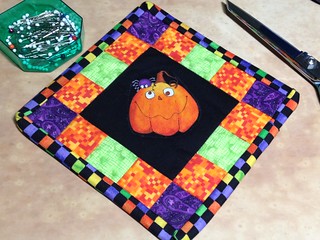
Next up I stitched down the binding on my teeny Halloween quilt … I did a bit of a hash job on the corners, but it’ll have to do …

Quilted mat

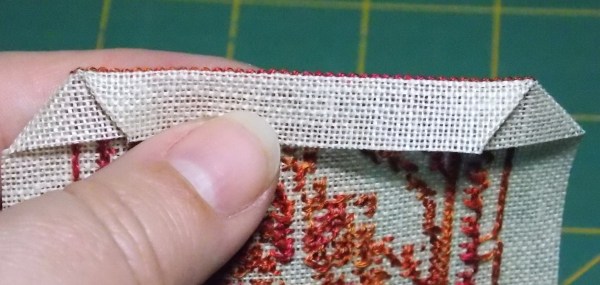
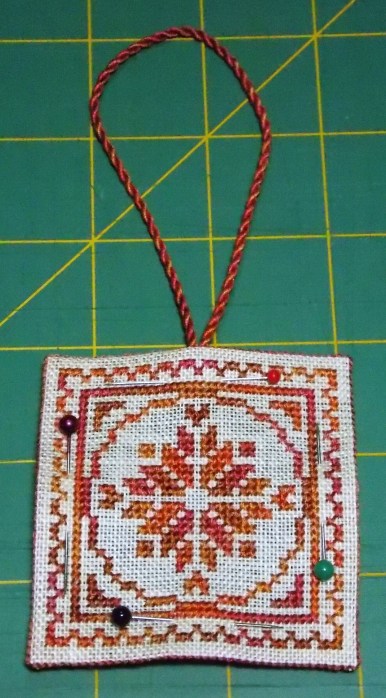
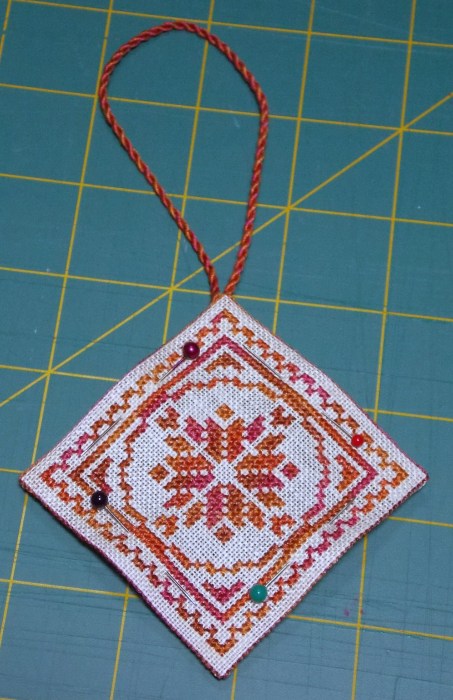
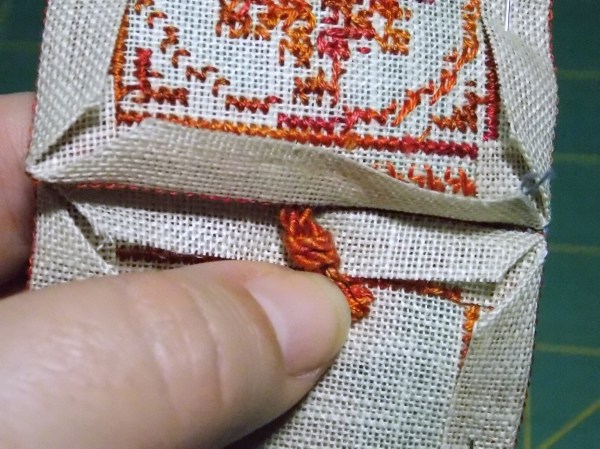
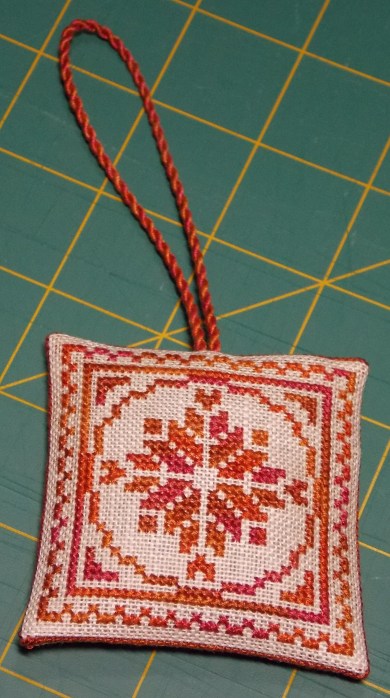
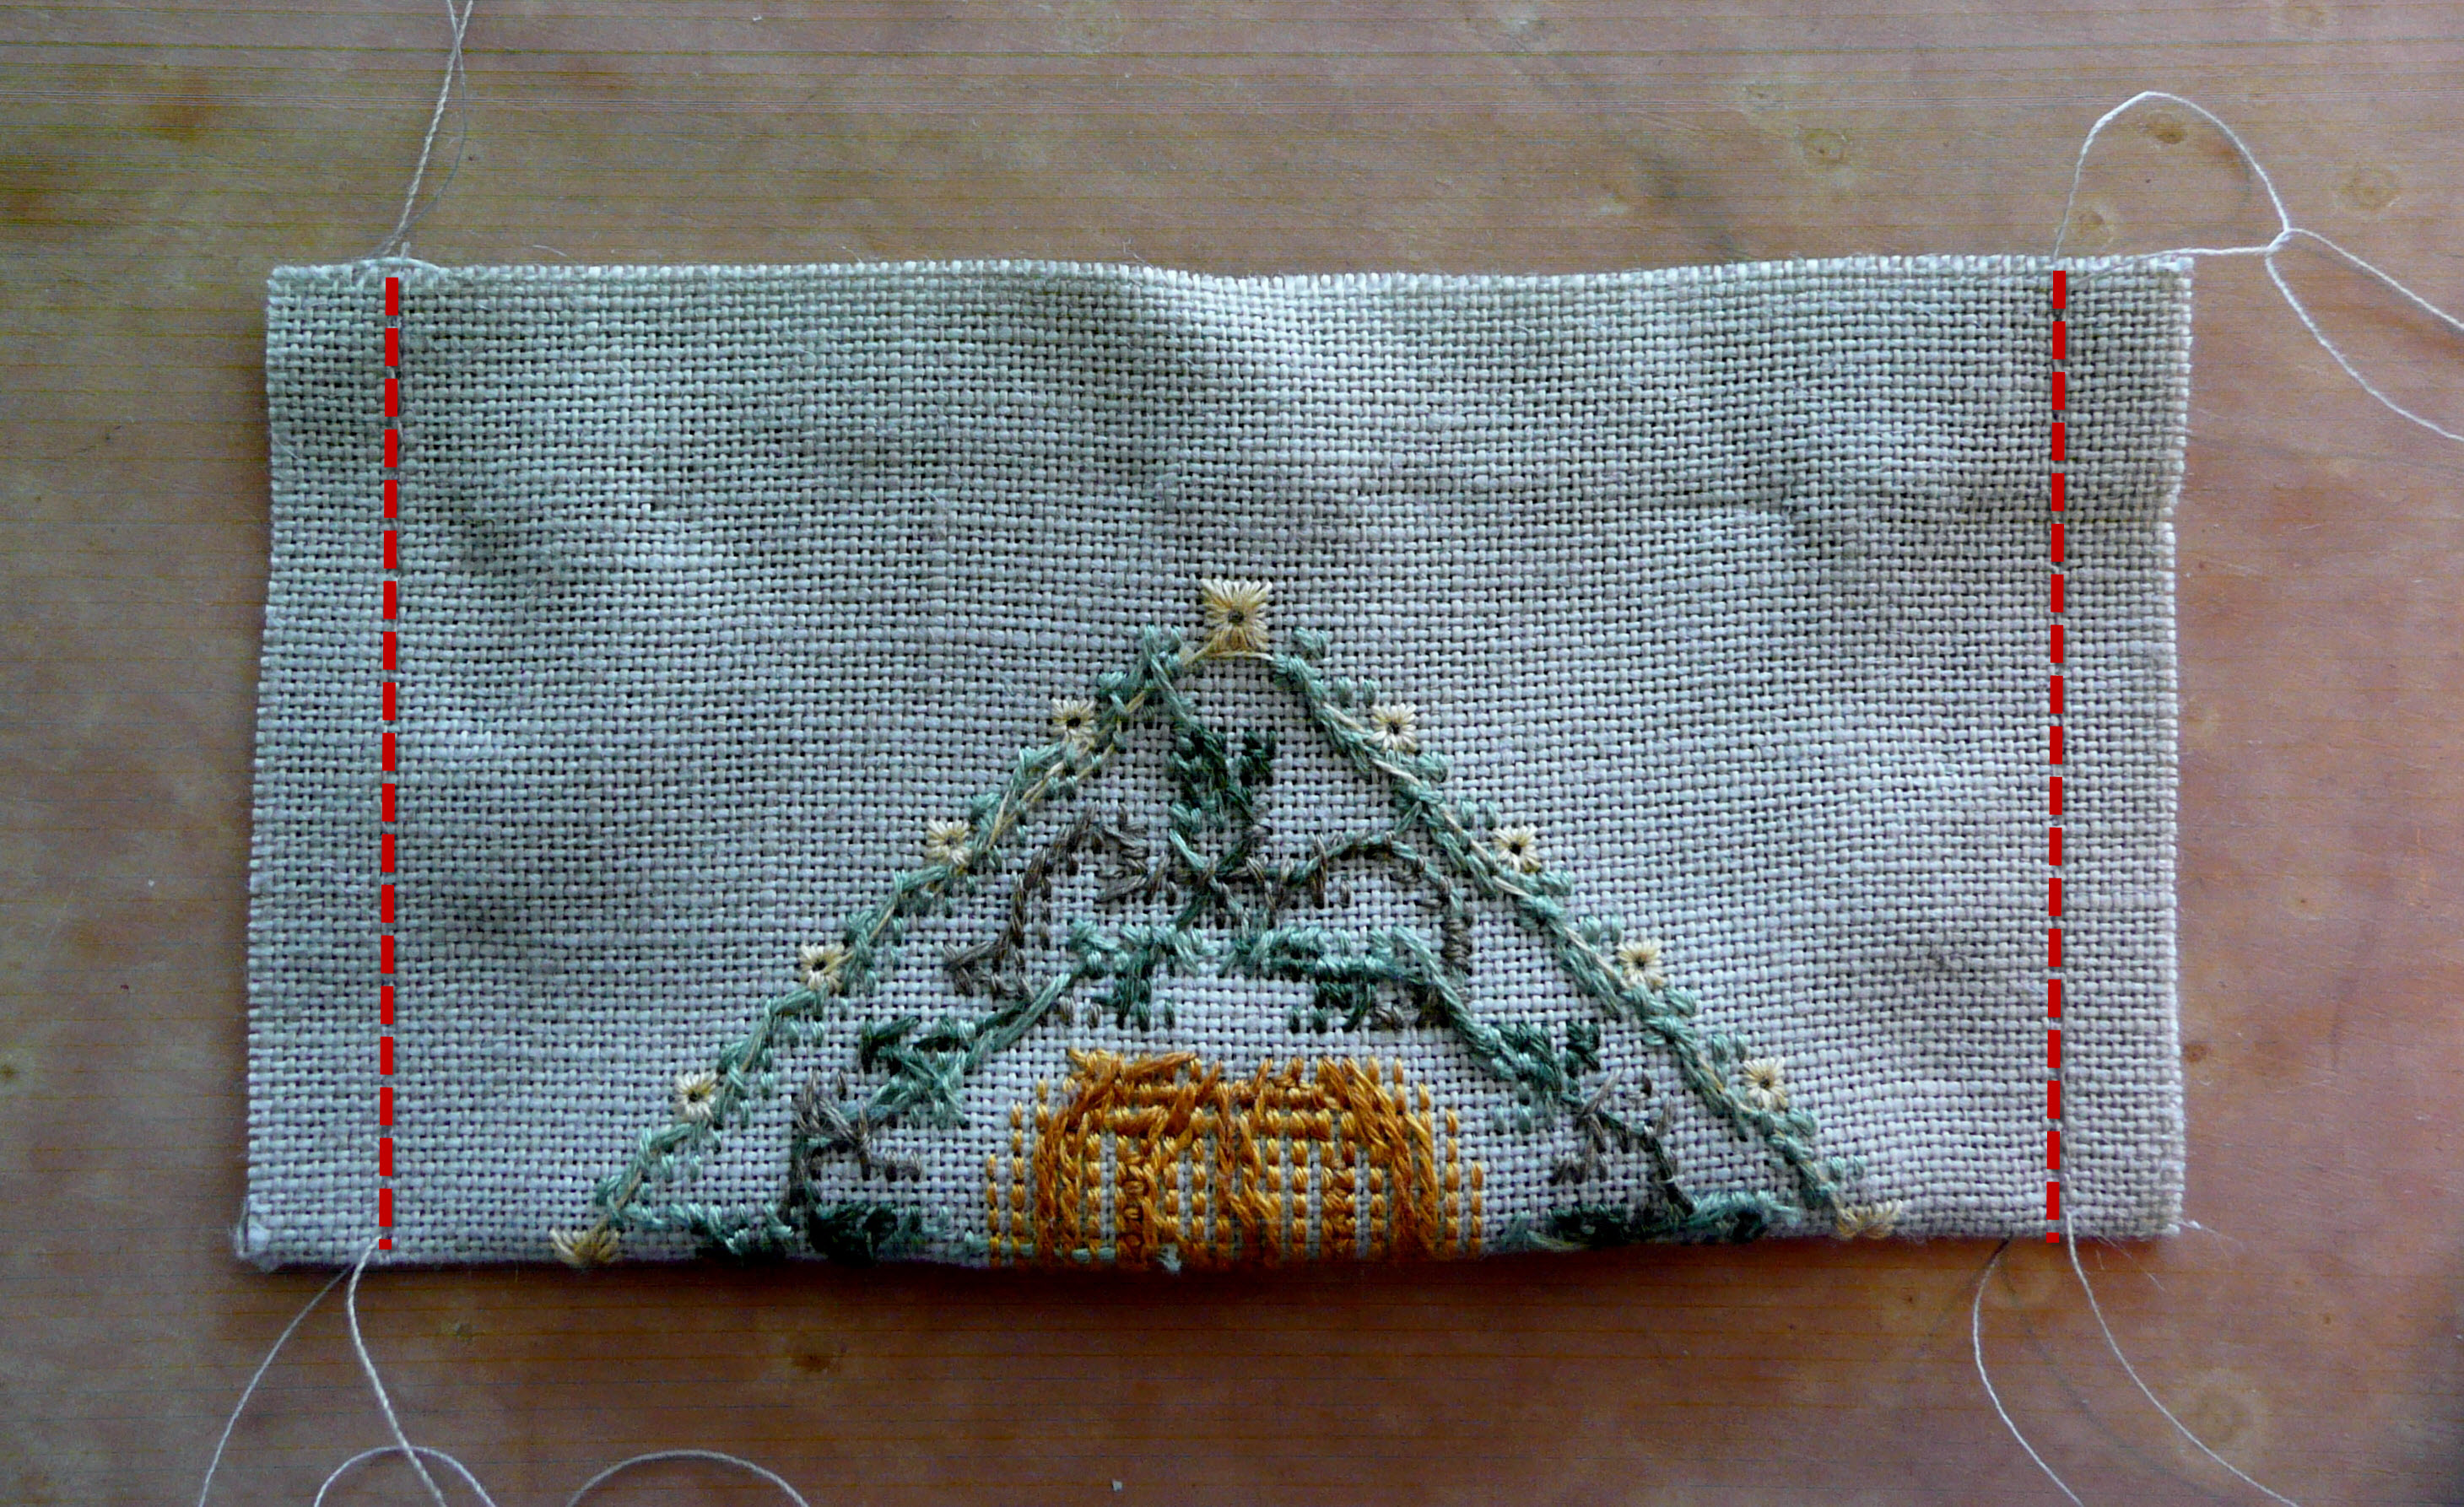
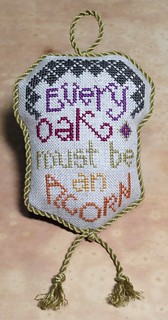
And then my final piece for that particular finishing session was to stitch the cord around the edge of this wee freebie:

Every oak must be an acorn

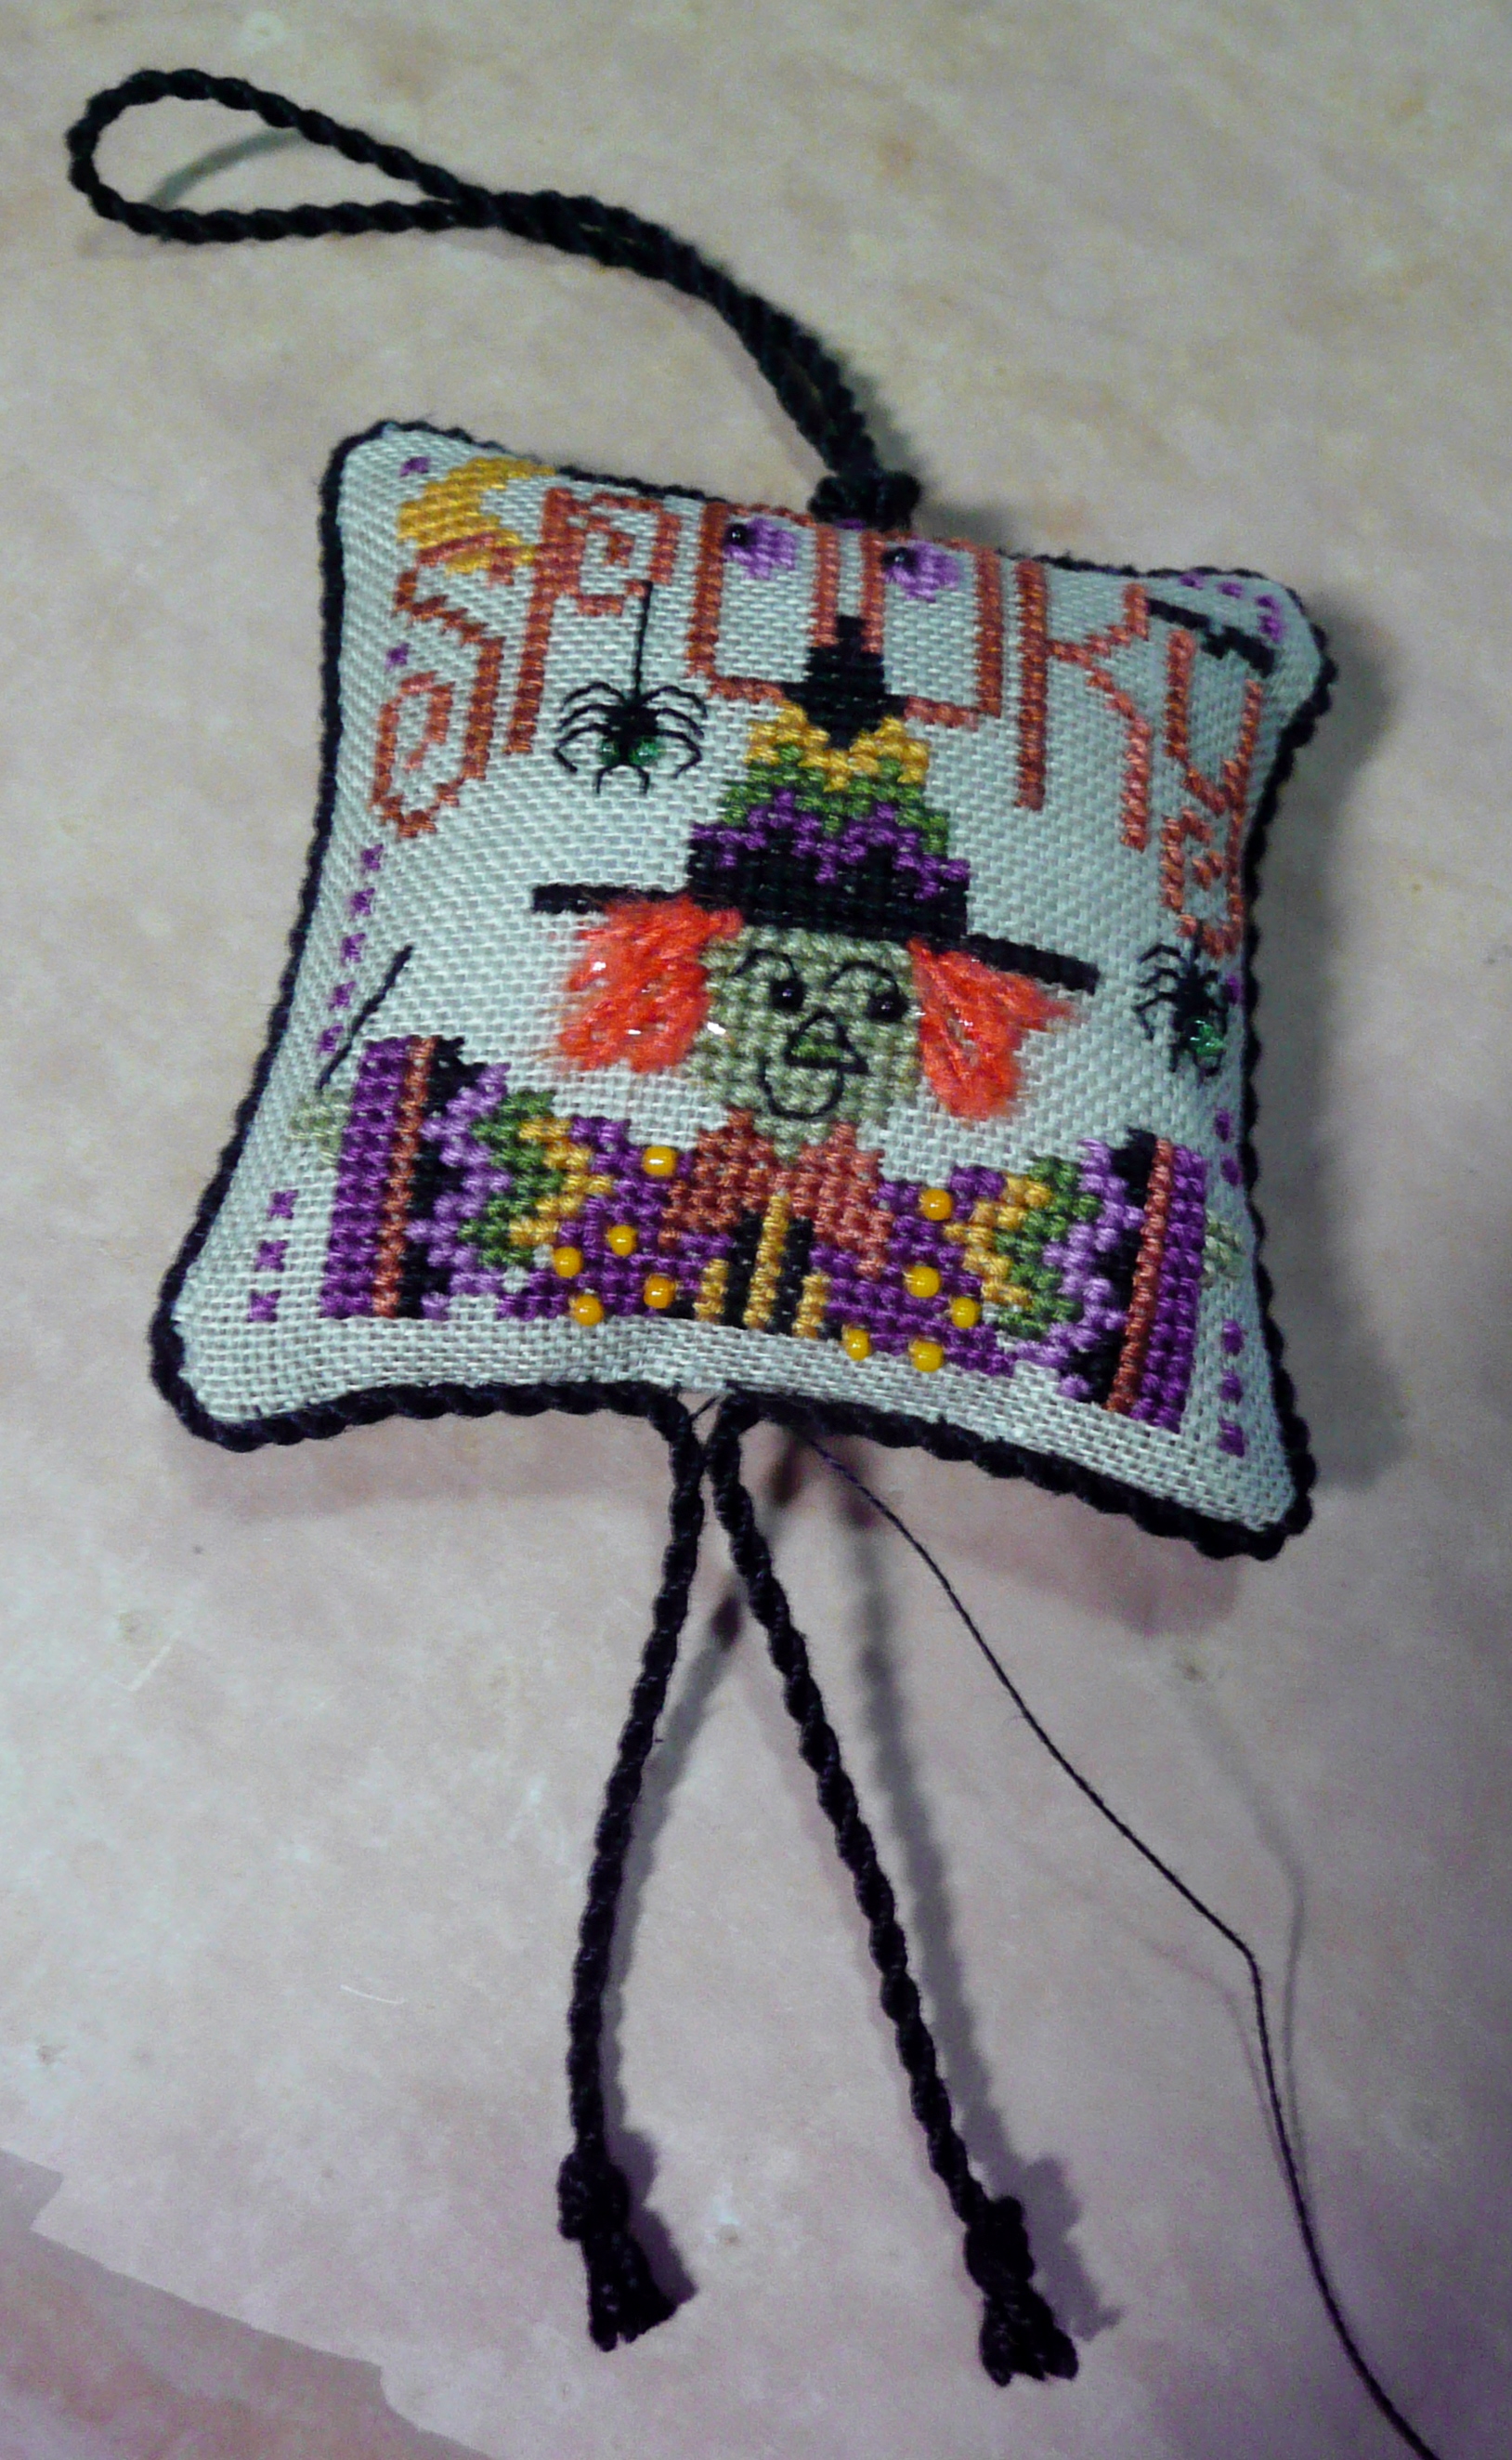
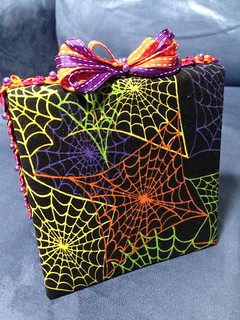
This last weekend just gone I managed to finish off one of my favourite Halloween pieces into a flat-fold … I found a bright trim in my stash along with some bright ribbons, and pretty happy with the way it turned out 🙂

Just Nan-Frightful

Just Nan-Frightful

Just Nan-Frightful

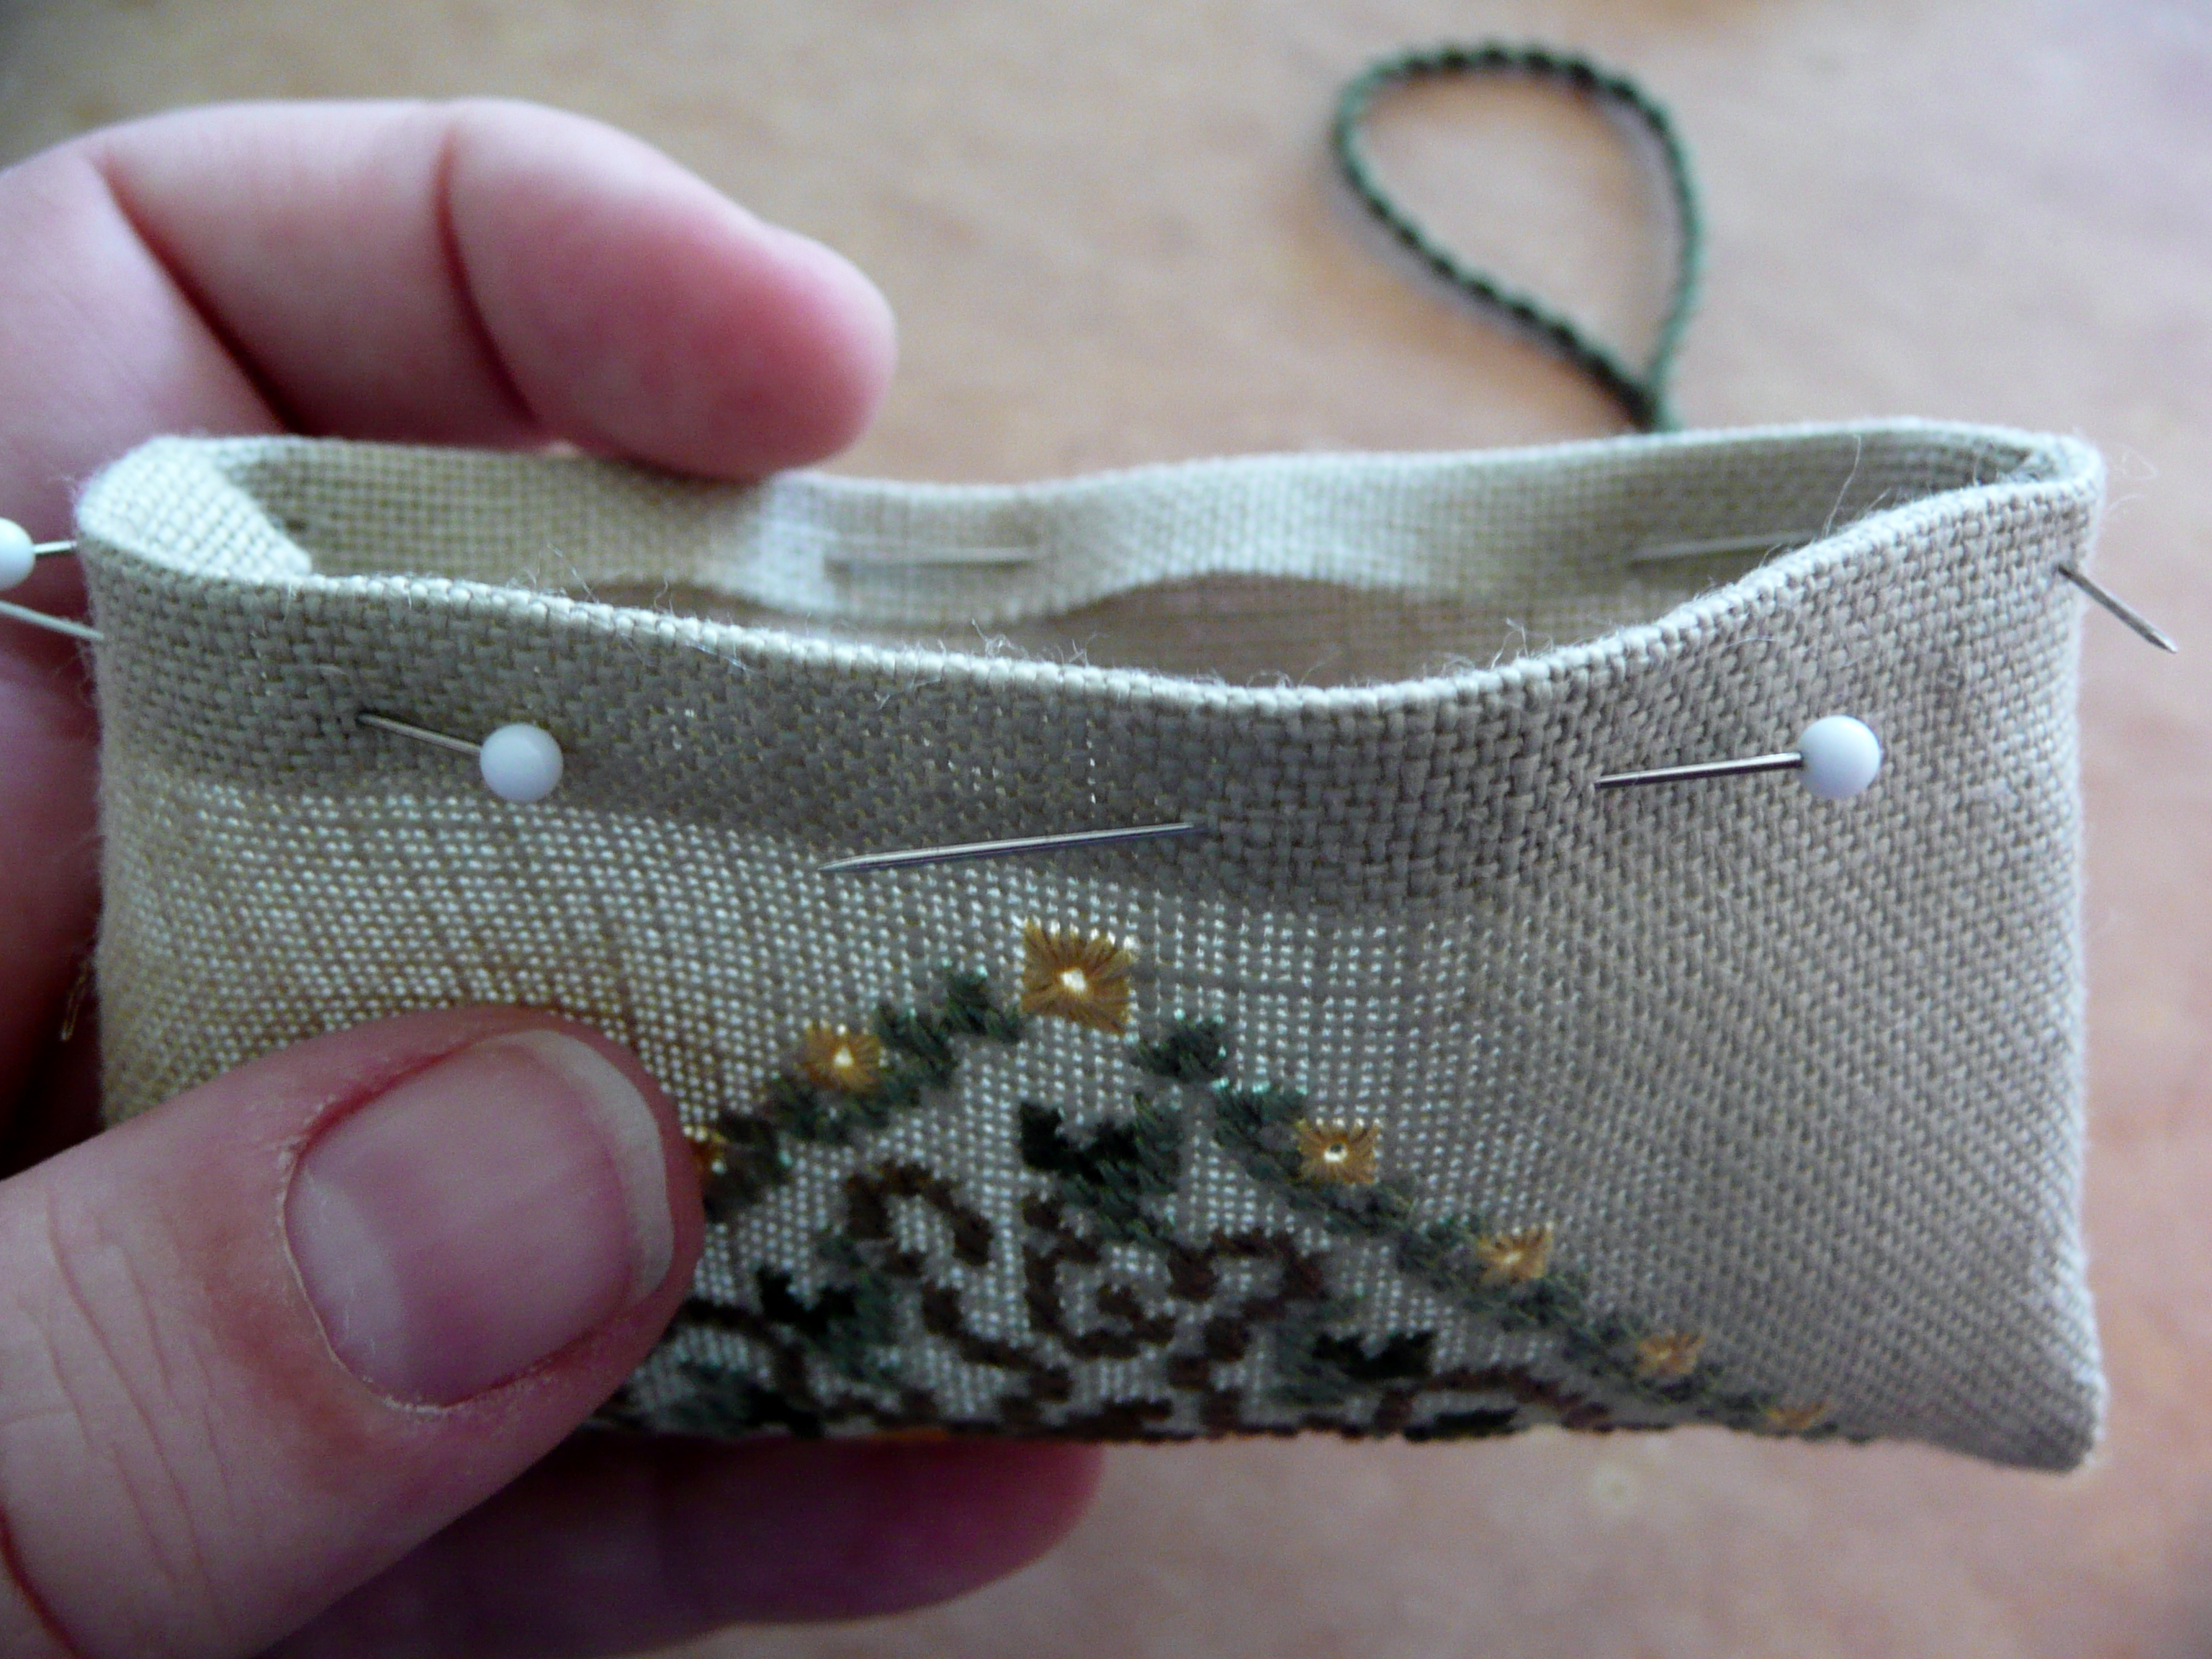
Then I finished off yesterday by trying to finish my Bunnies in the Garden needlework set that I stitched a few years ago … sadly it seems I don’t have the ribbon needed to completely finish it, so I’ve got as far as I can go without it … hopefully I’ll get chance next week to pop into Spotlight and find a silk ribbon that will work (assuming Spotlight still SELL silk ribbon, that is!).  Here is how it stands so far:

IMG_1797

The only stitching I’ve done since the last stitching update is to start a charity quilt block with the theme of butterflies.  I bought about a metre of 14-ct white Aida a few years ago in readiness to do some charity stitching, but with my city commute I just never had the mental or physical energy to do it … now I’m working closer to home I figure it’s time I pull my finger out and get some finished.  What also gave me the final kick in the pants was searching for an old XS kit in my wardrobe and finding a bunch that I’d bought especially to use for charity blocks … so out they came ready to start stitching!  Here are the kits I have in the charity block armoury to work my way through:

IMG_1748

IMG_1749

And here is where I’m at currently for my first butterflies block … once I’ve finished this block it’s time to get back into my formal rotation once again.

IMG_1800

I still have a couple of gifts to complete, but I work better when I’m sticking to my rotation properly so they will just have to find a rotation slot to drop into and work together with my other pieces 🙂 I’ve probably dribbled on enough for now, but before I hit “publish” I’ll finish off with the two WIPocalypse questions for April and May:

April:  How do you keep your stash organised?

Oh my goodness, I don’t know if I could truly say my stash is “organised” per se … although I guess to a certain extent it could be a lot worse!  My problem is that it is scattered all over the place and not all together.  I’m also a lazy git at heart, so often I can’t be bothered putting something away after stitching it (eg threads etc) and I end up with a dumping corner with threads and charts not put away … it’s no wonder I can often not find what I’m looking for when I just “know” I’ve got it “somewhere”!!  On the whole, though, it is kinda organised in a disorganised way …

  • Threads:  On the whole these are all stored in Flossaway baggies in numerical or alphanumeric order and on individual rings according to their brand.  DMC floss is all stored in numerical order in two plastic tubs so they’re easily accessible as I generally use those the most.  Overdyed threads etc are mostly stored alphanumerically by the colour name, but with the thread brands separated on different rings.  For example, I have separate rings for WDW, GAST, Crescent Colours, Needle Necessities/Threadworx etc.  All these threads are housed in a cardboard storage tub that sits in my Ikea ‘bookcase’.  Silks are stored the same way, and pearl cottons and other specialty threads (pearl cottons etc) are stored in another plastic tub.
  • Fabrics:  These are stored by thread count in two Ikea storage drawers – they used to be sorted in colour groups but I quickly gave up on that idea after I’d rummaged around a few times and disrupted it all!  I also have a ‘tub’ of fabrics sitting on top of my DMC that I’ve obviously pulled out at some stage for a project and never been put back …
  • Charts:  Generally these are stored by theme in ringbinders on bookshelves.  Most of these are housed in the kitchenette on my main bookshelves, but most of my favourite designs/smalls charts are in my bedroom on a narrow bookcase.  I have a couple of folders of “to be stitched ASAP”, but I’m trying to focus on those already partially kitted up first (see below).
  • Finishing fabrics/trims:  Truthfully these are all over the place!  Most of my quilting fabrics are in Ikea storage drawers in my wardrobe, with finishing trims etc in a little plastic storage system that has a few pullout drawers. Not ideal, but seems to work OK for now.

My projects themselves are in a whole world of their own where organisation is concerned!  I’ll try to differentiate the different types:

  • WIPs:  My current rotation projects are sitting in their own storage tub with the project on scrollbars/Qsnaps and sitting with their threads/charts etc in a plastic envelope.  That way each project is ready to go immediately when I want to drag it out of the tub.
  • UFOs:  Older WIPs that I haven’t touched for years are sitting in a cardboard storage tub in my Ikea bookcase in my bedroom – these are not stored on scrollbars etc and may/may not have threads with them … they just sit there forlornly at the very bottom of the bookcase feeling unloved …
  • Partial & full kits:  When I was housesitting in Melbourne I went a bit crazy and cut up fabrics for a few tubs worth of projects and put the fabric with the chart … these are now housed in two separate areas – some of these are sitting along with other full kits in two storage drawers in my wardrobe, and the others have all been split into cardboard storage boxes according to their size that will fit with my rotation.  I basically have one box each for “Large/BAPs”, “Medium” and “Small” projects.  I’m trying to work through those items first before kitting up new designs, seeing as the fabric is already committed and cut up ready for stitching!  That seems to work about 95% of the time, but ever now and then a new project seems to leap out of the chart pile demanding to be stitched first!! 😛
  • Canvaswork:  My canvaswork projects are sitting to the left of my Ikea storage bookcase in a shopping bag – these are kitted (or semi-kitted as far as I can for now) with their canvas and threads/charts all ready for when my canvaswork rotation rolls around.  This bag probably makes me drool more than the rest of my storage boxes, if the truth be known!

May:  What designs or themes do you really wish you could find?  What do you think is missing among stitching designs?

Truthfully I can’t say I really have had problems finding a specific type of design … I have, however, had problems finding a specific design that has since gone OOP and hard to locate unless you spend a fortune.  Those are the designs I wish would be more readily available, especially now that PDF downloads are widely available and don’t require a full print-run by a designer.  The other thing I find frustrating is the number of designs only available as kits and not charts, and how many are only available with Aida cloth as the fabric – the fact that I inevitably substitute the fabric in all my kits is not a cost-effective way for me to stitch a design … I really wish that all designs had the option of either having linen in the kit or to just have the chart made available (although I know this would diminish some of the designer’s/distributors’ profits to a certain degree).

The only other thing that has been happening over the last few weeks is something that I can’t talk about yet on my blog, but it threw me for a loop temporarily and my mind has been very very distracted over recent weeks, and I’ve been even more forgetful than ever, if that was even possible!  Hopefully there will be further news sooner rather than later and I can talk about it openly … for now it’s just a case of “wait and see” 🙂

Finishing, Focus on Finishing, Tutorials

Scissor Fob Tutorial #3 (with whip-stitch edging)

This tutorial is the next in my list of the many ways you can finish a scissor fob. The whip-stitched edge is one of the most versatile ways to attach two stitched pieces of fabric together, and is the perfect stitch for finishing scissor fobs. The next tutorial will include a beaded edge and tassel … so watch this space for that one … and in the meantime I hope you find the below tutorial of use. As always if there is something that is unclear or you have any questions don’t hesitate to scream out!

Scissor Fob with whip-stitch edging

DSCN0404

You will need:

  • Stitching (identical size front and back)
  • Cording or ribbon for the hanger
  • Matching cotton floss for the whip-stitching
  • Your choice of filling (eg polyfil, teddy bear pellets, etc)

1. Firstly you need a back-stitched line of stitching outside your stitched pieces, both front and back. The stitching must be identical in size on both the pieces, so make sure you count very very carefully, or your sides won’t match when you whip-stitch the sides together. In most cases I stitch approx 2 stitches away from my main stitching (ie 4 threads away on linen and 2 squares away on aida fabric).

DSCN0372

2. Cut away the excess fabric from each piece, leaving approx 3/4 to 1cm seam allowance.

DSCN0373

3. At this point I realised I hadn’t yet made myself a piece of cord, so I nipped off to quickly put a piece of cord together … see the previous tutorial for making your own cord. Alternatively you can use a piece of ribbon with the ends knotted together in the same way as the cord below.

DSCN0374

4. Now we need to turn over the seam allowance of your stitched pieces. First of all I fold over the corners right at the hole of the corner stitches of the back-stitched line.

DSCN0375

Then fold over the seam itself along the back-stitched line of stitches.

DSCN0377

DSCN0378

Continue all the way around until all the edges are folded over. You may prefer to hold down the seams with a pin – if you do this, though, don’t forget to pin it from the right side so you don’t accidentally stitch your pins on the inside of the fob!

DSCN0381

DSCN0382

DSCN0383

5. Now we start to back-stitch around the fob and stitch the front and back pieces together. I usually use 2 strands of cotton floss for my edges. Note that I have used a contrasting thread here so that the stitches show up more clearly – you can choose to do this if you want to have a contrast of the threads, but normally I prefer to use a complimentary thread colour to the fob, and usually use the same colour for the back-stitched seam lines and for the whip-stitching.

Start by coming up with your needle in the corner hole of one of the back-stitched lines.  I usually cheat and use a small knot to anchor my thread in the seam allowance.

DSCN0387

DSCN0389

Then take your needle under one of the back-stitches – start with the first stitch on each side.

DSCN0391

And continue to take it under the stitch that is directly opposite on the other piece of fabric (once again the first stitch on that side of the fabric).

DSCN0392

Then come back to the first piece of fabric, and take your needle under the next stitch and once again underneath the stitch directly opposite.

DSCN0393

DSCN0394

You continue this way until you come to a point where you want to attach your fob hanger. In this case I could have made my fob to hang in a diamond shape, or in a square shape … I ended up deciding on the square shape this time round.

DSCN0385

DSCN0386

To do this I continued whip-stitching the seam until I almost came to the half-way point across one of the sides – then I inserted the knot of the cord into the seam.

DSCN0395

DSCN0396

DSCN0397

Continue to whip-stitch through each side of stitches, but for the next two stitches you’ll need to pass your needle through the centre of the cord as you stitch – this will ensure that your cord doesn’t come free and helps to cement it neatly in place.

DSCN0398

DSCN0399

6. Continue to whip-stitch all the way around 3 of the sides, then leave a small opening on the 4th side so you can insert the filling of your choice. In my case I’ve used my favourite choice, teddy bear pellets.  (You will see that I’ve now started using the ‘proper’ coloured thread now to complete the finishing.)

DSCN0400

Once you have filled to your desired level, continue to finish off the remaining stitches.

DSCN0402

Finish off your thread at the end, and voila, your fob is all finished!!

DSCN0403

I hope you enjoyed the latest tutorial – thanks again for your previous comments on the other tutorials, it helps the motivation to keep doing more! 🙂

Finishing, Focus on Finishing, Shepherd's Bush, Tutorials

Scissor Fob #2 Tutorial (with corded edging)

This is the latest tutorial I’ve just posted on the Focus on Finishing blog … I hope someone finds it useful! 🙂

Scissor Fob #2 (with corded edging)

This time round the scissor fob I’ve chosen is a simple pillow with a corded edging.  I think it is better to use a home-made cord for this, as it is softer to manipulate, but you can always try to use purchased cord if the home-made cord intimidates you too much!

P1080011

Materials needed:

  • Your chosen stitched piece, including a front and back
  • Polyfil stuffing or other stuffing of your choice (eg teddy bear pellets or crushed walnut shells)
  • DMC pearl cotton or cotton floss for cording
  • DMC cotton floss for attaching the cord
  • Sewing needle (either a sharp or tapestry needle)
  • Pins and scissors

P1060958

1.  First of you you need to cut the front piece of your stitching into the desired size.  I find the easiest way is to count the number of threads when using linen or the number of holes when using aida.  In this case I followed the design’s suggestion and counted out 25 threads from the stitching, then I pulled out the next thread – this makes a clean line for you to cut the excess fabric away.  Then once all 4 sides of the front piece have been cut, place it face down onto the back piece, with right sides of the stitching facing each other, and cut out the back to be the same size (don’t forget to make sure the back piece is centred correctly before starting to cut – I usually do this by holding the two pieces up together in front of a light source such as a bright window).  Pin the two pieces together.

P1060960a

P1060961

2.  Sew a seam around the edges, but leave an open gap at the bottom seam to allow you to turn it inside out and add the stuffing.  I usually leave one long tail of the sewing thread that I use for sewing up the opening at the end.

P1060962

P1060963

3.  Cut away the corners, but don’t cut too close to the stitching, otherwise it may unravel when you turn the piece inside out.  Then trim back the side seams a little so they aren’t as bulky when turned inside out.

P1060964

P1060965

4.  Turn your stitching inside out.  You may want to ease the corners with a chopstick or something similar for a crisper ‘point’ at the corners – be careful, though, so you don’t make holes in the corners (yes, that’s the voice of experience talking from my first attempt years ago!).

P1060966

5.  Now it’s time to stuff with your choice of stuffing material.  In this case I’ve chosen Polyfil, and once again I use a chopstick to ease some of the stuffing gently into the corners.  The amount of filling you use is down to personal preference – I prefer mine not to be over-stuffed, but firm enough to feel ‘full’.

P1060967

P1060968

P1060969

6.  Next you close up the opening in the bottom seam.  My preference is to use a ladder stitch, however you can use a whip-stitch if that is easier for you.  To do a ladder stitch you just work your way alternatively up each side of the seam, taking a few threads in your needle for each stitch – this looks like the rungs of a ladder when the stitches are loose, and when you pull them tight they close up the seam very cleanly.

P1060971

P1060972

7.  Now it’s time to make your cording.  To do this you’ll need to have quite long pieces of thread, and I used 3 strands of pearl cotton that was supplied with my scissor fob kit.  Details of how to make cording yourself can be found in Scissor Fob #1 Tutorial.

P1060973

8.  Firstly you need to fold your cording in half and place a knot at approx 3 1/2″ to 4″ from the end.  Of course you may prefer a longer hanger, so feel free to make it as long as you want, just as long as you have enough cord to go around the edges 🙂

P1060975

P1060976

9.  When we start to attach the cording around the edge of the scissor fob ‘pillow’, I find it easiest to place a pin through the centre of the cord knot and take it down into the pillow at the centre of the top seam.  From there I take the cord along the top seam and add two more pins to hold the cord in place temporarily.  I start off my thread by poking my needle through the top of the pillow, through the stuffing; pull the needle so the thread just disappears from view under the fabric, then add a few little catch stitches at the back of the knot (because I’m using black thread you can’t see these stitches, if you’re using another colour where the stitching thread shows up, you may want to do your catch stitches underneath the knot out of sight).

P1060984

P1060985

P1060986

P1060987

Bring your needle to one side of the cord and take a small stitch under the seam – I try to put my needle in about 1 thread away from the seam, and come up approx 1 thread away from the seam on the other side, so it’s less likely to be seen.  (I pulled my knot up out of the way to show you the stitches, which pulled my loose tail out, so you need to be careful if you do this yourself!)

P1060989

P1060990

Now you take your needle and thread over the top of the cording to the right-hand side once again, and this time put your needle through the fabric just in front of the next twist in the cord.  You should use the cord as your guideline here for the length of your stitches – your top thread should follow the ‘furrows’ in the cording and sit neatly in the shape of the cord.

P1060998

Unfortunately it’s quite difficult to see this with the black thread, so I have use another piece of cord with a contrasting thread as an example so you can see more clearly what I mean …

DSCN0335

My cord is a dark colour, so I prefer to use the above method to attach my cording – sometimes, though, if you’ve used a variegated thread, or if your cording is a lighter colour, you may prefer to attach the cord with a small stitch underneath the cord attaching it to the fabric.  To do it this way you just need to take your needle through the cord at the bottom the cord:

DSCN0339

Then take your needle through the fabric seam underneath the cord, bringing the needle through on a diagonal … then continue the same way until the cord is attached.

DSCN0341

DSCN0342

Now after that little cording detour, it’s back to finishing off the scissor fob …

At this point you can remove the pins once your stitching is well underway.  Continue stitching the cord around the edge, stopping at the centre of the bottom seam.

P1080001

P1080002

Now go back up to the top of the cord and do the remaining side the exact same way, and finish off your thread by taking a couple of small stitches into the cord.  Once again I ‘bury my thread’ by taking my needle into the pillow and coming up a wee way away and cutting off the thread flush with the pillow fabric … then you just give your pillow a quick squeeze and the end of the tail disappears.

P1080004

P1080006

P1080007

Lucky last, I pop a quick knot at the base of the pillow, and the scissor fob is finished 🙂  If you find your cording is too long, just make another knot at your desired length of each piece of cord, and cut off any extra length not required.

P1080008

10.  All that is left is to attach your fob to your chosen pair of scissors!

P1080011

I hope you have found the tutorial useful – if you happen to use any of the information I’d love to see your projects where you have used them 🙂

Kindest regards,

Finishing, Scissor Fobs, Shepherd's Bush, Stitching Smalls, The Drawn Thread

Preview of the next tutorial

Yesterday I had a mini finishing spree where I did all the photos needed (almost all anyway!) for two scissor fob tutorials.  As you can see from my previous post I managed to complete one of them and have it published … I want to take some more photos before I publish the second one, though, so the cord attachment is more clear.  In the meantime, however, I can share my two finishes from yesterday – so you have a preview of which fob finishing method is coming next … 😉

P1080012

It’s felt really good doing the tutorials once again … perhaps my finishing funk is slowly disappearing and a wee bit of mojo is returning? … I really do hope so! 😀


Cross Stitch, Finished Items, Finishing, Focus on Finishing, Scissor Fobs, Stitching Smalls, The Drawn Thread, Tutorials

Stitching Tutorial #1

I have just published the following tutorial in my Focus on Finishing blog, but thought I’d include it here as well …

This is the first of a number of upcoming Scissor Fob tutorials … and is the type of finishing used by The Drawn Thread freebie designs and similar to Mill Hill treasure ornament series.  The finish is a diamond shape, which I think is really attractive for a scissor fob.  This one in my tutorial is a bit large for a scissor fob, in my opinion, but the finishing is the same irrespective of the design size you choose 🙂  If you are interested, this is Pumpkin Keeper freebie by The Drawn Thread.

P1060957

Materials needed:

  • Stitched project – this needs to be a square design, preferably stitched in a diamond shape
  • DMC thread or sewing machine thread to match the stitching fabric (and contrasting sewing machine thread for basting, if desired)
  • Stuffing (your preferred choice, can be Polyfil, crushed walnut shells, or teddy bear pellets, for example)
  • DMC for cording, or ready-made cord
  • Pencil or cording drill

1.  Ensure you have equal sides on your stitching – the easiest way to do this is to count the number of squares away from each of your piece if stitched on aida, or count a specified number of threads away from each side when stitching on linen.  In this case I followed the Drawn Thread instructions, which was to count out 24 threads away from the stitched area and cut off the fabric edges.  I find the easiest way to do this is to count out your designated number of threads then remove the next thread, ie pull it all the way out – this leaves a clean channel for cutting a straight line following the weave of the linen, as you can see in the photo below.

P1040636

P1040636

2.  Once you have cut away your edges and have a nice square piece of fabric, fold your stitching in half across the centre of the design, with the right side of the stitching facing each other.  Pin the edges together, and stitch a seam allowance at each of the short edges.  As it is hard to see my thread on the fabric, I have highlighted with red stitching where the seam line is below.

P1060927

P1060927a

I usually prefer top snip the corners slightly to make them easier to make ‘points’ once they’re turned the right-side-out.  If you do this, make sure you don’t snip them too close to the seam line, or it will unravel, and you don’t want that!

P1060928

3.  Now turn your stitched piece inside out, and put out the corners – sometimes I use a pointed chopstick to help get a nice point in the corner, but this needs to be done gently so you don’t poke a hole in the fabric!

P1060930P1060931

4.  Next we turn over the seam allowance on the top raw edges.  I prefer to give the seam a quick iron to make it sit flat.  You can just pin the seam allowance down around the top, or do as I do which is to baste it down using a contrasting sewing machine thread.

P1060932P1060933P1060935

5.  Next bring the two seams together to meet in the centre, and your stitching is in a diamond shape.  I usually pop a couple of pins in temporarily to hold the seams in place.  Turn your piece over to work out which is the top of your stitching, and where the cord will eventually be attached.  In this tutorial, because the fob is so big I’ve decided to just have a cord hanger at the top without any tassel or embellishments at the bottom – another tutorial will cover the option of adding tassels to your fob later.

P1060936P1060938

6.  Next it’s time to make your cord – obviously if you have purchased ready-made cord you can omit this step, but ensure your purchased cord is quite narrow so you can knot the ends easily.  I made my cord out of DMC cotton floss, and because of the size of the fob I opted to use 4 strands of DMC for my cord as I wanted it to be a bit thicker (my preference is usually 3 strands of either DMC or pearl cotton).  Sometimes it’s trial and error as to how thick the cord will turn out.  It is generally much easier to have another person assist you in making cord, but as I’m on my own I have to improvise with whatever is handy!  I apologise in advance for the poor photos in this section, I will do another tutorial soon to show the steps more clearly …

The first thing to do is to knot each end of the group of threads together.

P1060894

P1060898

Next you need to rope in an assistance to help out by holding one end of the threads tightly, or do what I do by finding something you can attach the other end to … in my case I have a portable clothes rack that I used, by snapping a metal ring over the rail and hooking the ring through the middle of the threads at the knot end.  Alternatively you could tie the end around a door handle or something similar.

P1060899

If you have a cord drill, that’s perfect, otherwise you can make do by using a simple pencil to wind the thread.  Take your pencil and insert it through the middle of the remaining end of the thread (at the knotted end), and walk back until your thread is nice and straight.  Then start turning your pencil – it doesn’t matter in which direction you turn your pencil, as long as you continue to turn it the same way 😉  I prefer to use a cord drill as it’s so much quicker, so that’s how I finished my cord off this time round.

P1060900P1060901P1060911

You need to keep turning your pencil/cord drill until your threads are very taut.  If you slacken off your tension a little bit and your thread starts to ‘kink’ and turn on itself it’s generally twisted enough.  I let go of the tension a little bit here so I can hopefully show you what I mean about the ‘kinking’ of the thread.

P1060913P1060915P1060917

This next part is very tricky to photograph as I needed both hands …  Once your thread is twisted enough, carefully hold the middle of your twisted thread with one hand, then using your other hand bring the two knotted ends together.

P1060918P1060921

I usually use a self-made weight that I hang in the middle, but forgot to use it this time!  I’ll show that method another time, as it’s a really quick way to get the threads twisting onto themselves!  In this case, however, I just used my left hand (my right hand was still holding the two ends together) to slide up the thread about an inch, and using my thumb and forefinger gave the threads a gentle twist.  You continue to do that by working up the thread and helping the threads twice nicely onto themselves.  Eventually you end up with a beautifully twisted cord.  Then you finish off by knotting the two loose ends together so it doesn’t unravel.  And voilà your cord is finished!! 😀

P1060923P1060924

7.  Decide how long you want your cord to be – generally 3 1/2 to 4 inches is about the right length, but you may prefer to have your hanger longer than that – it’s all personal preference!  In this case I’d made my cord quite short so I could do the tutorial easier for you.  Knot the two loose ends together at your desired length.

P1060925

8.  Now it’s time to pick up your stitching once again, and we need to start stitching up the remaining seam.  My preference is to close it up using a ladder stitch, however you can use a whip-stitch if that is easier for you.  Start at the bottom of the fob, away from where the cord will be inserted.  To do a ladder stitch you just work your way alternatively up each side of the seam, taking a few threads in your needle for each stitch – this looks like the rungs of a ladder when the stitches are loose, and when you pull them tight they close up the seam very cleanly.  Keep stitching up the seam until approx 1″ away from the end.

P1060942P1060944P1060946

9.  At this point you insert your chosen stuffing.  I have opted to use teddy bear pellets for mine, as I really like the extra weight it gives the fob, especially for smaller fobs (in hindsight I probably should have used Polyfil for one this big!!).  When I stuff with pellets I use a little Tupperware funnel that I find really useful for this job – alternatively you can roll a piece of stiff paper into a funnel instead!

P1060947P1060948

10.  Now we’re on the homeward stretch, and it’s time to add the cord and close up the seam!  Take your cord, and place the knot inside the seam opening, then continue stitching up the opening to the top.  Sometimes I will take my thread through the cord at the top to stop it from moving around, but it wasn’t needed for my fob this time.  You can now remove all your basting stitches.

P1060953

And that’s it, your fob is all finished and ready to adorn your chosen pair of scissors!!

P1060956

As always, please feel free to leave comments and let me know if you have any questions.  It’s always good to know if you find the tutorials useful, or if there is something you would like to see more of, so the comments are always appreciated!

Kindest regards,

Blackbird Designs, Christmas Ornaments, Exchanges, Finishing, Friends & Family

Mental health alert … I’ve been doing housework!!

It’s been an interesting few weeks, with not a stitch happening in this household except for Mum’s stitching while I’ve been busy doing things she can’t help with.  Rather we’ve been pulling out cupboard contents and chucking old things out and doing a general decluttering – all in readiness for when I start advertising for a new flatmate, or in readiness if I have to parcel things up and put everything in storage and move out.  Without going into too many details, I can only say that the last couple of weeks have been incredible not feeling like I’m walking on eggshells at home, and I feel a lot less tense at home.  It’s just a shame I have to get someone else in to live with me, ‘cos this is definitely a feeling of bliss I want to continue.  Oh well, maybe I’ll have to start buying Lotto tickets!

Anyway, a fortnight ago we had the lovely opportunity of meeting Cathy who was over visiting from WA – while I’ve been following Cathy’s blog for a number of years now, this is the first time we’ve met in person.  It was really lovely to finally meet up, and she managed to survive the day (and car trips) with me and my crazy Mum, so she’s pretty resilient! LOL.  We drove down the coast and met up with our other stitching pals in NSW and spent the day at Kiama – as always it was wonderful company, and we had a great day stuffing our faces with munchies and laughing the day away.  It was a really great day, and I’m already looking forward to the next one! I’ll ‘steal’ one of Alison’s photos from the day to share here … which stupidly sparked a tirade of hatred from a cousin in the UK on Facebook … I won’t go into details here, but let’s just say it was ‘interesting’ to say the least!!

While we were at Kiama I didn’t get any actual stitching done, but I took a pile of ornies that just needed to be stuffed and sewn up, so Mum and I did a shared job of it – Mum did the stuffing and I stitched their bottoms up.  Here are the results – there would have been a few more, but we ran out of stuffing 🙂

I also mentioned in my last post about an exchange that I’d received – this is what I received from Karen at The Stitching Post.  Funnily enough I’d only just been thinking about her recently, and I was surprised when an envelope arrived in my mailbox with her name on the back!  Karen chose a Blackbird Designs ornament for me, and the theme was “birds” for the exchange so it fit the bill perfectly!  She also included some extra little goodies that will come in handy.  Thanks Karen for a lovely exchange 🙂

And on that note it’s time to get back into cleaning and decluttering mode – we need to get everything finished by Monday at the latest so I can get carpet cleaners in to clean the carpet in Katie’s old room … it looks like she’s thrown up or something in there at one point, and is an absolute disgrace.  Bless Mum for offering to come over and help to clean things, as we’ve ended up doing everything again in that room.  Oh well, that’s all a part of history now … time to move on … and I have to admit the decluttering has been really cathartic 🙂

Cross Stitch, Finishing

Extreme finishing pile

Today Mum and I got out my entire collection of finished projects that need to be “finish-finished” – a number of these need to be measured up for framing (to be framed by myself), and others need to be ornamentified or made into pinkeeps, quilted wallhangings, etc etc etc. Some fellow friends and bloggers started showing their own finishing piles, and I figured I’d do the same thing … partly for my own record to make me actually make an effort and get some of these finished/framed instead of being rolled up in a project roll where no-one can see them. Sooooo, here’s my pile of shame … settle in ‘cos it’s MAJORLY photo heavy!!! 

Next up I’m going to number each one and make up a proper list and start deciding what to do with each item, so I’ll actually remember in a day’s/week’s time instead of looking at each one absently trying to remember what the hell I was going to make it into … and start tackling some of the list over time.

First up are Christmas ornaments that Mum has stitched for me, but still remain to be finished into pillow/felt-backed ornaments – I’ve told Mum she’s not allowed to leave until she finishes the 12 Days of Christmas ones for me, then I’ll finish off the remaining ones:

Finishing pile 9

***UPDATED:  In answer to questions received, Mum tells me the 12 Days of Christmas designs came from a magazine which might now be very hard to find – Better Homes & Gardens Cross Stitch Christmas 2002.***

Then there are the two snowflakes ornies that Mum also stitched for me – they have the finishing forms already set aside for them, and I’ve bought some white flannel fabric for padding, so these should be quick to complete once I pull my finger out!!:

Finishing pile 13

Then there’s the pile of Christmas ornaments that I’ve stitched but still not finished off:

Finishing pile 15

And yet more that I’ve pretty much finished except for adding the cording around the edges (we’re going to have a cording day tomorrow, because Mum wants me to make some for her ornies to take home, so perhaps these will shortly be moving out of the finishing pile … maybe …):

Finishing pile 14

Then there is the quilted wallhanging that I started making before my sewing machine broke down the last time … and here is the state it’s remained in ever since … these Santas were stitched by Mum, but once again I get the job of finishing them (a pretty good trade, I think, and a good team effort):

Finishing pile 1

Then there is the Quaker Round Robin – I haven’t been 100% happy with my fabric choice compliments of the crappy selection at Spotlight, so I’ve been waiting to make a trip out to Craft Depot at Pennant Hills before making a start on the finishing of this one:

Finishing pile 10

Then there are the general mix of projects – with different finishing methods assigned to each – and some I have absolutely no idea what to do with them! I guess in good time I’ll make a decision and turn each one into ‘something’:

Finishing pile 12

Finishing pile 2

Finishing pile 3

Finishing pile 4

Finishing pile 5

Finishing pile 6

Finishing pile 7

Plus of course I still have Chatelaine’s Stitching Leporello which needs to be finished off – so far I’ve cut out the four backing boards for the large squares, and that’s as far as I’ve managed, but I still need to find some lining fabric for the inside, so I guess there’s no hurry on this one yet:

Finishing pile 8

And perhaps a quick cord-making day might also see the end to this little treasure too – all it needs is some cord making/adding to the edges plus the needlepages added …

Finishing pile 11

So, doesn’t this make you feel better about YOUR finishing piles?? And I didn’t even include the latest influx of pumpkin finishes … oh boy, I really need to get cracking on these things – perhaps I need to have a dedicated finishing weekend at least once a month, or just give up stitching for a while and concentrate on finishing … either that or clone myself so I can do both! 😀

One great thing is that I found a wonderful picture framing supplier at Silverdale Silverwater who has some awesome ready-made frames plus they do a chop service for my custom-framing to do myself, plus good quality matboards etc – in the past I’ve ordered my supplies by mail order, and it’s hard to match colours etc obviously … this will make it soooo much easier, I just have to measure up and decide on approximate colours of matboards using my current L-cut samples, then save up to pay for the actual frames – easy!! 😛

Christmas Ornaments, Cross Stitch, Finishing, Tutorials

New Christmas Ornament tutorial for beginners

Following is a tutorial that I’ve just completed for the Focus on Finishing blog … I started this before my sewing machine went bust the last time, but finally completed the finishing a few weekends ago, and now the actual tutorial is done and dusted! 😀

* * * * * * * * * * * * * * * * * * * *

The following is a very basic pillow Christmas Ornament tutorial designed, in particular, for beginners.

Supplies needed:

  • Stitched project (if you want to you can also iron on some light interfacing to the back of the stitching to add some strength and stability as well as giving a smoother finish
  • Backing fabric
  • Approx 6″ (15-16cm) of ribbon to coordinate with your stitching for the hanger (I normally use 7mm double-sided satin ribbon)
  • Stuffing
  • Sewing machine with coordinating thread to match your fabrics
  • Complimentary sewing thread and needle

1. Start off by laying your stitching piece on top of your backing fabric, with wrong sides facing, as shown below:

2. Now we need to cut the fabric so that all sides are equal. The amount of margin that you leave is up to you, here you can see that I’ve allowed 3/4″ margin on each side. I line up my ruler along the edge of my stitching, and cut the fabric with my rotary cutter (both my stitched piece and backing fabric at the same time).

3. You continue this same way until all four sides are cut away. Remember that your backing fabric is underneath, so you need to be careful when you are moving your stitching around on the cutting mat that the fabric doesn’t move out of place or your pieces won’t match at the end. Once you have finished cutting all four sides, remove the backing fabric from your stitching fabric.

4. Next I attach the piece of ribbon to my stitching – the ribbon must be attached to the right side of your stitching. Adjust the size of the loop to match your own preferences, then pin in place. I like to have a slight angle to the top of the ribbon where it is pinned in place, so that it hangs nicer when it’s finished.

5. Next place your backing fabric on top of your stitching/ribbon, with right sides facing, as shown below. Pin the pieces together around the edges.

6. Now we need the sewing machine – once again, it is up to you to choose how much fabric margin you’d like to leave around the stitched piece

It’s quite hard to see the stitching threads because they match the fabric so well, so I’ve doctored the photo and drawn a line to show you the stitching line of where I started and finished – hopefully you can see clearly now that I have left an opening of about 1 1/2″. I like to leave a long tail of the sewing thread at one end, which I don’t trim off, so that I can use it for stitching up the final seam opening.

7. The next step is to trim the fabric at the seams, so they aren’t as bulky when you turn the ornament inside-out. The first photo below is my bottom seam – some fabrics tend to fray a lot when you are trying to pull the fabric through the opening, so I’ve learnt to leave the bottom seam a tiny bit wider than the other three seams. The second photo is the usual amount that I trim back the main seams.

8. Then you should trim off each of the corners – once again, this allows you to get a crisper point on the ornament corners once you’ve turned it inside-out and improves the look of the ornament. Just be careful not to snip the stitching!

Your ornament should now look something like this:

9. The next bit can be a little bit nervewracking if you haven’t done it before! You need to reach in and pinch a little bit of the backing fabric between your thumb and forefinger, and then slowly and gently pull the stitching and the backing fabric through the opening so it’s facing the right-side out. Take your time when doing this, and just pull your fabric through little by little – it seems like it will never come through, but then all of sudden a miracle seems to happen and you have it all turned inside-out. I often enlist the aid of a chopstick to help me get the corners nice and pointy once I’ve finished turning my ornament inside out.

Your ornament should now look a little something like this. Of course it was at this point that I realised I’d forgotten to attach my little gold charm to this particular ornament so I had to add that quickly before finishing the next stages … doh! I usually give the ornament a quick run over with an iron at this point to remove most of the creases caused by turning inside out.

10. The final stage is to stuff your ornament with stuffing of your choice. I tend to just use polyester fibrefill from my local craft store. Once you’ve stuffed it to your satisfaction (my preference is to fill it to a medium level – if I fill it too much it doesn’t sit quite as well on my little tree), you need to thread your sewing needle with sewing thread (if you didn’t leave a long tail from the seam stitching). You should use a sharp needle here, not a tapestry needle, so that you can pierce the backing fabric easily.

I use a ladder stitch to sew up the opening. As you can see from the photo below, I start off by slipping my needle into the seam of the backing fabric, then coming back out about 1/4″ along the seam (about 3mm) and bring my needle out.

I then take my needle directly opposite where I just came out of the backing fabric and slip my needle into the linen and follow the seam along for about 1/4″ (3mm) and bring the needle back out again.

I’ve left the stitches nice and loose in the photo below to help illustrate how the stitches follow along opposite each other, like rungs of a ladder.

When you pull the thread tighter, the stitches almost disappear into the fabric, giving a really nice clean finish – this is definitely my favourite stitch for closing up openings for that reason!

Once you reach the end of the seam opening, you need to finish off your thread with a couple of teeny stitches – I then bury the needle into the seam and come out somewhere about an inch way and bring the needle back out again – then clip the thread close to the fabric so that my thread tail does’t appear easily.

And here’s the final seam all finished off – see now nice and tidy that ladder stitch is in the opening? 😀

Your ornament is now finished, and ready to hang on the tree 😀

I hope you’ve enjoyed this tutorial, and found it useful. I would love to see any photos of ornaments you’ve completed using this tutorial so please do drop me a line or leave a comment with a link to your pictures 🙂

Christmas Ornaments, Cross Stitch, Finishing, Gift of Stitching, Pay It Forward, pillows, pincushions, Stitching Smalls, tin topper, Works in Progress

Final day of finishing

Wow, what a spectacular weekend I’ve had finishing-wise – I’ve really enjoyed sitting around in my PJ’s and scruffy clothes on my own all weekend and concentrating on my finishing efforts.  As the hours went on, I felt more confident again in doing finishing – and I’m thinking perhaps I should assign one weekend a month to doing the same thing …

Here are the final efforts from today’s finishing session – there is still one pincushion left to show, but I still have to stitch on the cord edging before I can claim it as being finish-finished 🙂

1 more Christmas ornament
(excuse the greenish tinge, it’s actually white fabric!)
Christmas Ornie

1 tie-on Easter pillow (certainly not my best ever finishing!)
Easter pillow

My first Pay It Forward completed (with my tea-dyed lace)
(name removed so the recipient can be surprised)
Pay It Forward 1 Incognito

1 Tin Topper – LOVE this one –
I’ve been meaning to turn this into a tin topper for EVER!
(now I just need to find some magnet strips for the lid –
I’m sure I have some hiding away somewhere)
Tin Topper 1a

Tin Topper 3

And I also ‘forced’ myself to sit and watch a bit of vintage TV tonight while I sat and stitched for about 2 hours … I’ve been working my way through The Professionals on DVD – from waaaaay back in the 70’s, this used to be one of my absolute favourite shows in my youth.  I had the biggest crush on Bodie (Lewis Collins) at the time … and now just giggle a bit at the outlandish clothes and tight pants 😛

At least that vintage TV session gave me chance to put a few more stitches into Just Nan’s Ghastly Ghostly Ghouls – I managed to complete one side of the garden fencing, and planted a tree (well, OK, maybe HALF a tree!) 😀

And do you remember I said I’d mislaid my teeny white buttons for Lizzie*Kate’s Boo Club? Hmmm, I guess I was a bit smarter than I thought – I found them hiding where they actually should be … in my embellishments box … hmmm.  Anyway, I’ve now thrown in my little black buttons with them too, so during my next stitching session I’ll be tossing up between Sapphire Star, Ghastly Ghostly Ghouls and Boo Club – oh, decisions, decisions 😛

Tomorrow it’s time to back to work again – where I will be putting my hand up for another 12 month secondment (that is of course if I actually get offered it) … it’s basically doing the same job that I’m doing now, and working within the same team, but being paid for by another department and working purely on their projects for 12 months – which means additional exposure to a different side of the business and chance to become more focused (plus it’s a side of the business I’m the most knowledgeable about).  It’s going to be a massive 12 months, going by what I’ve heard about so far, but at least it’ll be a subject I enjoy … I guess I can only stick my hand up and say I’m interested and then see what happens … 😀

Cross Stitch, Finishing, Flatfold, Just Nan, Prairie Schooler, Works in Progress

Flat-fold finish

Well, if I thought my hand cramps during the hemstitching of my needlerolls was annoying, the cramps from the ladder stitching of the sides of my flat-fold were downright tortuous … it took me hours just to complete one little flat-fold, and that turned out to be my only finishing completed yesterday.  Now I just need to buy some nice trim for the edges of the front piece and add a nice rich red bow or something on the top.  I’ll take another piccie later when I eventually get around to going shopping.

PS-Santa Ltd Ed 1

PS-Santa Ltd Ed 2

PS-Santa Ltd Ed 3

During my finishing session I watched another couple of movies – the highlight for me was Charlie & Boots, it was a nice lighthearted Aussie movie that I could easily watch again.  On the other end of the scale I watched District 9 … or should I say “started to watch” … that has got to be the biggest waste of celluloid I’ve seen for quite some time!  Thankfully not long afterwards I managed to finish my flat-fold and then sat and finished watching the last half of the Taking of Pelham 123 while I stitched for a short while.  I have to agree with Gina’s comment in my last post that I really enjoyed this one … not enough to stop me from stitching, but then again there isn’t much movie-wise that can manage to do that – it’s one of the reasons I can generally sit and watch movies over and over while I’m stitching 🙂

I must say, though, I was thrilled to see the little ghostie showing up nice and clearly against the slightly darker tea-dyed fabric – definitely worth doing it!  I did start visualising this little piece as a little flat-fold though, so at that point I decided I was getting delirious and had to take myself off to bed … at least it won’t be ready for finishing for a while, so I’m not quite a sucker for punishment just yet 😛

Unfortunately I was woken up at 4.30am to the sound of glass smashing, so I was as nervous as heck sleeping (even though I’m on the 3rd floor of our apartment block!), and I had a very broken sleep – not entirely sure what I’ll finish off today, but it probably won’t be half as productive as Saturday as today is also housekeeping day when I have to tidy everything up as well as doing all the housework in readiness for the working week beginning.