It’s been an interesting weekend and start to the week so far … this week I’ve been totally addicted to Ghost Trappers on Facebook – I’ve been having a blast! I actually found the game’s Wiki and have been learning more about playing, and it’s all making a heckuva lot more sense! And I’ve been glued to the chat room and internet radio for giveaway prizes, and been exceptionally lucky to win 3 or 4 prizes … now all I need to do is transfer that luck to the Lotto draws, and I’ll be happy LOL 😉
I haven’t been stitching much at all – on Sunday (or Saturday night, I can’t remember now!) I managed to get the following paltry start into Mirabilia’s Enchanted Mermaid … quite pitiful, really!
What I did do, though, is to go online and order my first picture frames to give it a shot with framing myself. This is how I’ve chosen to frame five of my stitches pieces – the biggest piece size-wise is probably Graeme Ross’ Tiger, and I’ve chosen a total of three mats for that one. Fingers crossed the frames/mats all look OK when they arrive, and that I manage to actually put them all together!
And on that note, I’d better hit the hay – I’ve been up until 1am every night this week playing and hunting ghosties on Ghost Trappers and think it’s time I hit the sheets before the haunting hour!!
I also just remembered that I need to draw the names of the scissor fob winners, so I’ll rope my friend and flatmate Katie into giving me an impartial hand in drawing names out of the proverbial hat over the next couple of days 🙂
Here is my choice for this week’s Ruby Tuesday – White water rafting on the Wairoa River, Tauranga, Bay of Plenty, New Zealand. According to a tourism website “Open just 28 days a year, the Wairoa River is one of New Zealand’s most exciting rivers for rafting or kayaking. The rapids start with simple grade two cascades and gradually build up to thundering grade five rapids.”
If you look closely, there I am tucked down towards the front of the raft on the left … thankfully I wasn’t the one that was thrown out of the raft and who is at the back of the raft clinging on for dear life! It was a major rush doing this trip, but not one I’m keen to repeat again in a hurry – especially going over the waterfall!!!!! In hindsight, perhaps not the perfect idea to try a grade 5 river on your first trip 😮
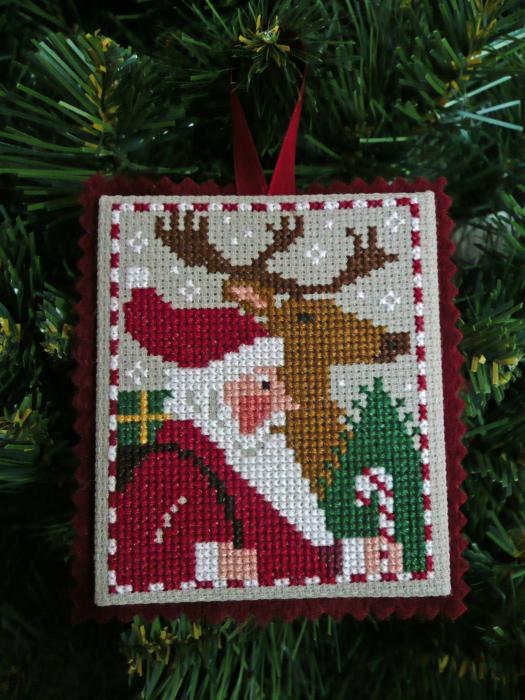
Unfortunately I don’t think the Just Cross Stitch ornie magazine is very clear with their finishing instructions for ‘newbies’ so I thought I’d make one up myself to help people out that haven’t done this type of fnishing before – and show just how simple it is 🙂
CHRISTMAS ORNAMENT TUTORIAL
(the way Prairie Schooler finishes them)
Materials needed:
Stitched ornament
Felt in coordinating colour
Cardboard (I use matboard)
Batting (I prefer cotton)
Ribbon for hanger
Glue
Thread for lacing (I use crochet cotton or pearl cotton)
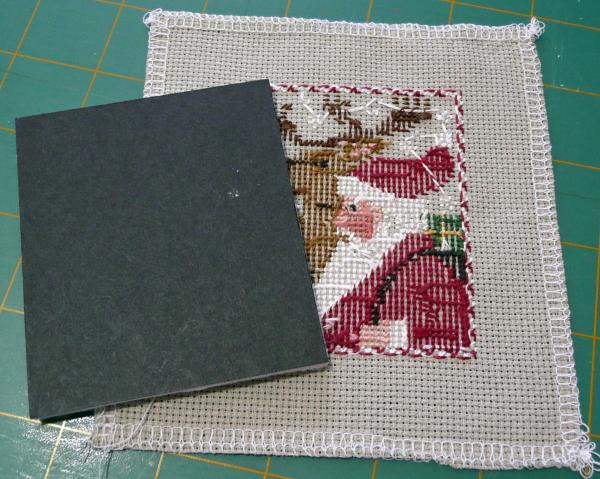
1. Firstly measure your stitched ornie for the size that you want the cardboard to be.
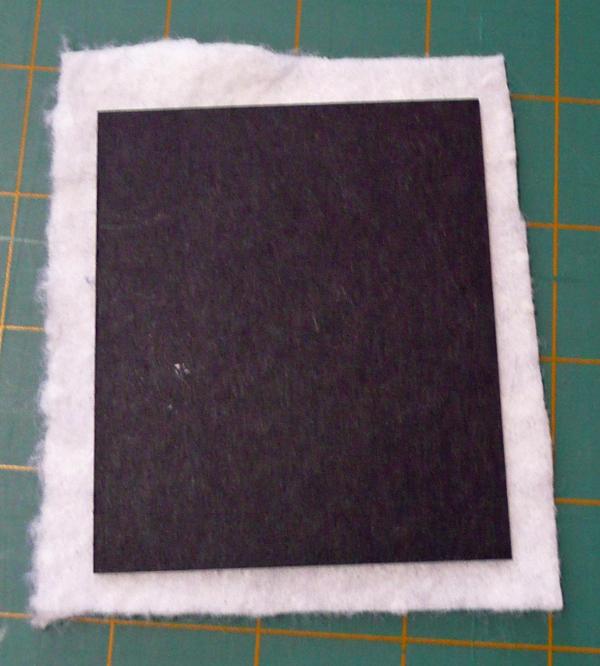
2. Next, cut out your cardboard/mattboard to the desired size. Add glue to one side of the cardboard, and place glue-side down on your batting. Even though I don’t show it in the photos, I actually smooth down the glue with a little offcut of mattboard so that the glue covers the cardboard evenly – that way you don’t feel ugly bumps on the front when it dries.
3. Once the glue has dried, cut around the cardboard shape and cut off the excess batting (my mattboard is black on one side, it just happened to be the piece that our local framers gave me).
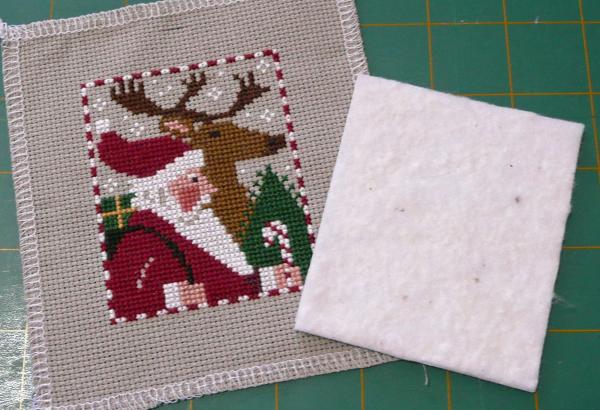
4. Now it’s time to attach the stitched piece to the padded mattboard.
Turn the stitching over so the good side is facing down – place the padded mattboard padded-side down on top of the stitching.
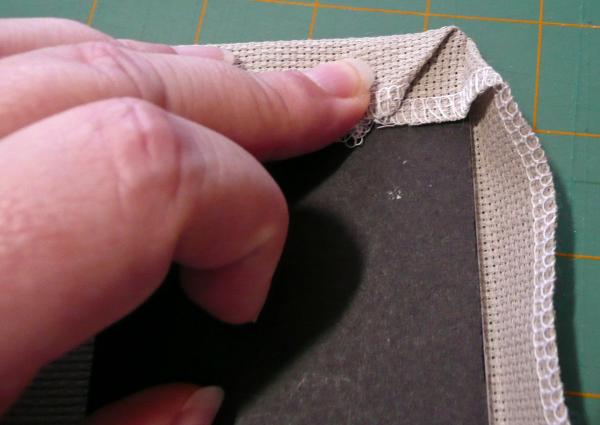
5. My instructions for the next part are in relation to lacing the ornie together – I’ve found that this gives a much cleaner finish on the front of the ornie, and in particular in the corners. If you don’t want to lace, you can just use glue to stick the sides down in the same way – you’ll just have to be careful that the glue doesn’t dry before you have the stitched piece nicely centred on the front.
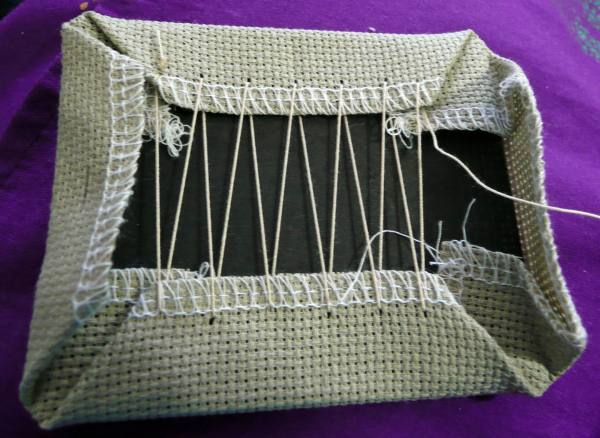
7. Next I start lacing – I usually start with a couple of little anchor stitches at the start, but here I used a waste-away knot first (this will be cut off later) – then you just work from one side of the ornie to the other, as you can see from the series of photos below.
8. At this point turn the stitched piece over and check that the stitching is sitting nicely centred over the mattboard. If it’s not centred perfectly, just give it a little jiggle around until it is nicely centred.
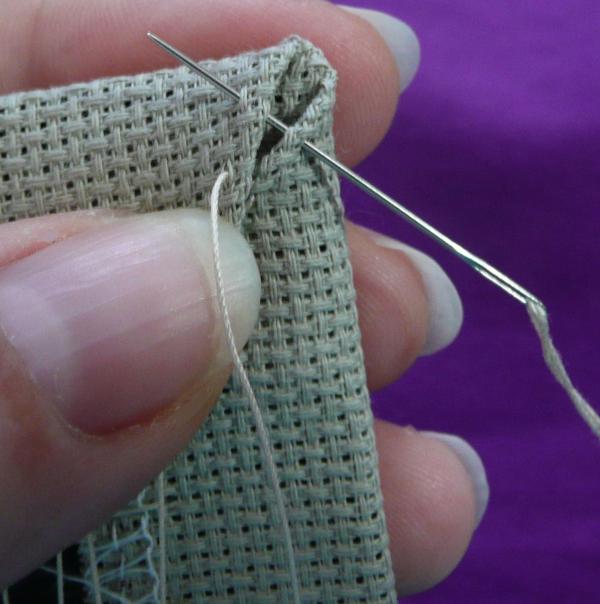
9. Turn the ornie back over again, and continue to lace the remaining two sides. Now I usually stitch up the mitred corners, as this really tidies up the corners and gives nice clean points.
10. The finished version should look something like this if you’ve laced it according to my version.
11. You now have the choice of adding your ribbon hanger now, or at the end. I always used to add my hanger at the end, but decided to try it this way for the tutorial, and have added the ribbon prior to adding the felt backing.
Cut a piece of ribbon to your preferred length – I ‘twist’ my ribbon to give it a nice loop, if you just fold it in half the ribbon doesn’t sit quite as nicely. Hopefully that makes sense, and you can see what I mean from the photos! Attach the ribbon with a couple of little stitches to attach it to the fabric – I prefer to stitch it rather than just gluing to ensure the ribbon hanger doesn’t fall off in a hurry.
12. Next, turn your ornie over and add glue to the back – I usually use Tacky Glue and once again I use a little offcut of mattboard to spread the glue out all over the backing, but this isn’t essential. I figure this will help to keep the glue stuck down for longer than just having a little bit on the edges 🙂
13. Now place your glued ornie down on the felt backing and ensure the felt is pressed down nice and evenly onto the glue. Then, using pinking shears, cut around the ornie shape – don’t forget to hold your ribbon hanger out of the way so it’s not accidentally lopped off!
14. If you prefer to add your ribbon hanger at the end, this is an example of one of my older finished ornies that I completed this way 🙂
15. And you now have a beautifully finished ornie – all you have to do is to hang it up on your (or a loved one’s) tree! 😀
I hope that’s easy enough to follow – if you have any questions, don’t hesitate to scream out and I’ll try to answer them.
Those in my family who know me the best will know I’m a crappy baker – one particular cake I tried making (an orange cake, from memory) sank nicely in the middle and had a heavy texture. Dad loved it! And afterwards asked me to make another “sad cake” ‘cos it was so lovely … I’ll never forget that “sad cake” 😉
Anyway, last weekend I had a HUGE urge to bake something … not being a baker, this was EXTREMELY unusual, as I just don’t bake anymore – but even MORE unusual is the fact that it turned out to be the best damned cake I’ve ever baked in my life (and those good ones can be counted on one hand with a few fingers left over!) … and I’d even go so far as to say it was one of the best damned cakes I’ve ever eaten in my life! Yep, BIG words!! Anyway, I thought I’d share it online so Mum can try it out – I should really try it again myself too to make sure it wasn’t some kind of huge fluke that it worked out so nicely!! 😛
ALL-OCCASION CHOCOLATE CAKE
1 cup (250ml) water
1 1/2 cups (330g) caster sugar
125g butter
2 tablespoons cocoa powder
1/2 teaspoon bicarbonate of soda
1 1/2 cups (225g) self-raising flour
2 eggs
Grease deep 19cm square cake pan, line base with baking paper.
Combine water, sugar, butter, cocoa and soda in medium saucepan; stir over heat, without boiling, until sugar dissolves. Bring to boil, simmer, uncovered, 5 minutes. Transfer mixture to large bowl; cool 10 minutes.
Add flour and eggs to mixture; beat with electric mixer, on low speed, until smooth. Pour mixture into prepared pan. Bake in moderate oven (180-190C / 350-375F) about 40 minutes. Stand cake in pan 10 minutes; turn onto wire rack to cool.
Top cold cake with 1 quantity Fluffy Cocoa Frosting.
FLUFFY COCOA FROSTING
50g butter
2 tablespoons water
1/4 cup (55g) caster sugar
3/4 cup (120g) icing sugar mixture
2 tablespoons cocoa powder
Combine butter, water and caster sugar in small saucepan, stir over heat, without boiling, until sugar is dissolved. Sift icing sugar and cocoa into medium heatproof bowl; gradually stir in hot butter mixture; cover, refrigerate until thick. Beat with wooden spoon until a spreading consistency.
Yesterday I ended up coming home from work due to feeling nauseous and hypersensitive hearing – as it was a ‘theme day’ at work, there was much hilarity and it finally sent me over the edge and I ran screaming for the hills. I guess I’m still not 100% over these darned bugs, as it’s been a real struggle at work this week. Oh well, it’s the weekend again, thank goodness, so two more days to chill out and relax 🙂
Once I did start feeling a bit brighter yesterday afternoon in the peace and quiet of home, I managed to get some stitching done, and managed to finish off my Home of a Needleworker Too. I really like this one – I did change one thing, and replaced the Crescent Colours Old Blue Jeans thread with something lighter – the Old Blue Jeans skeins I have in my stash are just revolting, and I really didn’t want my house stitched in it. Rather than buy more threads, I just found something that would be suitable in my existing stash – I like it soooo much more than that manky Old Blue Jeans 😀
“Home of a Needleworker Too” by Little House Needleworks Stitched on 28ct Vintage linen by Wichelt
using recommended Crescent Colours threads with one exception
– replaced Old Blue Jeans with Crescent Colours Blue Moon
That now means that I can use those scroll bars to start Mirabilia’s Enchanted Mermaid in the Large/BAP rotation slot … all I need to do now is to blow up a big working copy so I can highlight over the stitched sections easily – might take a run over to Officeworks tomorrow and organise that 🙂
I finally managed to put the final stitches into Just Nan’s Winter in the Square tonight – and I am sooooo in love with this finish, it’s ever so pretty 😀
“Winter in the Square” by Just Nan stitched on 28ct ‘mystery’ Cashel linen, tea-dyed
with recommended threads (DMC)
Even in the late hour of the night, the photos didn’t come out too badly – I’m so glad I decided to tea-dye the fabric, as it’s added just the right level of colour to the linen and makes the white thread stand out so much more.
The next slot in my rotation is supposed to be “Large/BAP Projects”, and I’m supposed to be started Mirabilia’s Enchanted Mermaid next, but I need to empty the scroll bars first, so I’m finishing up LHN’s Home of a Needleworker Too first up, as those are the scroll bars I need. I managed to finish up the little spool of thread, and most of the letter “H”, but that’s all so I didn’t bother taking a progress piccie. Fingers crossed this weekend I’ll be able to put a few more stitches into it and perhaps get that one finished off 😀
I was sorry to hear of the death of the designer and artist Graeme Ross this weekend – he was the creator of Ross Originals designs, and had an incredible designing talent. If you want to read more about him and his life, feel free to wander over to the Ross Originals website for more information. I personally adore his bird and wildlife designs.
One of my all-time favourite stitched pieces was a Ross Originals piece – this is one of my very first ever XS projects, stitched on 14ct Aida back in the days when I didn’t know anything called linen was in existence. Here is my Ross Originals’ “Tiger” in all its magnificent glory. Actually it looks like I scanned the piccie years ago, as I notice the right-hand side in particular is a bit cropped off – oops!
I’ve always wanted to get this piece framed, and have never managed to get it done (in fact I’ve never managed to get much framed at all … I can probably count on one hand the number of XS pieces I’ve had framed) – but now I have a real urge to finally pull my finger out and get him finished. I want to learn how to do my own framing, and this one will definitely be added high to the top of the pile to be done. I’ve had a mat-cutter for years now, that I bought in the US at the Heart of XS shopping mall way back in 1999 – and I just bought the beginning kit for the staples and frame straps to start framing at our recent craft show in Sydney, but just need to buy some cut up pieces of frame ready to give it a go … I really do need to do this soon and start building up my confidence!
Of course, I still have two pieces in particular by Ross Originals that I still have to stitch – one that is currently sitting in UFO status, that I was stitching as a SAL with Carina (who has since disappeared off the face of the earth), and one that is very very high up the list of wanting to stitch. Both of these are being stitched over-one … probably why the Macaw is currently sitting in UFO status! Of the two pieces, my absolute favourite is the Rainbow Lorikeets piece – but I started the Macaw first, as that was the choice of Carina for us to stitch together. Perhaps now that I’m not doing a SAL any longer I should just ditch the Macaw and get the Lorikeets done first – life’s too short … and I can always return to the Macaw again afterwards 🙂
Here’s the Macaw chart, along with my current pitiful progress where I left it a couple of years ago:
And here’s the beautiful Rainbow Lorikeets chart – I just adore this one!
The world has lost an exceptionally talented designer and stitcher – but his name will continue in the finished works of those of us who adore his designs. RIP Graeme Ross!