Christmas, Cross Stitch, Home & Family TO BE FIXED, Works in Progress

Christmas festivities

I hope everyone had a wonderful Christmas Day in whatever way you chose to celebrate the day – and for those of you who don’t celebrate Christmas, I hope you had a good holiday day.

I left home on Christmas Eve and spent Christmas Day and Boxing Day with my closest friends here in Sydney, Brenda and Nigel, and we had a wonderful time.  We didn’t over-eat as much as previous years, which was great.  Nigel spoiled us, as he always does, by cooking us Eggs Benedict for a late breakfast (which Brenda and I washed down with a mini bottle of bubbly each).  We then skipped lunch and saved ourselves for our Christmas feast of baked ham, boiled baby potatoes, sliced beans fresh from the garden, peas, and the most succulent turkey I’ve ever had – topped off with Nigel’s famous pavlova for dessert.  My contribution was at Brenda’s request – I brought all the ingredients to make Sangria and Brenda and I polished off two jugfuls of it throughout Christmas Day (Nigel doesn’t drink, which always means more for us!).  We both adored the recipe I chose, which can be found on the Taste.com.au website.

It was a very hot and humid day here in Sydney, so we ate our evening meal outside (along with their favourite next door neighbours who joined us for dinner) – I enjoyed it immensely until Nigel spied a huge spider … and I mean HUGE!!! … sitting on the fence by the table. I only needed to look once at its massive long legs hanging over the top of the fence and I was outta my chair quicker than a speeding bullet.  Even Nigel said it was probably the biggest spider he’s ever seen, and when he tried to get closer to it it tried to bite him with its big fangs … I finally decided I couldn’t handle it any longer even hiding behind Brenda’s chair, and I cleared the table and did the dishes – then ate my dessert inside on my own!  That’s one bit of company I did NOT want to share my time with on Christmas Day (or any day for that matter) – thankfully Brenda and Nigel know what I’m like so they weren’t offended in the slightest, and it got most of the dishes done early LOL.

After the neighbours left for the night we settled in for a bit more TV and DVD viewing – that’s all we did the entire two days I was there … it was sheer bliss!!  A highlight was watching the New Zealand movie “Boy” – we really loved it. We also watched a Billy T James DVD that my best friend Vicki had sent over for my birthday from last year – we really did have a kiwi-fied Christmas with all our viewing choices! I even managed to get some stitching done – I worked on my Valentine Bird then realised I’d left one thread colour at home, so then I picked up a Halloween ornie to start, and yesterday I managed to finish them both off while sat in front of the gogglebox at home watching season 1 of Fringe. I’ll add a separate post shortly with the stitching finishes, but this is the progress I made on Christmas Day and Boxing Day.

Valentine-Bird-25Dec10 BRD-Owl-perched-on-a-Pumpki

Brenda brought tears to my eyes when I opened my Christmas gift from them – she had hand-painted a ceramic plate especially for me, and engraved it on the back with our names and date. I am incredibly touched by this gift by the simple fact that I know she doesn’t do these types of gifts for people often these days and the amount of effort that goes into each and every piece. This is one gift I will treasure always, I truly adore it!  I’ve said it before and I’ll say it again, hand made gifts are the BEST! 😀

I forgot to mention that I drove over to Brenda and Nigel’s on Christmas Eve, and at about 9pm we went out driving to see the lights and nativity at the ‘local’ Mormon church – it was really lovely wandering around the lit up gardens, and while I’m not religious it was really nice to see the life-size nativity scene created for those who celebrate.

Christmas-lights-1

Christmas-lights-2

Christmas-Nativity-1

Christmas-Nativity-2

Christmas-Nativity-3

We then finished off by driving round the local neighbourhood to visit a couple of Christmas displays that people have put up – there were very few houses decorated with lights this year compared to past years, I think the steep jump in electricity costs has taken a toll (I know ours jumped up $100 from one bill to the next from $157 to $257, and that was before “electric fan season” had started!).

Christmas-house-lights-1

Christmas-house-lights-2

The highlight for me, though, was a home where the occupants section off parts of their home just for Christmas to have window displays for visitors to look at – how awesome is this? They’re a lovely retired couple who stand outside every night throughout December to welcome visitors and have a chat … just wonderful, and really brought the warm fuzzies of Christmas cheer into my heart that evening 🙂

Christmas-house-display-1

Christmas-house-display-2

Cross Stitch, Stash

Feeling brighter overnight

Sorry for the grumbly post yesterday – I think my broken sleeps etc are turning me into a cranky old bat this week … and things I can normally tune out have been getting to me {{sigh}}.  Never mind – my ultrasound came back clear, and now I’m just waiting for the results of the CT scan I had yesterday … fingers crossed they can actually find something, which means they can start treating something, which means I can start feeling normal again 🙂

I just managed to take a quick piccie of my stash arrival yesterday, so seeing that again this morning cheers me up no end, and it means I now have some new possibilities of chart starts, so I think I may have to review that list of 15 new starts for January haha.  Anyway, here’s the stash I thought had gone AWOL (and all this is purely down to the fact that no-one locally seemed to have Kreinik #4 braid in colour 027 in stock, so I ended up going offshore … and of course I had to make the most of the postage) 😛


LHN – Sandollar Cottage (Chart 5 from Summer Seascape Series)
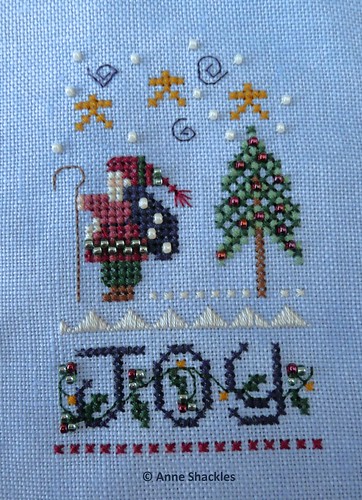
LHN – Joy to the World ornie
Blue Ribbon Designs – Blessed Beyond Measure (stitch start ruler with sleeve designs)
Just Nan – Hagatha’s Purple Hat
Just Nan – Screamy Mimi Tricky Tweets
Kreinik #4 Braids, GAST Forest Glade, Belle Soie silks and NPI silks

I’ve decided to only stitch 4 charts out of the Summer Seascape series by LHN, as the little couple with balloons just does nothing for me, which means I now have the whole series available for stitching and I just need to get some fabric together.  I think this is going to become one of my 15 projects, and I think it will be pretty quick to stitch.  I also think I need to add Katie’s Christmas gift to that list, assuming the fabric turns up in time by 15 January to join the list … hmmm, maybe by 31 December I will have made up my mind 100% … but maybe not! 😛

Cross Stitch, Home & Family TO BE FIXED, Stash

‘Tis the season to be jolly

I am trying really hard to remind myself this week of the positive things in life this week … in particular I’m trying hard not to focus on:

  • the fact that other team members are allowed to go on holiday while I am working through Christmas and the New Year and having to cover their work instead of catching up on my own backlog over Christmas – bah humbug to the lot of you, if I’d known I wouldn’t be working on my own work I’d be taking the time off too and making you stay do your own damned work, just like I’ve had to do for 2 out of 3 years!;
  • the pile of laundry still sitting on the lounge floor from my flatmate’s Mum visiting two weeks ago – and the fact that my flatmate has now gone on two week’s leave and left it sitting there for the laundry fairies to do in her absence;
  • ditto the cup cake container sitting on the bench, complete with leftover cupcakes, ready for me to have to wash up and dispose of the leftover foodstuffs because otherwise the Sydney cockroaches would be having a field day;
  • the recycling bags overflowing with recyclable bottles and cans that are always without fail left for me to carry down to the rubbish bins (I have actually been told she does this), not to mention to empty glass bottles and jars that are just left laying around the kitchen bench … perhaps I should leave a map on the bench, because obviously the overflowing pile in the corner isn’t standing out enough to be obvious!

Ah, venting over … I don’t often get grumpy with these things, as I’m often really messy with my stitching stuff laying around etc, but I really do get peeved when food etc is left around.  I’ve just got used to the fact that I will always be the one emptying trash cans and washing the shower curtain and bathmats, along with the kitchen towels and tea-towels … that’s just my lot in life … pfffft.  Anyway, seriously moving on now I’ve had my rant for the evening!!!

The GREAT news that really does offset all that grumpiness is that the parcel that had gone AWOL has actually turned up in my PO Box!  I just assumed that it was the latest parcel that had turned up, but then I saw the date stamp of 15 November on the parcel and I almost hyperventilated!!  I am seriously excited and thrilled, as now I have my missing threads and can complete my Bittersweet Seasons WIP – perhaps I’ll take that along to finish on Christmas Day instead of the Christmas chart … hmmm …

Anyway, I’ve only just walked in the door from work and feeling totally wrecked, so I think I’ll sign off now and go and fondle my stash, as I haven’t had chance to look at it properly yet!

PS:  Did I tell you, I’m excited??? 😛

Christmas, Christmas Ornaments, Cross Stitch, Gifts TO BE FIXED, Quilting, Works in Progress

Christmas decorations

Before I show piccies of the decorations, I want to say a heartfelt “thanks” to one of my closest stitching pals Katrina who has been spoiling me for a number of years now with a handmade ornie – each one I treasure dearly, and this latest one is absolutely no exception!  (Excuse the silver lametta sitting on the top!)

Don’t you think this is just so “ME”? 😀 Unfortunately I forgot to bring the other part of the gift home with me, and it’s still sitting on my computer at work … it’s the cutest little yellow rubber ducky with little santa hat and scarf on … too, too cute!  He was keeping a smile on my face all day at work on Friday.  Thanks again Katrina, you have once again spoilt me rotten, and I totally adore it!  I feel very blessed that the internet has enabled such a lovely friendship to blossom 🙂

Unfortunately I haven’t been in the brightest of stitching moods throughout the year, to be honest, and my own ornie plans pretty much went out the window – instead I’ve been focused on stitching whatever I’ve felt like just to keep my momentum up as much as possible and keeping the feeling of being ‘overwhelmed’ at bay. I think I’m finally coming out of that blue phase, so fingers crossed in the new year I’ll get a few more ornies stitched up and sent to some of my best online pals, as well as fulfilling some outstanding stitching commitments!

Anyway, back to the decorations, it was receiving Katrina’s ornie on Friday that made me start thinking of bringing up my ‘little’ Christmas tree from the garage instead of the huge 6ft one and having only my stitched ornies on display. Even Katie gave it the thumbs-up when I’d finished and said she really likes it, so I guess it gets the official seal of approval 🙂

Rightio, enough of the waffling, here are this year’s lounge decorations in all their glory (I personally think the tree’s a bit crowded, but I didn’t want to leave any ornies out! – I think maybe next year I need to buy a tree that’s just a little bit taller and fuller, and it’ll be a perfect size):

DSC_1715

DSC_1716

DSC_1717

DSC_1718

DSC_1720

DSC_1721

DSC_1723

And this little tree (which stays up all year as a backdrop to my ornie finishes) is look a wee bit bare as it’s waiting for Mum’s 12 Days of Christmas set to be finished and added … not entirely sure that’ll be completed before Christmas, but it definitely will happen before I have to put them all away again! 🙂

DSC_1722

The next year I also want to make a table runner for the lounge and/or the table under the tree – I bought this fabric a few months ago in readiness for when the urge of quilting creativity struck (which will hopefully be some times prior to December 2011!) – this is from the 12 Days of Christmas fabric range by Moda:

19-12-2010 6-26-47 PM
19-12-2010 6-26-13 PM 19-12-2010 6-25-34 PM 19-12-2010 6-24-44 PM 19-12-2010 6-23-36 PM

And on that note, I’m off to sip on my iced Paull’s Egg Nog (that’s the brand on sale in supermarkets over here) and perhaps do a bit of stitching … perhaps … unfortunately Bittersweet Season will continue looking like this for a while longer, as the threads I need are still lost in transit, but I do now have the threads to finish “Valentine Bird”, so perhaps that will suffice for now and may even get some of that stitching mojo back … ?

DSC_1726

Christmas, Cross Stitch, Food, Gifts TO BE FIXED, Home & Family TO BE FIXED, recipes

Christmas has arrived … finally

Ever since my flatmate made a comment about my Christmas tree being up when her Mum was here visiting I just haven’t felt like putting decorations up, and definitely had the “bah humbug” feeling. On Friday night, though, I decided to put a few things out and decorated the lounge – a lot more understated than normal, and I have to say I think I really like it!

Because my flatmate is away for Christmas (she flew out today), we had Christmas morning early on Friday night and I refused to swap gifts until we at least had some sort of Christmas decorations up. I’m usually cracking the decoration boxes open on 1 December (or the closest weekend afterwards), so it’s really really unusual for me this year! Even when I lived on my own, I still had my own little tree and made myself a Christmas stocking each year – it seems a little silly, but I still bought myself a little chocolate bar and some nuts in their shells and popped a little baby bottle of champers in there (and for the first time ever something I’ve neglected to do for myself this year yet). I’m tossing up whether to approach a LNS next year and see if they will bundle up some surprise goodies from my wish list and then get someone to wrap them up for me so I can have something of a surprise in there – I was originally going to do my own 12 days of Christmas and parcel up 12 little items early in the year so I may have forgotten about them by Christmastime, but it’s not really the same, is it? haha.

Last year Katie said she was going to buying a white Christmas tree with black balls to put up this year, with a skull instead of an angel/star … sigh 😉 Let’s just say it hasn’t happened yet, and if it does happen next year then I will sit my own tree up in a different corner to be a bit more traditional!! Anyhoo, earlier in the year I found the most PERFECT gift for her … I was going to stitch her this chart and frame it up for her – I had my heart set on it, because it is just so “her” haha.  As you can see, it was the Christmas tree that made it think it was so perfect!

Unfortunately I’ve had various items back-ordered for over 3 months, and the Belle Soie threads that were sent along with my other parcel goodies an exact month ago still haven’t arrived – not to mention I was really unhappy with the fabric I ordered from NZ for it, so I ended up placing an extra order for the recommended fabric listed on the chart, and that was also on back order for a while. The fabric finally left about 1 1/2 weeks ago, but the first parcel is still AWOL, and there was no insurance on the parcel {{sigh}}. I’ll wait for another few weeks, then I’ll have to save up and re-order everything again, I guess 😦 I was then in a quandary as to what to buy my flatmate, but my heart was still set on this chart, so I ended up wrapping just the chart up and saying the real version would be coming whenever I can get it together.

To say Katie was over the moon with it is an understatement! She loved it so much she’s been taking photos of the chart and showing all her friends and family and can’t stop talking about haha. The great thing now, I guess, is that I can actually stitch it in the lounge without having to hide away, so she can watch it grow each week once I finally manage to get it started 🙂  I also gave her two Jared Padalecki movies on DVD to fill her horror quota for the year (Friday the 13th and Cry Wolf).

As for what I got, I was truly spoilt – I knew in advance what I was getting, but it made it not less thrilling – I got a ticket to see Tap Dogs next month with Katie, and we’re only a few rows from the front so we can drool over Adam Garcia without squinting haha.  I’ve always loved him in the movie Bootmen, which is so similar to Tap Dogs – if you haven’t seen it yet, I can definitely recommend it as a great Aussie drama/romance (but make sure the tissue box is handy) … love, love, love it! 😀

Today I actually started one of my 101 Things in 1001 Days – I’ve been playing with this list for the last month or so, and have finally published it live.  Seeing as I’ve started feeling a bit more positive over the last 48 hours, I’ve started making a move to see some of the goals happen. Today’s effort was in relation to #23 in the list, which is to make something out of every recipe book I own in Sydney – considering there are 130+ books, that’ll keep me busy for longer than the 1001 days, but it’ll be fun anyway!  Today’s recipe was from “Simple Delights: Coffee & Tea” book – and the chosen recipe was “Bonoffee  Coffee”.  Perhaps not the ‘best’ thing I’ve ever tasted, I have certainly enjoyed slurping it down this afternoon while I’ve been pottering around – here’s the full recipe if you’re interested:

BONOFFEE COFFEE

3 teaspoons instant coffee granules
150ml (5fl oz or 2/3 cup) boiling water
450ml (16fl oz or 2 cups) vanilla ice cream
1 large banana
300ml (10fl oz or 1 1/4 cups) milk
Few drops vanilla essence
85ml (3fl oz or 1/3 cup) Tia Maria
2 teaspoons drinking chocolate
Chocolate flakes, to serve (optional)

Mix together coffee and water and set aside to cool.  Place all the ingredients, except the chocolate powder, in a blender or food processor and process them until completely smooth.  Pour into tall glasses and sprinkle the chocolate powder over the top.  Serve with chocolate flakes, if desired.
Serves 4-6.

Alas I couldn’t find any drinking chocolate in the cupboard, but I did find some Lindt chocolate shavings … score!!! haha.  I even broke out the super-duper expensive hand-blown glassware to drink it out of.  I was given a pair of these by my very best friend Vicki, and I’d hate to think what they’re worth today – they’re hand-blown by Hoglund Glass, and apparently are quite the collector’s item … I personally don’t care, because I adore them to death, and will never sell them, I love them too much! 😀

I really should show the results of my decorations, but I think this post is getting waaaay to long by now, so I’ll create a new post shortly 🙂

Christmas Ornaments, Cross Stitch

What happens when you don’t stitch

I still don’t feel like stitching, and have no urge to pick up a needle yet … I do, however, have the urge to do some organising of my stitching ‘stash’ in the computer!

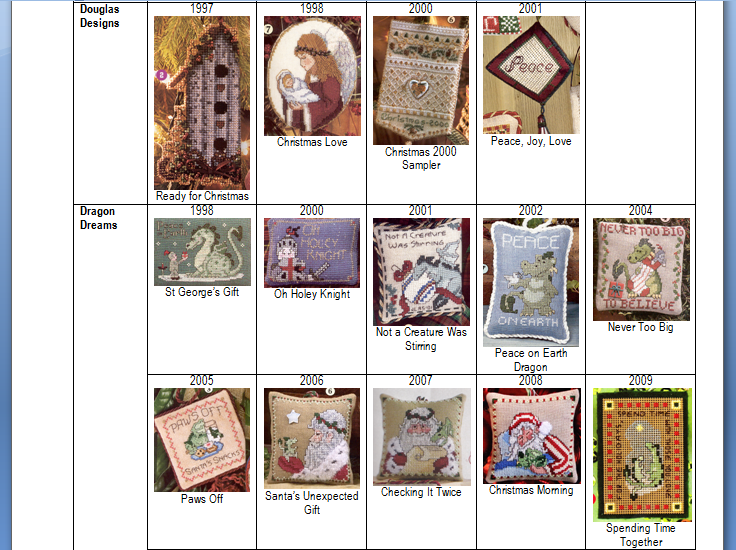
Years ago I started scanning the JCS Christmas ornie magazines, and started creating a library of sorts within Microsoft Word. It basically has a thumbnail of each year’s ornaments listed by designer, and the details of the ornie along with magazine issue (year), scanned thumbnail and ornie title. I originally started doing this when I was going to do a personal challenge, ie stitching one ornament by every single designer that has been published – now this was a number of years ago, and there weren’t as many designers as there are today, but I still never did get very far with that challenge. I thought it would make me stitch some designs I’d never really looked at before, as often ornies are much better in real life than in the magazine … it was a good idea at the time 😛

Anyway, seeing as I wasn’t feeling up to stitching and I felt like getting a numb butt in front of the PC for a while, I scanned the 2010 magazine and updated the various pages with the latest ornies.

It’s really nice to flick through the pages for visual inspiration, and it helps to find an ornie quickly when you get that sudden urge to stitch a specific one. It might be a lot of work once a year, but it sure is worth it! 😀

Here’s a little sample of what a page looks like – alas, I’ve never been able to track down the 1999 issue, so that one is missing … but otherwise I have every year from 1997 to 2010 😀

Crazy January 2011 Challenge, Cross Stitch

Crazy January 2011 Challenge

Yep, I’ve decided to throw my hat into the ring and complete the Crazy January 2011 Challenge, as started by Minna.  I’ve chosen designs that are a reasonable mix of designers and stitching styles, and also of medium size so that the challenge is do-able.  I’m hoping that these projects will also still allow me the flexibility and time to work on some existing WIPs at the same time, plus at least one Christmas ornament a month, as that’s another challenge I’m picking up again next year.

Anyway, without any more waffling, here are the current choices for my 15 projects for January – I can’t say with 100% certainty that one or two won’t change before January 1st, but I’m relatively happy with this list so far.  And here they are:

1. Waxing Moon Designs – Halloween Short Stack
2. The Goode Huswife – With My Needle (modified, without the wording)
3. From Nancy’s Needle – Lavender Blue Celtic Knot Quilt (canvaswork)
4. The Victoria Sampler – Crimson Fire Sampler
5. Little House Needleworks – Ladybug, Ladybug
6. Dimensions kit – Tiger Reflections
7. Judy Odell – My Treasures Workstation
8. Bent Creek – Winter Snapperland
9. JBW Designs – Autumn Harvest
10. DMC – Baby Lorikeets
11. The Prairie Schooler – When Witches Go Riding
12. Just Nan – Trick or Treat Box
13. Shepherd’s Bush – Happy Pumpkin Needle Roll
14. Shepherd’s Bush – Baby Bug Ball
15. Forget-Me-Nots in Stitches – Raphael’s Raspberries

On the short list are also the following that I’ve love to complete sooner rather than later:

  • Rosewood Manor – Quaker Diamonds
  • JBW Designs – English Plum Pudding
  • Lizzie*Kate – Needle Nick
  • Linda Barry – Elizabethan Treasures
  • Northern Pine Designs – Ebb Tide
  • Forget-Me-Nots in Stitches – Golden Garden Sweet Bag
  • Fancy Work – Lavender Rose Sewing Case
Christmas Ornaments, Cross Stitch, Finishes, Works in Progress

Christmas Treat Bag

As you can obviously tell, I’ve been busy this morning, going by all the separate posts.  I finally finished off two pin pillow tutorials that have been languishing since last weekend, and I’ve been listening to my flatmate clean up the flat in readiness for her mother arriving this afternoon.  It seems she’s worked out how to use both the mop and vacuum cleaner, all that is needed now is to work out how to take the recycling down to the rubbish bins, and it’ll be a perfect day from my perspective! 😛

This afternoon I’ll be hibernating in my room all afternoon catching up on some of my own housework while I finish off the last DVD of Criminal Minds Season 1 – then I can take it back to its owner and trade it in for Season 2.  There may not be any more stitching done this weekend, but yesterday I did manage to finish up a little cutie – as per normal I’ve managed to misplace my bags of charms that I know I had in my hot little hands last weekend, so hence the tidy-up in my room that is well and truly needed.

Shepherd's Bush-Christmas Treat Bag

“Christmas Treat Bag” by Shepherd’s Bush
stitched on 32ct hand-dyed Belfast linen by Countrystitch
~ in colour “Little Boy Blue” (Kiwi Illusions)

with recommended DMC and Mill Hill beads

Then yesterday I started another Christmas ornie that was already kitted up and ready to go … but I looked at the fabric already cut out and thought ‘what a waste’ – after a quick measuring up with a ruler, I decided if I was frugal enough I could just get two ornies out of it, so lo and behold my stitching session is now seeing two ornies grow side by side instead of the one!  It’s a bit slow going on the stitching front, but at least it’s a start!  And as I’ve already stitched this one before for myself, these are eventually going to reside with family or friends some time next year.

I seem to have forgotten all about Christmas ornies this year, so doubt there’ll be any to be sent out this year.  Last year I didn’t even manage to post out Christmas cards, so at least I’m ahead of the game this time, and have a pile ready to be posted out over the next week or two.

And on that note, I’d better haul it and get my A into G! 😀

Cross Stitch, pillows, pincushions, Stitching Smalls, Tutorials

Pin Pillow Tutorial #2

Boo-Tyme-pillow

You will need:

  • Stitching for the centre of the cushion
  • Coordinating fabric(s) for side strips and backing
  • Sewing machine with coordinating sewing machine thread to match your fabric(s)
  • Scissors/rotary cutter and mat
  • Pins
  • Ribbon/lace/button embellishments (optional)
  • Polyfil stuffing (or something similar)
  • Sewing needle and thread to close up the seam opening

Pin-pillow-tutorial-2.1

1. First of all trim your stitched piece, and cut your coordinating fabric to your preferred length and the approximate width of your sewing project.  In my case I have chosen to have my coordinating fabric at the bottom of my stitched piece, and I prefer to have the quilting fabric slightly smaller than my stitched piece so it doesn’t take too much attention from the stitching – I have, however, seen some stunning pillows with the stitching taking up just a small amount of room at the top of the pillow.  The only difference is down to your preference, as the finishing process is exactly the same.

Pin-pillow-tutorial-2.2

Pin-pillow-tutorial-2.3

2. Pin the fabrics together, with right sides facing, and stitch a normal seam allowance (alternatively you may prefer to just a quilters 1/4″ seam).

Pin-pillow-tutorial-2.5

3. At this point I cut off my excess fabrics on each side, and trim my seams to 1/4″.  This is also the time when you should open up the seam(s) and give a quick pressing with the iron.

Pin-pillow-tutorial-2.6

4. If you have decided to have fabric on both sides of your stitching (either top and bottom, or left and right) this you will need to repeat the above process a second time for the additional piece of fabric.  Once you’ve finished attaching the coordinating fabrics, check the edges to ensure they’re all even, and give it a quick trim with the rotary cutter if needed.

5. At this point I add any seam embellishments to the pillow front.  For this particular pillow I just wanted to add one row of matching ric-a-rac.  This can either be attached by the sewing machine or by hand (I ended up adding this one by hand, as I didn’t have a matching brown sewing machine thread).  This is also a good time to add any buttons or other trims you want to add, prior to constructing the pillow itself.  Alternatively, you can add your ribbon at the very end once the pillow is finished, but just wrapping it around the pillow and tying a bow to hold it in place 🙂

Pin-pillow-tutorial-2.7

6. Now you need to cut your backing fabric the same size as your finished article, and pin them together with right sides facing together (the right side of the stitching will be on the inside of the sandwich).

Pin-pillow-tutorial-2.8

7. Stitch a seam allowance around the edges, but leave an opening at the bottom so that you can turn your pillow inside-out.  I tend to leave about 1 1/2″ opening and that’s normally enough room to allow for turning.

Pin-pillow-tutorial-2.9

8. I use a chopstick to help push the corners into a nice shape from the outside – you just have to be careful not to force the seam stitching too much!  Once you have turned your pillow inside out, it should look something like this.  Now all you have to do is stuff it to your preferred thickness with your favourite stuffing.

Pin-pillow-tutorial-2.10

9. I close my pillow openings with a ladder stitch – and the following is taken from a previous Christmas ornament tutorial, but is the exact same instruction for closing the pillows.

As you can see from the photo below, I start off by slipping my needle into the seam of the backing fabric, then coming back out about 1/4″ along the seam (about 3mm) and bring my needle out.

Christmas Cheer 20

I then take my needle directly opposite where I just came out of the backing fabric and slip my needle into the linen and follow the seam along for about 3mm and bring the needle back out again.

Christmas Cheer 21

I’ve left the stitches nice and loose in the photo below to help illustrate how the stitches follow along opposite each other, like rungs of a ladder.

Christmas Cheer 22

When you pull the thread tighter, the stitches almost disappear into the fabric, giving a really nice clean finish – this is definitely my favourite stitch for closing up openings for that reason!

Christmas Cheer 23

Once you reach the end of the seam opening, you need to finish off your thread with a couple of teeny stitches – I then bury the needle into the seam and come out somewhere about an inch way and bring the needle back out again – then clip the thread close to the fabric so that my thread tail does’t appear easily.

And here’s the final seam all finished off – see now nice and tidy that ladder stitch is in the opening? :D

Christmas Cheer 24

10. And that is the final step in your beautiful new pin pillow coming to life.  Now all you need to do is to find somewhere to display it where it can be admired by everyone 😀

Boo-Tyme-pillow

Pumpkins-pillow Halloween-pillow P1030899

Cross Stitch, pillows, pincushions, Stitching Smalls, Tutorials

Pin Pillow Tutorial #1

While I was finishing my wee pillows last weekend, I took a series of photos to create some basic tutorials. Here is the first one:

PILLOW/PIN PILLOW TUTORIAL #1

Boo-pillow

You will need:

  • Stitching for the centre of the cushion
  • Coordinating fabric(s) for side strips and backing
  • Sewing machine with coordinating sewing machine thread to match your fabric(s)
  • Scissors/rotary cutter and mat
  • Pins
  • Embellishments (optional)
  • Polyfil stuffing (or something similar)
  • Sewing needle and thread to close up the seam opening

Pin-pillow-tutorial-1.1

1. First of all cut your coordinating fabric into equal width strips, and approximate width of your sewing project.  In my case I have chosen to have two different fabrics on the front of my pillow, and have started with a narrow strip of bright rust fabric for the inner border.

Pin the first strip with right sides facing to your stitching (I prefer to start with the pieces attached to the left and right sides, but you may prefer to start with the top and bottom sections first), and stitch a normal seam allowance (alternatively you may prefer to just a quilters 1/4″ seam).

Pin-pillow-tutorial-1.2

Once you have stitched the first seam, attach the 2nd strip of fabric to the opposite side of your stitching and stitch another seam.

Pin-pillow-tutorial-1.3

2. At this point I cut off my excess fabrics on each side, and trim my seams to 1/4″ – I usually prefer to do this because I don’t trust myself to get things right the first time!

Pin-pillow-tutorial-1.4

3. You finish with nice tidy edges, ready to attach the last two sides of fabric.

Pin-pillow-tutorial-1.5

4. Before we do that, though, we need to open the fabric sides up and give them a quick press with the iron so that they sit nicely.  If you want to you can also do a row of top-stitching to assist with holding the fabric nicely, but I don’t normally bother.

Pin-pillow-tutorial-1.6

Pin-pillow-tutorial-1.7

5. Now we attach the top and bottom sides in exactly the same way as we did with the first two sides.  Once all sides have finished, I normally check the side strips to ensure they’re nice and tidy and even, and if not I give them a quick trim all round with the rotary cutter.

Pin-pillow-tutorial-1.8

6. In my case I decided to just have a narrow strip of bright rust fabric as a contrasting focal point, then added some wider strips of fabric for the outside edges.  These are attached in exactly the same way as the rust strips, they are just cut into wider pieces.  You just need to remember to add the next lot of strips in the same order as you did previously, which was in my case left and right first, followed by top and bottom.  Once I had ironed my finished strips I decided that little buttons would be nice in the corners, so I added these before adding the backing fabric.

Pin-pillow-tutorial-1.9

7. Now you need to cut your backing fabric the same size as your finished article, and pin them together with right sides facing together (the right side of the stitching will be on the inside of the sandwich).

Pin-pillow-tutorial-1.10

8. Stitch a seam allowance around the edges, but leave an opening at the bottom so that you can turn your pillow inside-out.  I tend to leave about 1 1/2″ opening and that’s normally enough room to allow for turning.

Pin-pillow-tutorial-1.11

9. I use a chopstick to help push the corners into a nice shape from the outside – you just have to be careful not to force the seam stitching too much!  Once you have turned your pillow inside out, it should look something like this.  Now all you have to do is stuff it to your preferred thickness with your favourite stuffing.

Pin-pillow-tutorial-1.12

10. I close my pillow openings with a ladder stitch – and the following is taken from a previous Christmas ornament tutorial, but is the exact same instruction for closing the pillows.

As you can see from the photo below, I start off by slipping my needle into the seam of the backing fabric, then coming back out about 1/4″ along the seam (about 3mm) and bring my needle out.

Christmas Cheer 20

I then take my needle directly opposite where I just came out of the backing fabric and slip my needle into the linen and follow the seam along for about 3mm and bring the needle back out again.

Christmas Cheer 21

I’ve left the stitches nice and loose in the photo below to help illustrate how the stitches follow along opposite each other, like rungs of a ladder.

Christmas Cheer 22

When you pull the thread tighter, the stitches almost disappear into the fabric, giving a really nice clean finish – this is definitely my favourite stitch for closing up openings for that reason!

Christmas Cheer 23

Once you reach the end of the seam opening, you need to finish off your thread with a couple of teeny stitches – I then bury the needle into the seam and come out somewhere about an inch way and bring the needle back out again – then clip the thread close to the fabric so that my thread tail does’t appear easily.

And here’s the final seam all finished off – see now nice and tidy that ladder stitch is in the opening? :D

Christmas Cheer 24

11. And that is the final step in your beautiful new pin pillow coming to life.  Now all you need to do is to find somewhere to display it where it can be admired by everyone 😀

Boo-pillow