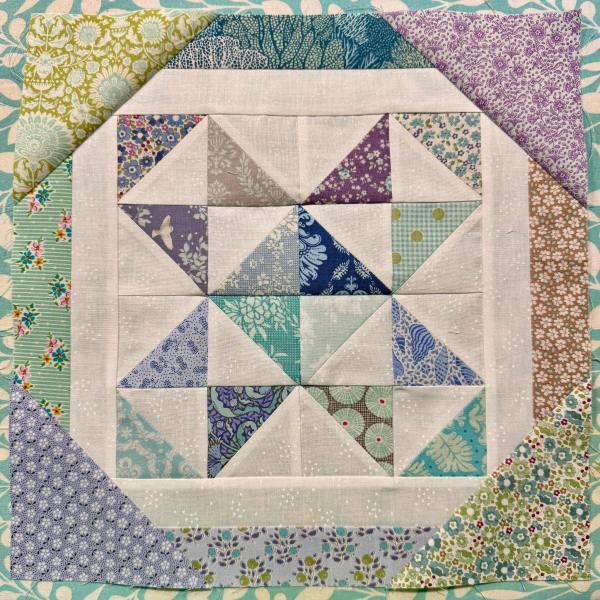
A bit late, but I finally managed to finish my block 3 version of the Coriander Quilts/Cali & Co mystery quilt-along. Instead of using Cali & Co fabrics I’m using my cool-toned Tilda fabrics from my stash.

Enjoying a sense of peace one stitch at a time
A bit late, but I finally managed to finish my block 3 version of the Coriander Quilts/Cali & Co mystery quilt-along. Instead of using Cali & Co fabrics I’m using my cool-toned Tilda fabrics from my stash.
Here’s my February/second block for the quilt-along by Coriander Quilts. I’ve realised I’m going to need to create 3-4 of each month’s blocks to have a quilt big enough for a queen-sized bed, so I may have trouble having enough of the Tilda fabrics … I guess time will tell. I have plenty of the teal ones that can be used, but some of the purples and greens etc I only have a fat quarter of each fabric, and I’m likely to need 1/2 yards. I might just have to get a bit creative down the track …
These blocks continue to make me supremely happy – you can’t help but feel that way when you’re with fabric colours that you adore 🙂 I can’t wait for each new block to arrive each month!
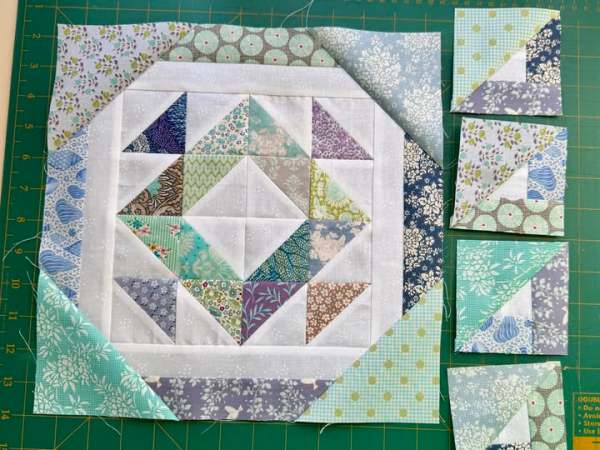
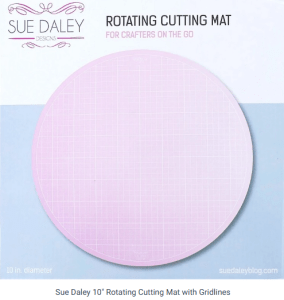
I was very unexpectedly given a $50 gift voucher to a quilting shop by a dear friend for my birthday, so I decided to use it towards a Sue Daley rotating cutting mat. It seems I have hundreds of half square triangles in my future with this quilt, and having a rotating mat will hopefully make it a lot quicker to trim down all those blocks! I know I shouldn’t be spending money right now, but I haven’t a small moment of self-indulgence for my birthday month 😉
I’ve wanted to try quilting for many years – I’ve been amassing quilt fabrics to support that dream in readiness for having the motivation to start. Finally yesterday was the day where I started bringing my dream to life. Truthfully I actually have about four quilts planned right now, along with the fabrics, but this quilt-along by Coriander Quilts is the one that gave me the push to make a start. It’s a mystery quilt where a new block is released every month and for a beginner like me it’s perfect because Corey also provides a video tutorial for every block as well so it gives a confidence boost to give it a try. It’s actually designed around a fat 1/8 bundle of fabric by Cali & Co which has 40 fabrics, but I couldn’t justify the extra $200-$300 to source it locally, and let’s face it, with my ridiculous fabric stash it made sense to use what I have.
I was originally going to choose similar fabric colours to the Cali & Co bundle from my Tilda stash, but in the end my heart decided for me and I went with my favourite cool toned Tilda fabrics. It’s an overall scrappy quilt, so it was a great excuse to start using all of those fat 1/4s in my Tilda stash … including some very very precious vintage Tilda pieces. I also figure if I make the quilt in my favourite colours maybe I’ll be more inspired to actually finish it. Honestly I don’t think I could be any more proud and thrilled with the end result of my first block … it truly makes my heart sing, and I just know I’m going to love this quilt at the end of the year!

I think the 12 blocks will only end up being big enough for a single bed, so I’m going to have to make multiple blocks to increase it to fit a queen sized bed, but I’ll work that out at some point. I think it makes sense to make the additional blocks at the same time each month, so hopefully I’ll find out over the next month or two. But right now I can’t stop looking at this block – it makes me so freaking happy!! 😀
As I mentioned in my last post, in early October I attended a Patchwork & Quilting Retreat in the Blue Mountains, NSW, organised by Linen and Threads. It was such a wonderful day away, I’m so glad I made the effort to attend in the middle of all the turmoil at home. I can certainly recommend the retreat – the organisation was great, the tutors wonderful, and the other attendees really lovely and welcoming.
These are all the great projects that were taught over the weekend, and the progress I managed to do in that week or two after I moved apartments. I love how each of the projects is big enough to give a challenge or two, but small enough to be totally manageable and more likely to actually get finished post-retreat!
The Little Things Pencil Case by Hatched and Patched

I was so chuffed with this one, my first ever wool appliqué project. I was a bit nervous about the construction, but actually managed it all without too much trouble. A huge shout-out to Anni, the designer/tutor from Hatched and Patched, who took me through all the key requirements one-on-one seeing as I wouldn’t be there the following day. Her tips were invaluable when I got home to start working on it! My rotary cutter now resides proudly in this wee case away from the elements. My very first wool appliqué project, and a finish no less!!
Snowmen & Santa Decorations by Hatched and Patched
The next project I attempted (and again actually completed) was another wool appliqué kit by Hatched and Patched – and I really, really love these wee ornaments! I will definitely do some more of these, they’re so much fun! I managed to whip through the stitching of these really quickly, and definitely will be looking to do more wool appliqué in the future! I guess that also means another stash pile of fabric will be starting very very soon 😉

The next couple of projects were by Marg Low Designs – and once again it was lots of fun challenging myself with new types of stitching, as well as doing the finishing by hand. I’ve managed to finish the first project, but still have to complete the last two.
Thread Roll by Marg Low
This is the one project of Marg’s that I’ve managed to entirely finish – however I changed my colours entirely from the designer’s version (mainly because of the pink colour being so prominent, and it’s by far my least favourite colour … so true to form I made mine in blues and greens instead). The picture below shows a sneak piccie of the original design, in the top left corner of the first picture, along with my fabric choices:


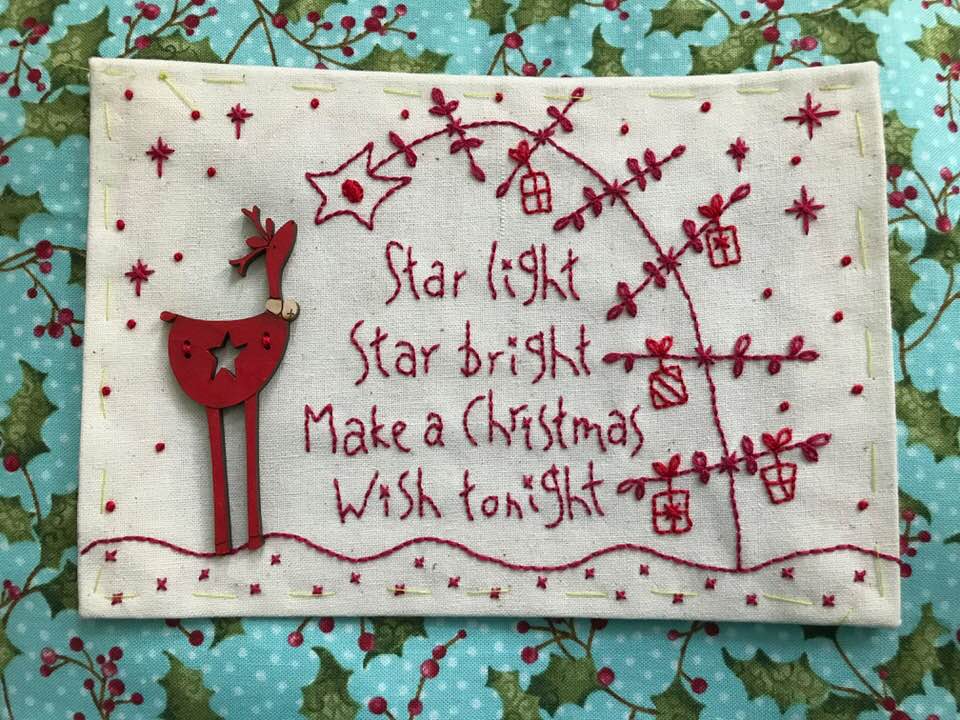
Make a Christmas Wish by Marg Low
Then I did the stitching on this one – but my initial thought of having teal/turqoise background fabric didn’t quite work out, I think … when I put the finished stitching onto the blue fabric it looks a bit ‘off’. I’m now thinking I might have to revert back to a red background fabric instead, hence why this one isn’t “finished” and frame yet. Seriously, how cute is that wee red reindeer button?!!

Hearts & Berries by Marg Low
The final design by Marg Low was another one I opted to kit up myself – and as always I chose to have blue tones in my fabric … I tried to follow the designer’s recommendations to a certain extent, though, and ensured to have a checked red fabric for the trim. These colours are a bit out of my comfort zone with the red/brick highlights, so I’m still pushing myself a wee bit with my choices. I’ve only managed to get as far as stitching the heart for the outer of the bag so far – one day soon I’ll get the actual bag itself constructed and finished, though.

Travel Cord Buddy by Michelle Marvig
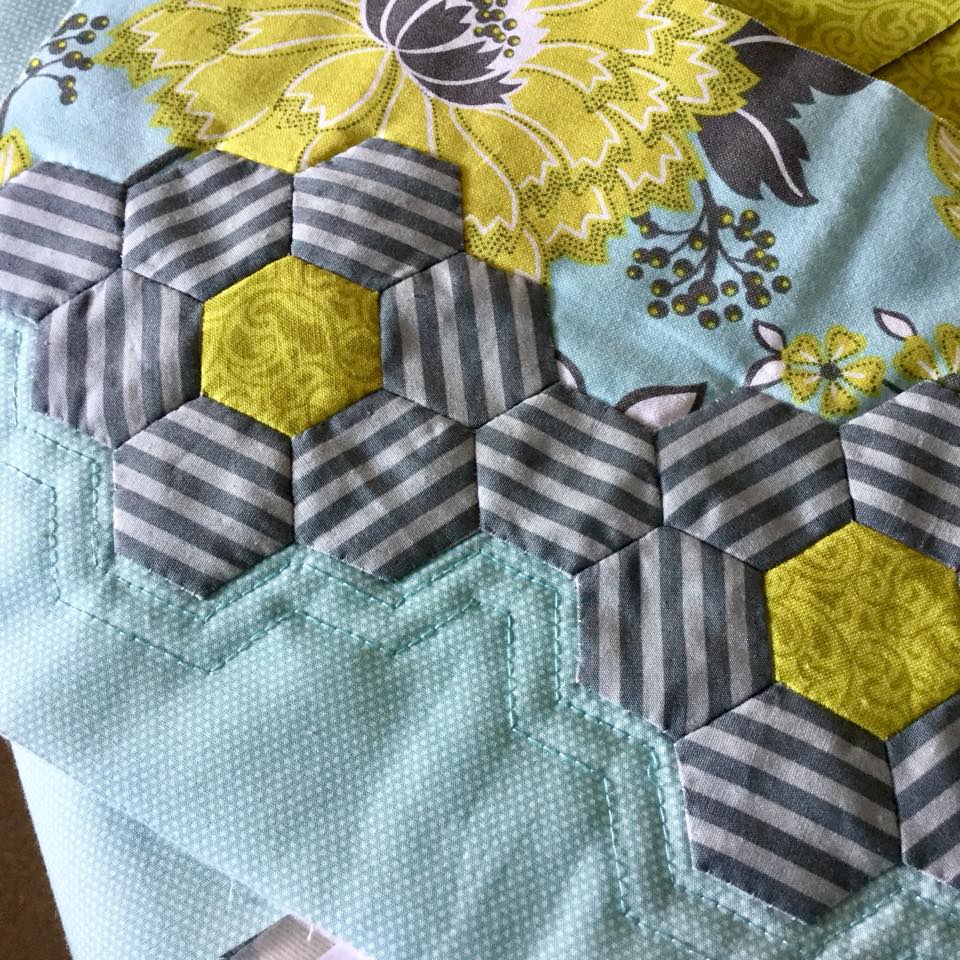
And lucky last, the project that scared me the most from the weekend away – doing wee quilt hexagons … yikes! To say I was out of my comfort zone for this one is a total understatement. I didn’t have to do that many hexagons in the scheme of things, but I have to admit this was the least pleasurable of all of the projects and I’m not sure why. Perhaps doing hexagons while trying to match all the stripes wasn’t the best way for me to learn this skill! I have to say, though, I was pretty chuffed with the results, even though not every hexagon is perfectly lined up. This one also had me running to find a thimble, which I don’t normally use, but crikey my poor wee fingertips took a pounding with this one. I’m also not keen on the quilting job I was doing as I couldn’t get the tension right on my machine and couldn’t find my machine manual, so it ended up getting put away at this stage. I’ll get back to this one again soon, though, because I found a digital machine manual I could download, and as soon as I unpick the last stitches and tweak the tension, I’ll have another crack at it (and this time start a bit closer in to the hexagons for the first quilting line). It’ll be wonderful to have it finished as it’s a really useful tool to use (it holds your power cords etc for travelling) – it’s a gorgeous wee project, that’s for sure. And maybe in the New Year, I’ll be ready to tackle another hexagon project again … maybe 😉

So there you have it – a really stunning selection of projects from three terrific tutors. I enjoyed myself so much even having just one day of attendance, that I’m already booked in for next year’s retreat on the Central Coast of NSW. I can’t wait to see what projects will be awaiting us next year … and by then I should have all these projects finished too 😀
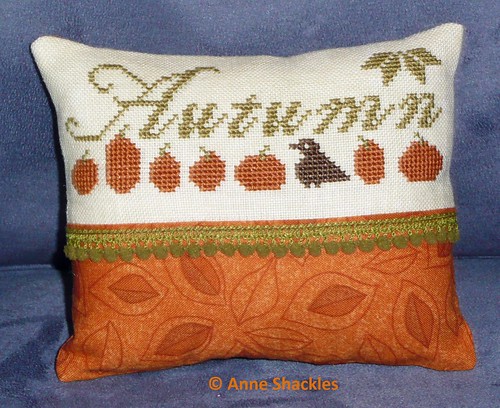
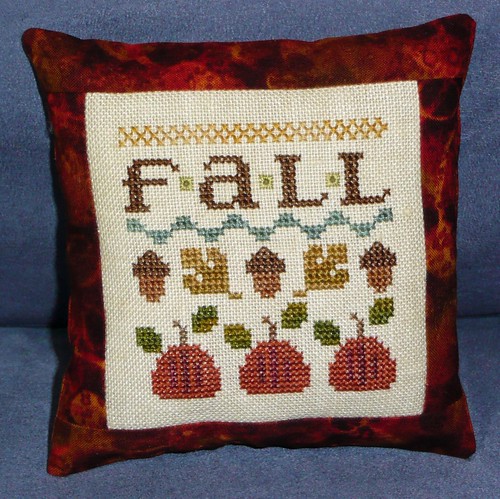
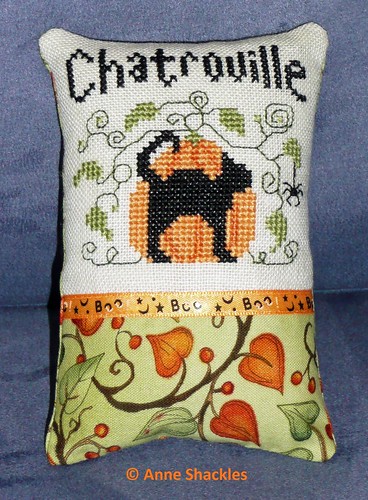
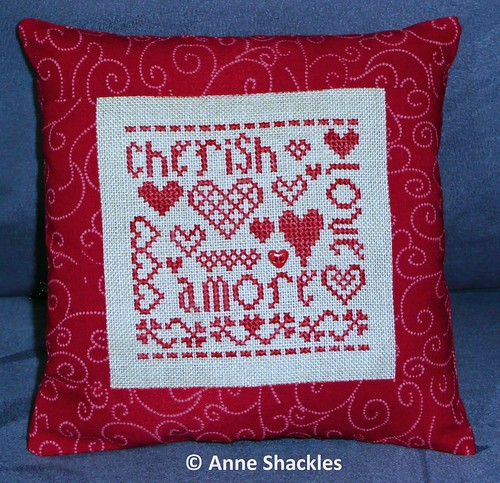
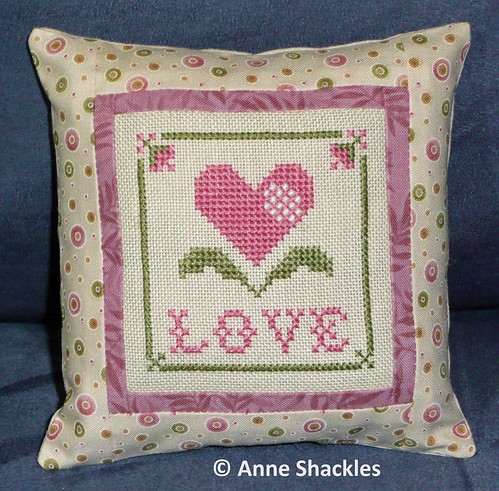
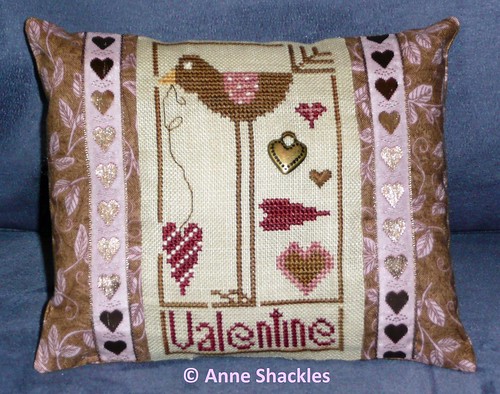
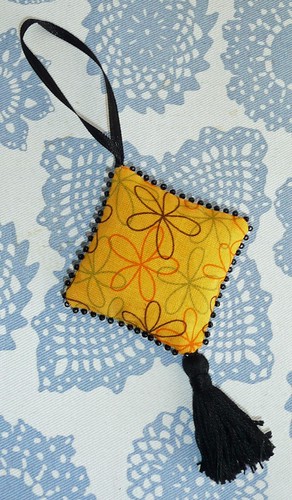
I had planned to get acquainted with my sewing machine over the weekend, but the end results weren’t actually what I’d planned … for some reason I got a serious urge to get some of my finished projects sewn up into pillows etc – it ended up being an exceptionally productive weekend on that score, with 9 pillows and a scissor fob completed, along with a little mini-quilt that just needs the binding to be hand-stitched … plus I also made some minor amendments to a lovely wall-hanging that Sylvia gave me years ago. Anyway, here are the end results – I’ll let the pictures speak for themselves:


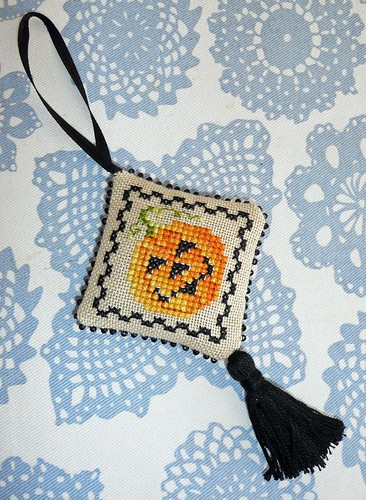
This one just needs the binding to be stitched down 🙂

Sadly Sylvia’s lovely wall-hanging was folding up due to the high humidity, so I chopped up the hanger into pieces and stitched it in 4 places directly onto a pretty wee wire hanger 🙂

This is what first got me into “sewing machine mode” – the first month’s BOTM fabrics and instructions for my Piece and Plenty quilt … sadly it doesn’t come with any specific instructions for each block, and I’ve ended up spending a fair bit of time rummaging through my quilting books and online tutorials trying to work out how to do paper piecing – once I’ve got a bit more comfortable with my sewing machine I’ll be ready to start this one 😀

Before I show piccies of the decorations, I want to say a heartfelt “thanks” to one of my closest stitching pals Katrina who has been spoiling me for a number of years now with a handmade ornie – each one I treasure dearly, and this latest one is absolutely no exception! (Excuse the silver lametta sitting on the top!)

Don’t you think this is just so “ME”? 😀 Unfortunately I forgot to bring the other part of the gift home with me, and it’s still sitting on my computer at work … it’s the cutest little yellow rubber ducky with little santa hat and scarf on … too, too cute! He was keeping a smile on my face all day at work on Friday. Thanks again Katrina, you have once again spoilt me rotten, and I totally adore it! I feel very blessed that the internet has enabled such a lovely friendship to blossom 🙂
Unfortunately I haven’t been in the brightest of stitching moods throughout the year, to be honest, and my own ornie plans pretty much went out the window – instead I’ve been focused on stitching whatever I’ve felt like just to keep my momentum up as much as possible and keeping the feeling of being ‘overwhelmed’ at bay. I think I’m finally coming out of that blue phase, so fingers crossed in the new year I’ll get a few more ornies stitched up and sent to some of my best online pals, as well as fulfilling some outstanding stitching commitments!
Anyway, back to the decorations, it was receiving Katrina’s ornie on Friday that made me start thinking of bringing up my ‘little’ Christmas tree from the garage instead of the huge 6ft one and having only my stitched ornies on display. Even Katie gave it the thumbs-up when I’d finished and said she really likes it, so I guess it gets the official seal of approval 🙂
Rightio, enough of the waffling, here are this year’s lounge decorations in all their glory (I personally think the tree’s a bit crowded, but I didn’t want to leave any ornies out! – I think maybe next year I need to buy a tree that’s just a little bit taller and fuller, and it’ll be a perfect size):


And this little tree (which stays up all year as a backdrop to my ornie finishes) is look a wee bit bare as it’s waiting for Mum’s 12 Days of Christmas set to be finished and added … not entirely sure that’ll be completed before Christmas, but it definitely will happen before I have to put them all away again! 🙂

The next year I also want to make a table runner for the lounge and/or the table under the tree – I bought this fabric a few months ago in readiness for when the urge of quilting creativity struck (which will hopefully be some times prior to December 2011!) – this is from the 12 Days of Christmas fabric range by Moda:


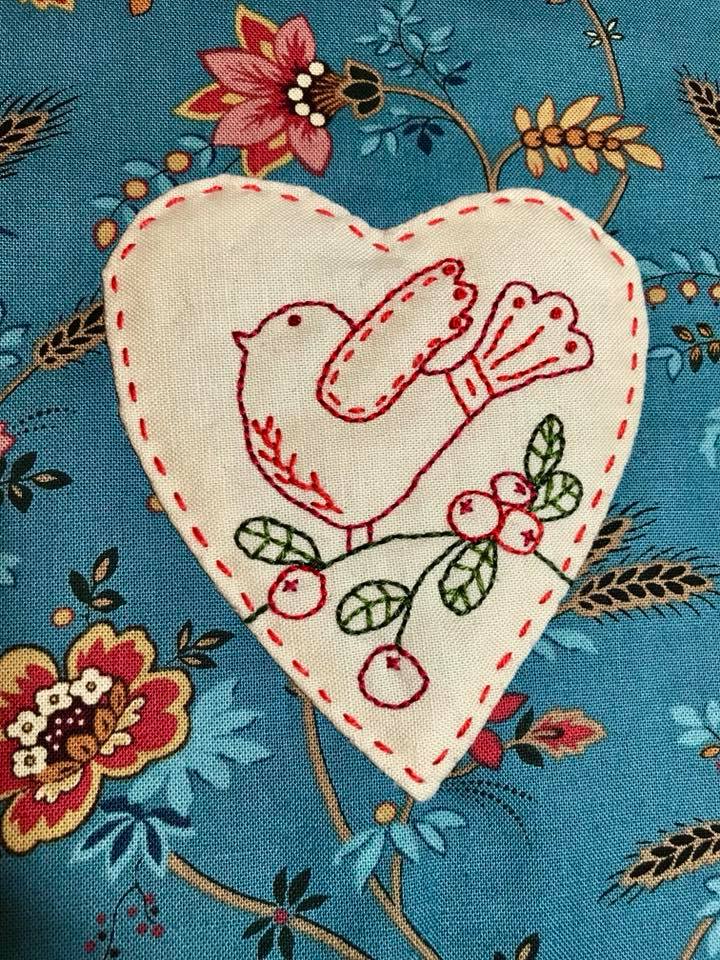
And on that note, I’m off to sip on my iced Paull’s Egg Nog (that’s the brand on sale in supermarkets over here) and perhaps do a bit of stitching … perhaps … unfortunately Bittersweet Season will continue looking like this for a while longer, as the threads I need are still lost in transit, but I do now have the threads to finish “Valentine Bird”, so perhaps that will suffice for now and may even get some of that stitching mojo back … ?

I want to start a quilt (I’ve only ever made one cot quilt before, so this is a major achievement in itself wanting to make a big queen-sized quilt) that I’ve been wanting to do for a few years, but when I look at how it’s made up, I wonder to myself why it’s done that way. You see the individual block looks like this:

And when you start putting them all together it puts a seam smack-bang in the middle of the cream blocks:

Which then made me think, why don’t they stitch the blocks then piece together on the diagonal, either in large blocks with connecting smaller strips, or just big long strips – I’ve tried to make a picture that will explain what I mean:

If anyone could offer advice I’d really appreciate it before I start cutting up my fabric. While I can understand the simplicity of putting everything together when it’s all symmetrical blocks, it seems an awful lot of seamwork where there doesn’t need to be any … but it could just be me trying to make things awfully difficult for myself for my very first big quilt! 😛
Basically I need to know if I should just suck it up and continue doing the quilt as it was designed in the magazine and make things easy in myself or whether doing it one of the other ways will give a more pleasing result, even with the extra brainwork involved …
This is especially for Kathy of the Blig Blog … here are photos of the current state of all my UFO’s (I could pretend that they were WIP’s but seeing as the majority haven’t seen a stitch put into them in over 12 months, 95% would definitely be deemed as UFO status!):


Macaw -&- Beaded Fish


Egyptian Garden Mandala -&- English Garden Sampler


Le Jardin Silk Sampler -&- Flight of the Bumblebees


Noah’s Ark -&- Winter Queen


In the Dark Needleroll -&- Love & Affection


Wildflowers Needleroll -&- Apricot Elegance


Monica Hunt Hussif -&- Classical Garden Bookmark


Nature’s Resting Place -&- Wool Beehive Needlebook


Oriental Poppy -&- Summer Fruits Pincushion


Pomegranates & Beetle – Martha Schmidt Hussif


Stumpwork Needlework Accessories


Goldwork Pea -&- Wool hot water bottle cover


Honesty & Heartsease -&- Bullion Rose Facecloth


Long stitch frogs -&- Butterflies & Hearts Needleroll


Stumpwork Dragonfly


Berry Delightful Bag -&- Mediterranean Village XS

Vicki’s Cot Quilt
Stitching Leporello isn’t included in the photos, as I’ve been stitching a complete section each time, so no individual section is in progress at the moment. And I can’t put my hands to either a photo or the actual project of GCC Ornamental Delights, so I guess that one won’t be getting stitched in a hurry haha.
Very sad that some of these projects are over halfway and never finished, however there are many there that are barely started … I’m sorely tempted to just unpick the bullion rose facecloth, for example, as I don’t know if I truly ever want to finish it, the same with a couple more projects in there … will see how I feel after one more stitching session on them, I guess, before I make the ultimate decision to turf out. It’s funny when you look back through the photos and remember why you stopped working on them … for example the Lorri Birmingham Butterflies & Hearts needleroll, I really hated the colours used, as I felt the wording etc just faded into the background, so no doubt that whole piece will be unpicked and started again from scratch with my choice of threads 🙂
I’ve already gone out and pulled numbers out of the hat for the first round, and highlighted the text in bold in the main list in the previous post … and I’m really looking forward to starting my rotation – I just want to finish my current piece first … although I guess I could just choose to start at the “free choice” slot and start counting my hours, that way I can continue with my current project and be starting my actual rotation at the same time – ooh, I like it when a plan comes together!!! 😀
That means my new current rotation is as follows:
I’m back briefly for a two-week stint on the internet, before losing it again for possibly a full month … I wish I could say I’ve been spending my time offline stitching my little heart out, but the truth of the matter is I’ve hardly touched a needle the whole time … I’ve had my nose in a book instead, and finally read Diana Gabaldon’s latest novel “A Breath of Fire & Ashes”. All I can say is “wow!” – over 900 pages, and once you get into it you just can’t put it down!!! Those novels would have to be some of my all-time favourite books – and every single one has had me hooked and enthralled through every single page! Next up I’ve borrowed “The Kite Runner to read, which apparently is supposed to be exceptional – everyone I’ve spoken to so far has raved about it, so I thought I’d find out what all the fuss is about … 😉
Anyway, I can say that I have done some sort of stitching, although it’s not embroidery … I finally hand-stitched all the binding onto my Quilt UFO – this would have to be about 8-10 years old, and it’s a great feeling to finally get it finished. One of the Supervisors at work has offered to buy it from me, as I wasn’t too sure what to do with it now it’s all finished, so I’ll probably take her up on her offer – even if I just get $20 for it. I need to get it drycleaned first, though, to get rid of both the old musty smell and the wrinkles 😉

As to what else I’ve been up to … there have been some hiccups with my housesitting, which I won’t go into in huge detail, but it’s started me thinking about giving it up and looking for my own place in November. Daniel came home from overseas a day early, when I was in the middle of packing up … I got a call at 7pm (on a 6pm shift) to say they were at home and basically wanted to get into their own bed – having no spare room, they stayed at his parents place overnight and kept saying “how early can we come over?” so I felt really uncomfortable, I ended up finishing my packing after work at 2am and doing the last lot of cleaning, then going back to work at 5am to pick up a key from my pal a day early … she wasn’t expecting me turning up at work, of course, and let’s just say I had a frosty reception. Made me realise how much I rely on her for my ‘inbetween’ times of housesitting, and I think it would be better to call it quits (mind you, I did get an apology from Daniel when I saw him next.) It would be perfect if I could get something for 2-3 months over Christmas, but I guess that’s not going to happen, so decisions need to be made ho-hum 😦
While I had my days off, though, I made a concerted effort to get out and see some more of the Mornington Peninsula – I headed out for a drive to Arthur’s Seat to take in the views, then spent time in both The Enchanted Maze Garden and Ashcombe Maze & Lavender Gardens, before taking a quick drive out to Sorrento and back home. It was a wonderful day out, and even though most of the garden wasn’t in bloom yet, it was a really pleasant way to spend the day. I’ll definitely have to go back again when the flowers are out, as the gardens will take on a whole different personality again 🙂
Here are some shots of the views from Arthur’s Seat … there’s usually a chairlift operating to the summit, but it’s closed during winter, so I just drove up to the top instead 🙂


The next couple of posts will be dedicated to both of the individual gardens I went to, and they’ll be pretty chocka full of photos – I took oodles more as well, and in fact went a bit snap happy overall haha.
In the meantime I’ll close this post with photos of some of the colourful beach huts on the beaches of the Mornington Peninsula – I just adore their bright colours, and I’ve been dying to take some photos of them forever. I still want to head out to Brighton beach at some stage and take photos of those ones too, as they’re the most famous ones in Melbourne, I think (there’s a great shot here – love it!). Here are a few from Dromana anyway …


Rightio, while my next lot of photos are loading up into Webshots, I’m off to clean up cat sick … that was what greeted me on my first ‘morning’ here in Edithvale – I woke up after my nightshift to find a pile of cat sick on the lounge carpet and floorboards … there’d better be some rubber gloves somewhere, that’s all I can say!!! Let’s just hope I’m not like I normally am … I often join in in sympathy at the sound and smell of sick … yukky!! 😦


